
The Dryer That Took Three Cycles
My dryer started taking forever to dry clothes about two years ago. I didn’t notice at first. Raquel noticed. She asked why she was running the same load twice and I said maybe the clothes were extra wet. She gave me that look. The look that means I should probably figure out what’s actually wrong before I make up more excuses.
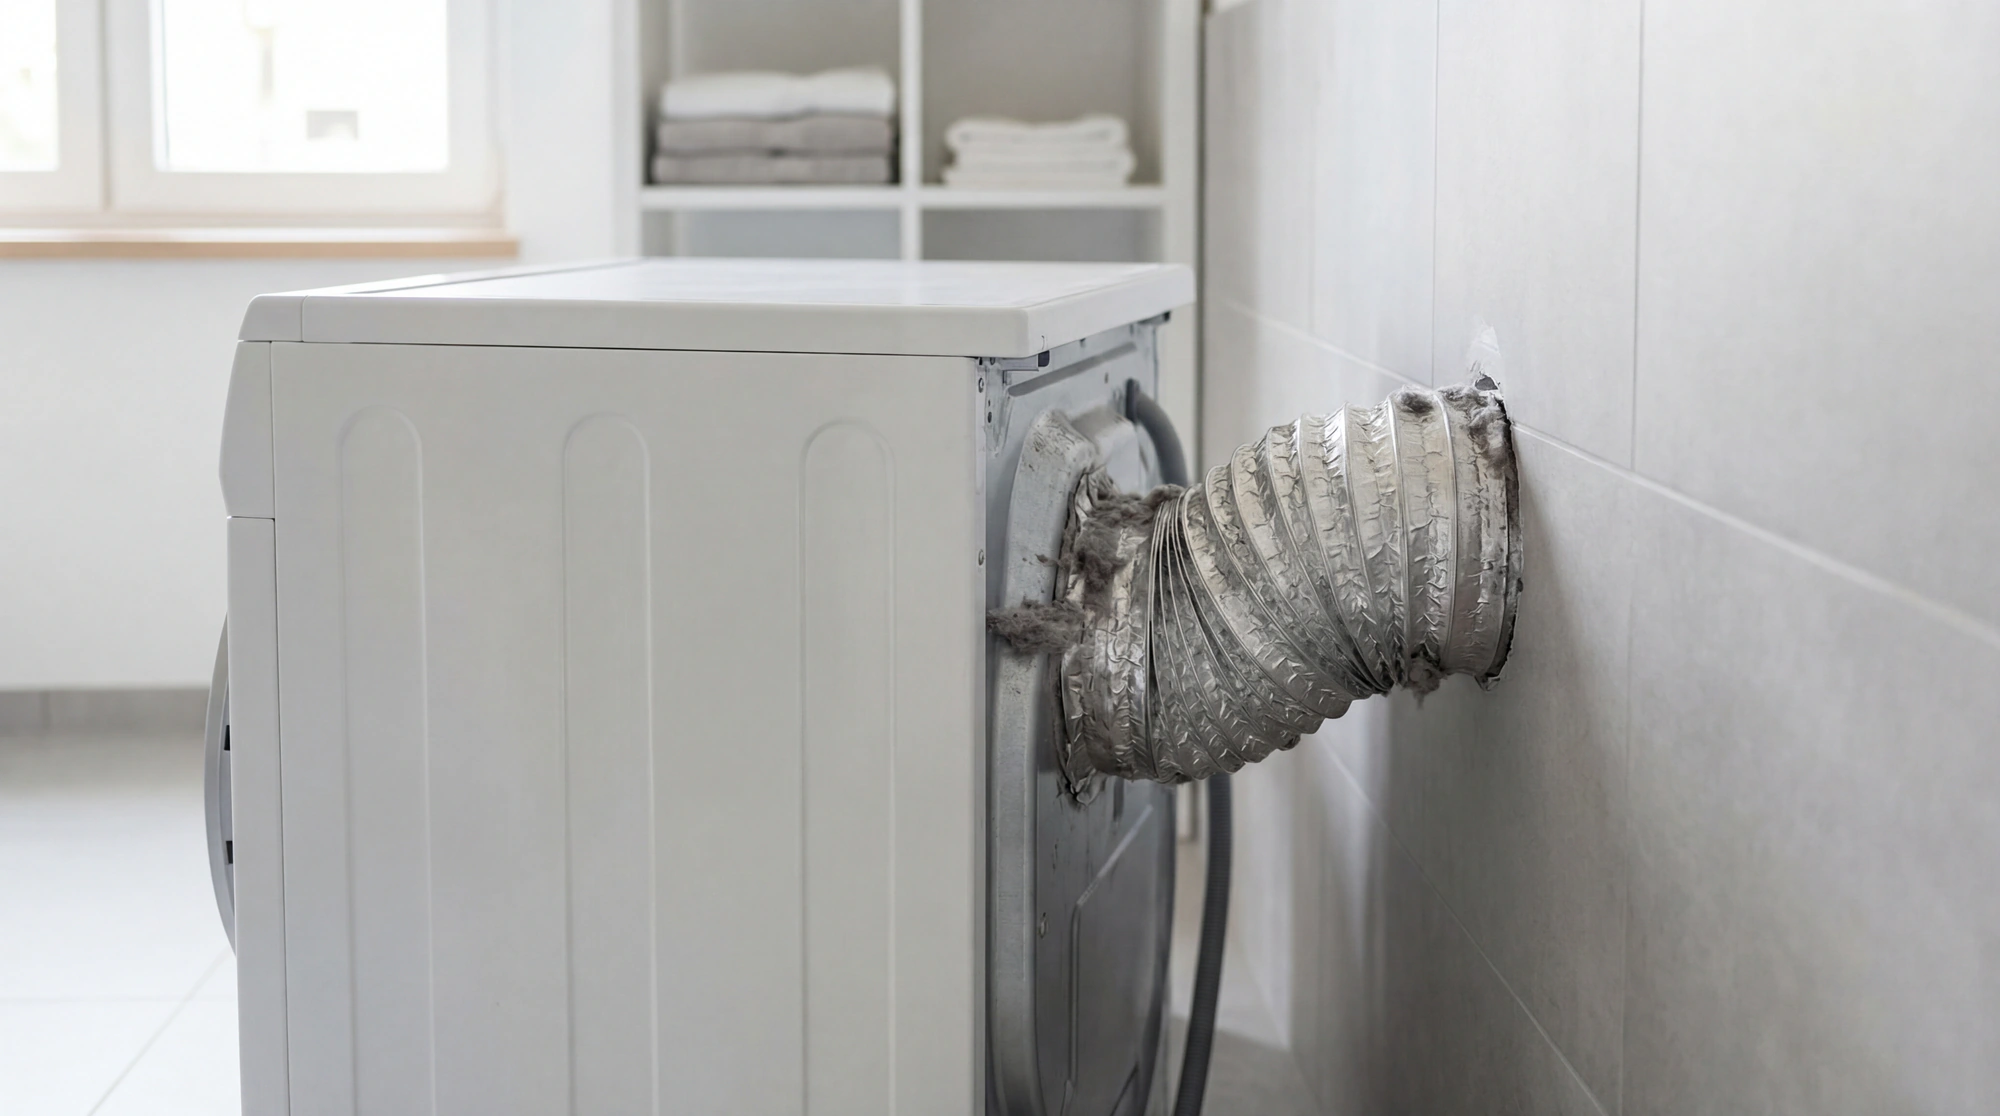
Took me about fifteen minutes to find the problem. The flexible duct behind the dryer had gotten crushed when I pushed the unit back after cleaning behind it. Crushed duct means restricted airflow means hot moist air has nowhere to go. So it just sits there. And your clothes stay damp. And you run the cycle again. And your electric bill goes up. And eventually something worse happens.
Dryer exhaust repair is one of those things that sounds complicated but usually isnt. Most of the problems I see fall into four or five categories and most of them you can fix yourself with basic tools and maybe thirty dollars in parts. The exceptions are roof vents and anything that requires going into walls, and I’ll tell you when to call someone.
Why Dryer Vents Fail
Your dryer pushes hot humid air through a duct and out of your house. Thats it. Thats the whole system. Air goes in, lint gets caught by the filter (hopefully), and everything else goes through the exhaust.
The problems happen when that airflow gets restricted. And there are really only a few ways that happens:
Lint buildup. This is the big one and its the one that causes fires. Your lint filter catches most of it but not all of it. Some lint gets past the filter and accumulates in the duct, in the connections, in the vent hood outside. Over time that accumulation restricts airflow. Restricted airflow means the dryer runs hotter. Hotter plus lint equals fire hazard. For a complete guide on keeping your vents clean, see our article on dryer vent cleaning.
Crushed or kinked duct. This is what happened to me. Flexible ducts are convenient because you can bend them to fit the space but they’re also easy to damage. Push your dryer too far back and you crush the duct. Let it sag between supports and you create low spots where lint accumulates.
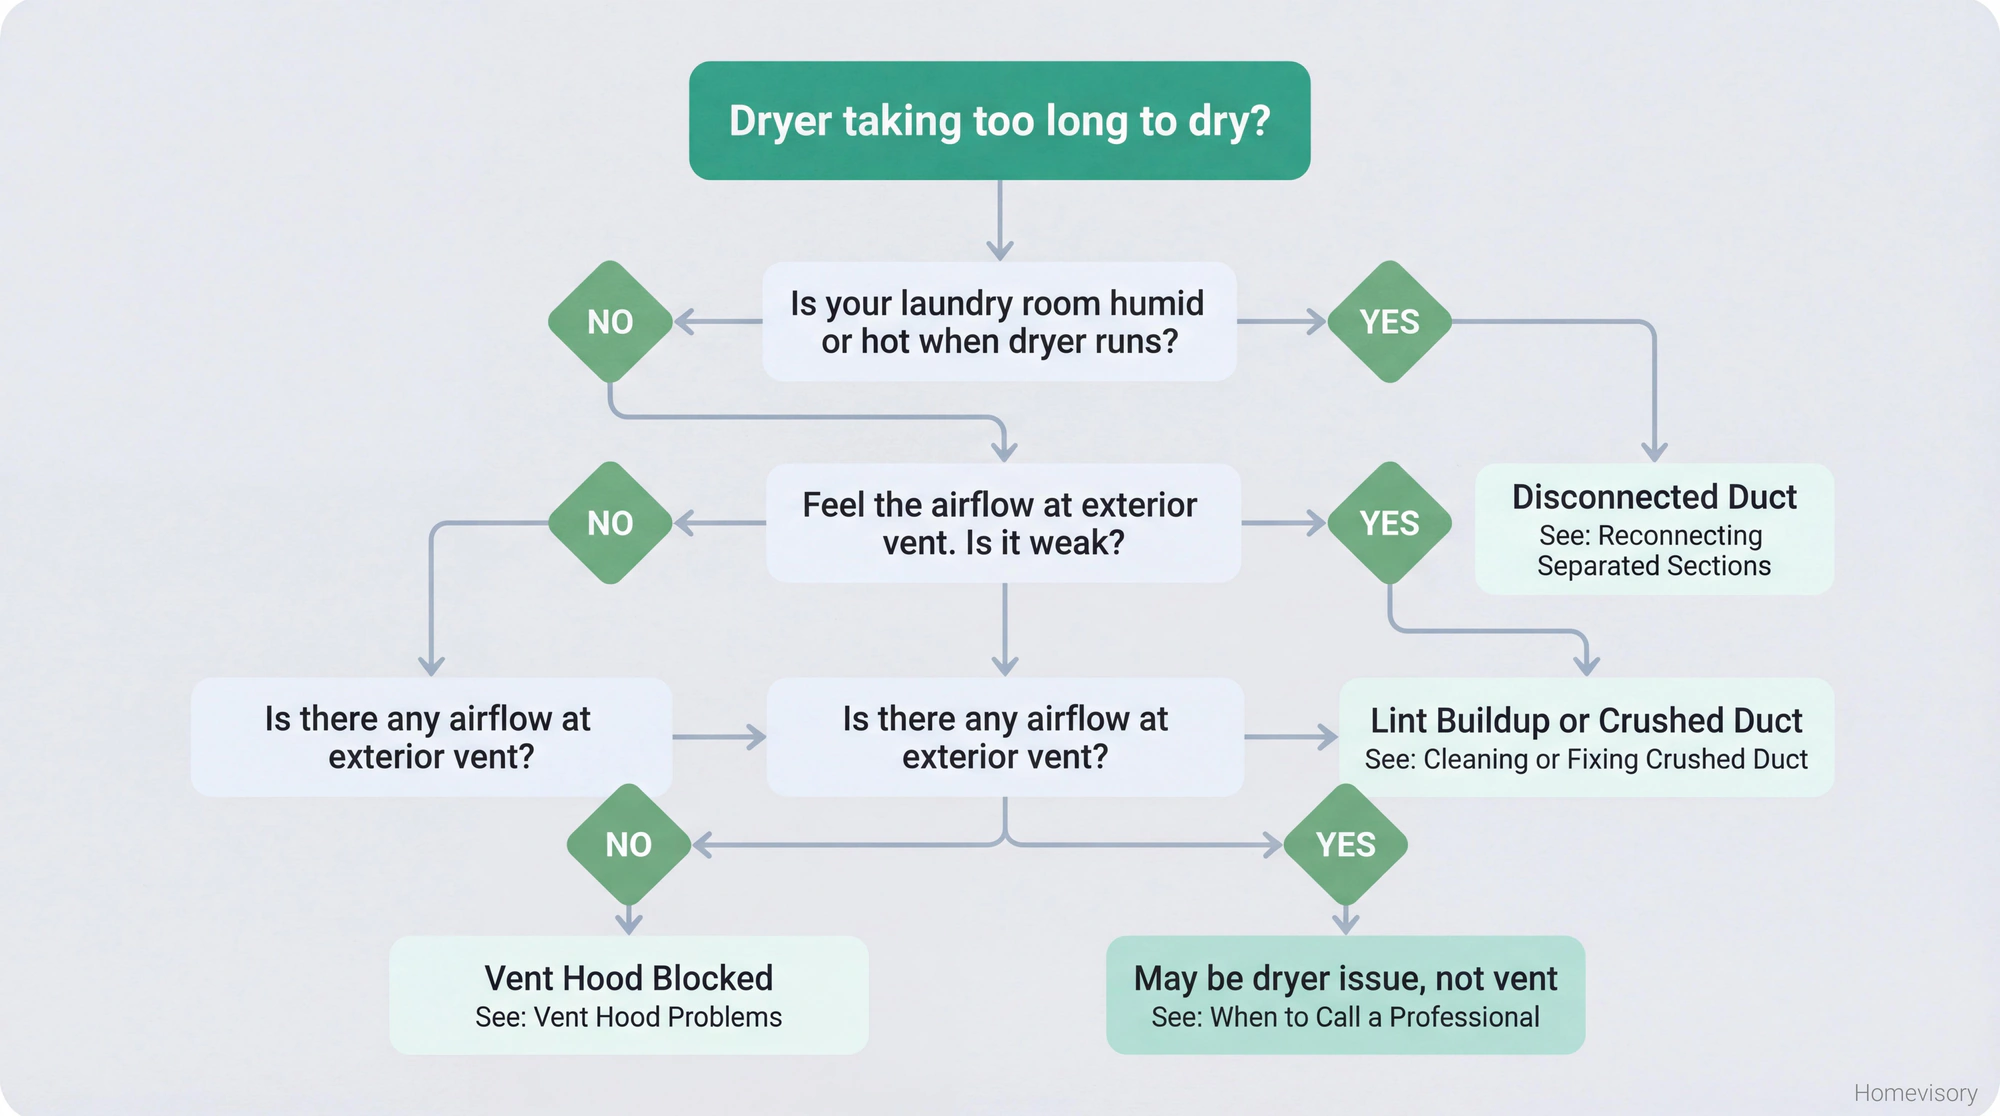
Disconnected sections. The duct comes apart at a joint and suddenly your exhaust is going into your wall or your laundry room instead of outside. You’ll notice this one because your laundry room gets humid and hot when the dryer runs.
Damaged vent hood. The flapper outside gets stuck open (birds and debris love this) or stuck closed (paint, rust, whatever) or the whole hood gets damaged. If the flapper wont open, air cant escape.
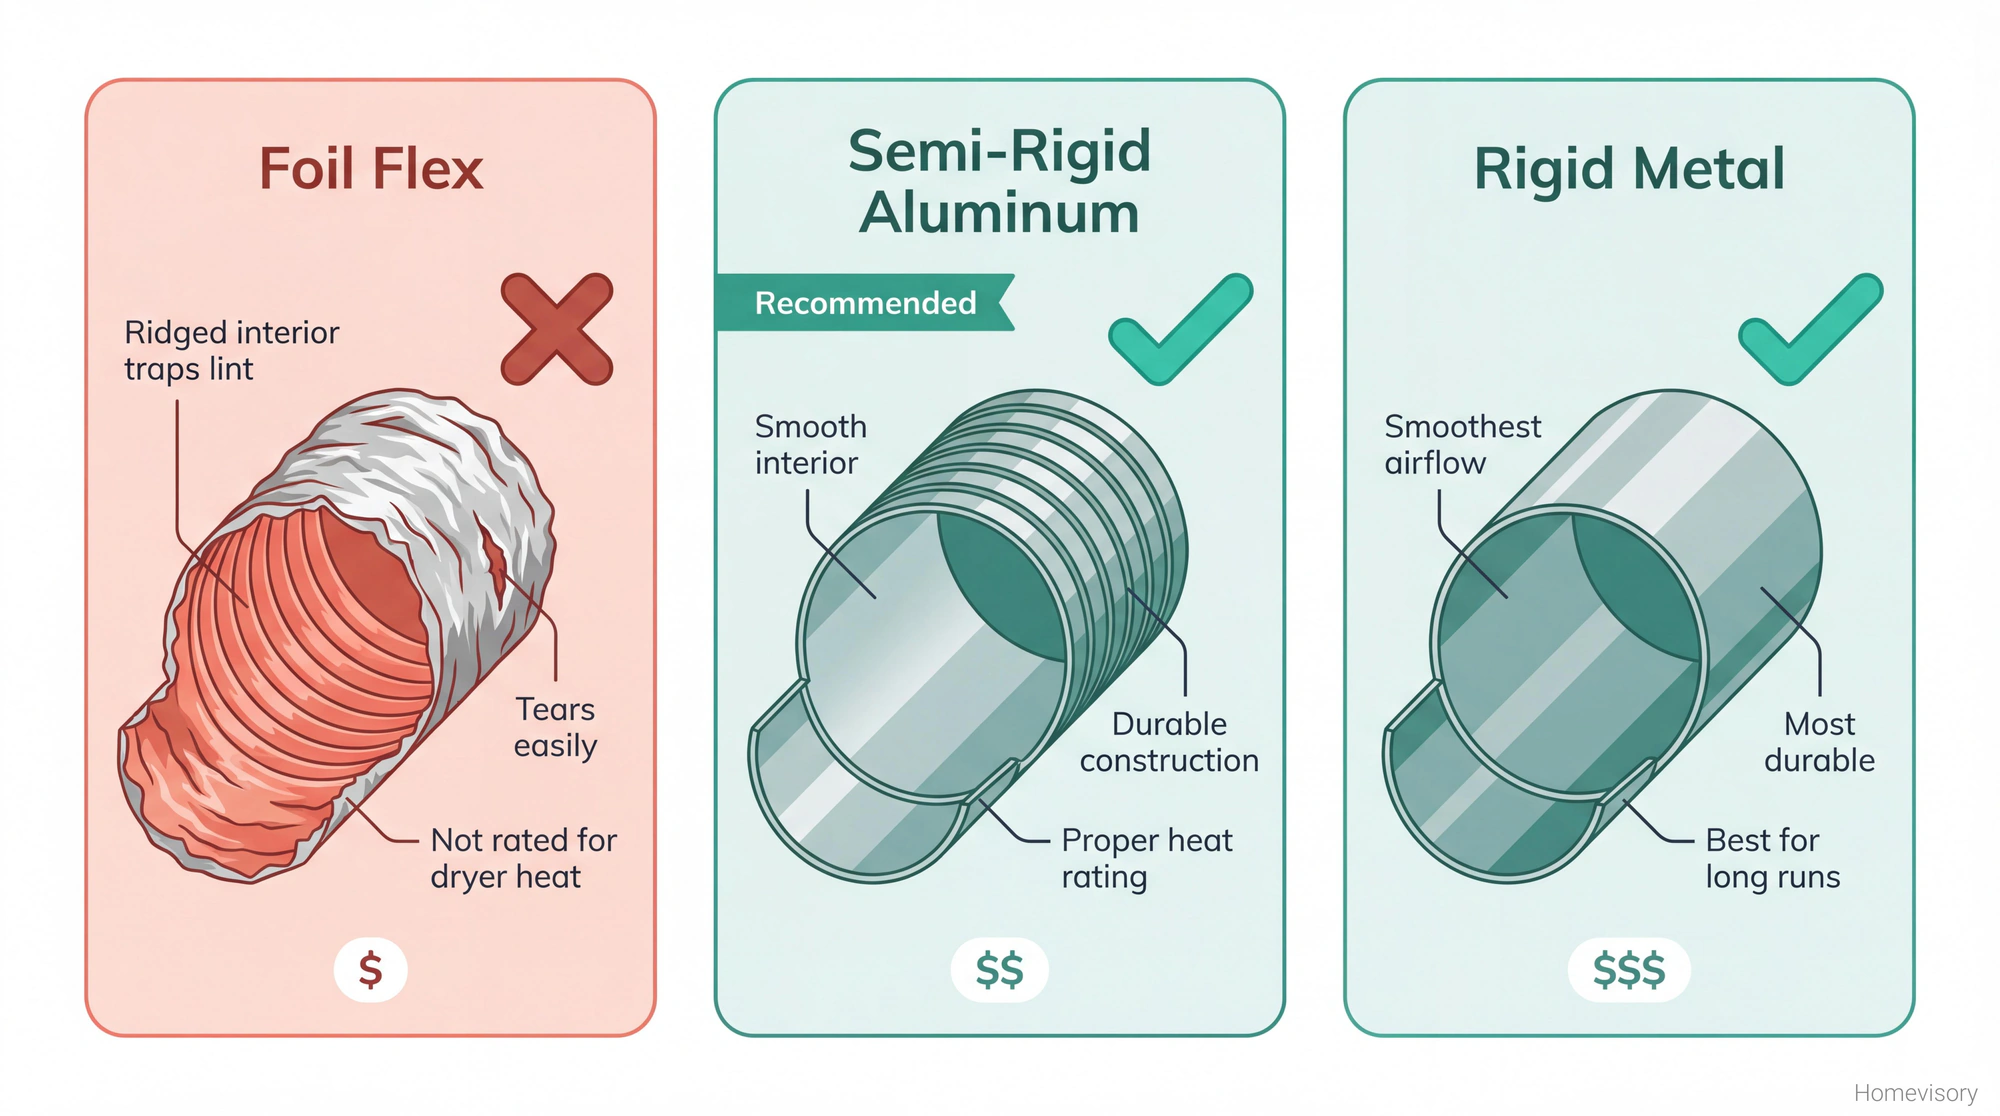
Wrong duct material. This one makes me genuinely annoyed. People use foil flex duct because it’s cheap and easy. And for some applications it’s fine. But for clothes dryer vent repair you want semi-rigid aluminum or rigid metal duct. The foil stuff has ridges inside that catch lint and it tears easily and it’s not rated for the heat a dryer produces. I’ve seen it in houses where the previous owner “did it themselves” and I’ve seen what happens when that foil duct gets a pinhole and starts dumping lint inside the wall. Use the right materials. Its not that much more expensive.
The Lint Situation
I’m going to spend more time on this than I probably should but it matters.
My dad Curtis worked in a factory for thirty-some years and he used to talk about the machines and how they had to be cleaned on a schedule or they’d shut down. “The machines dont care about your schedule,” he’d say. “They care about maintenance.” He was talking about industrial equipment but dryers are the same way. They dont care that you’re busy. They dont care that you forgot. They care about airflow.
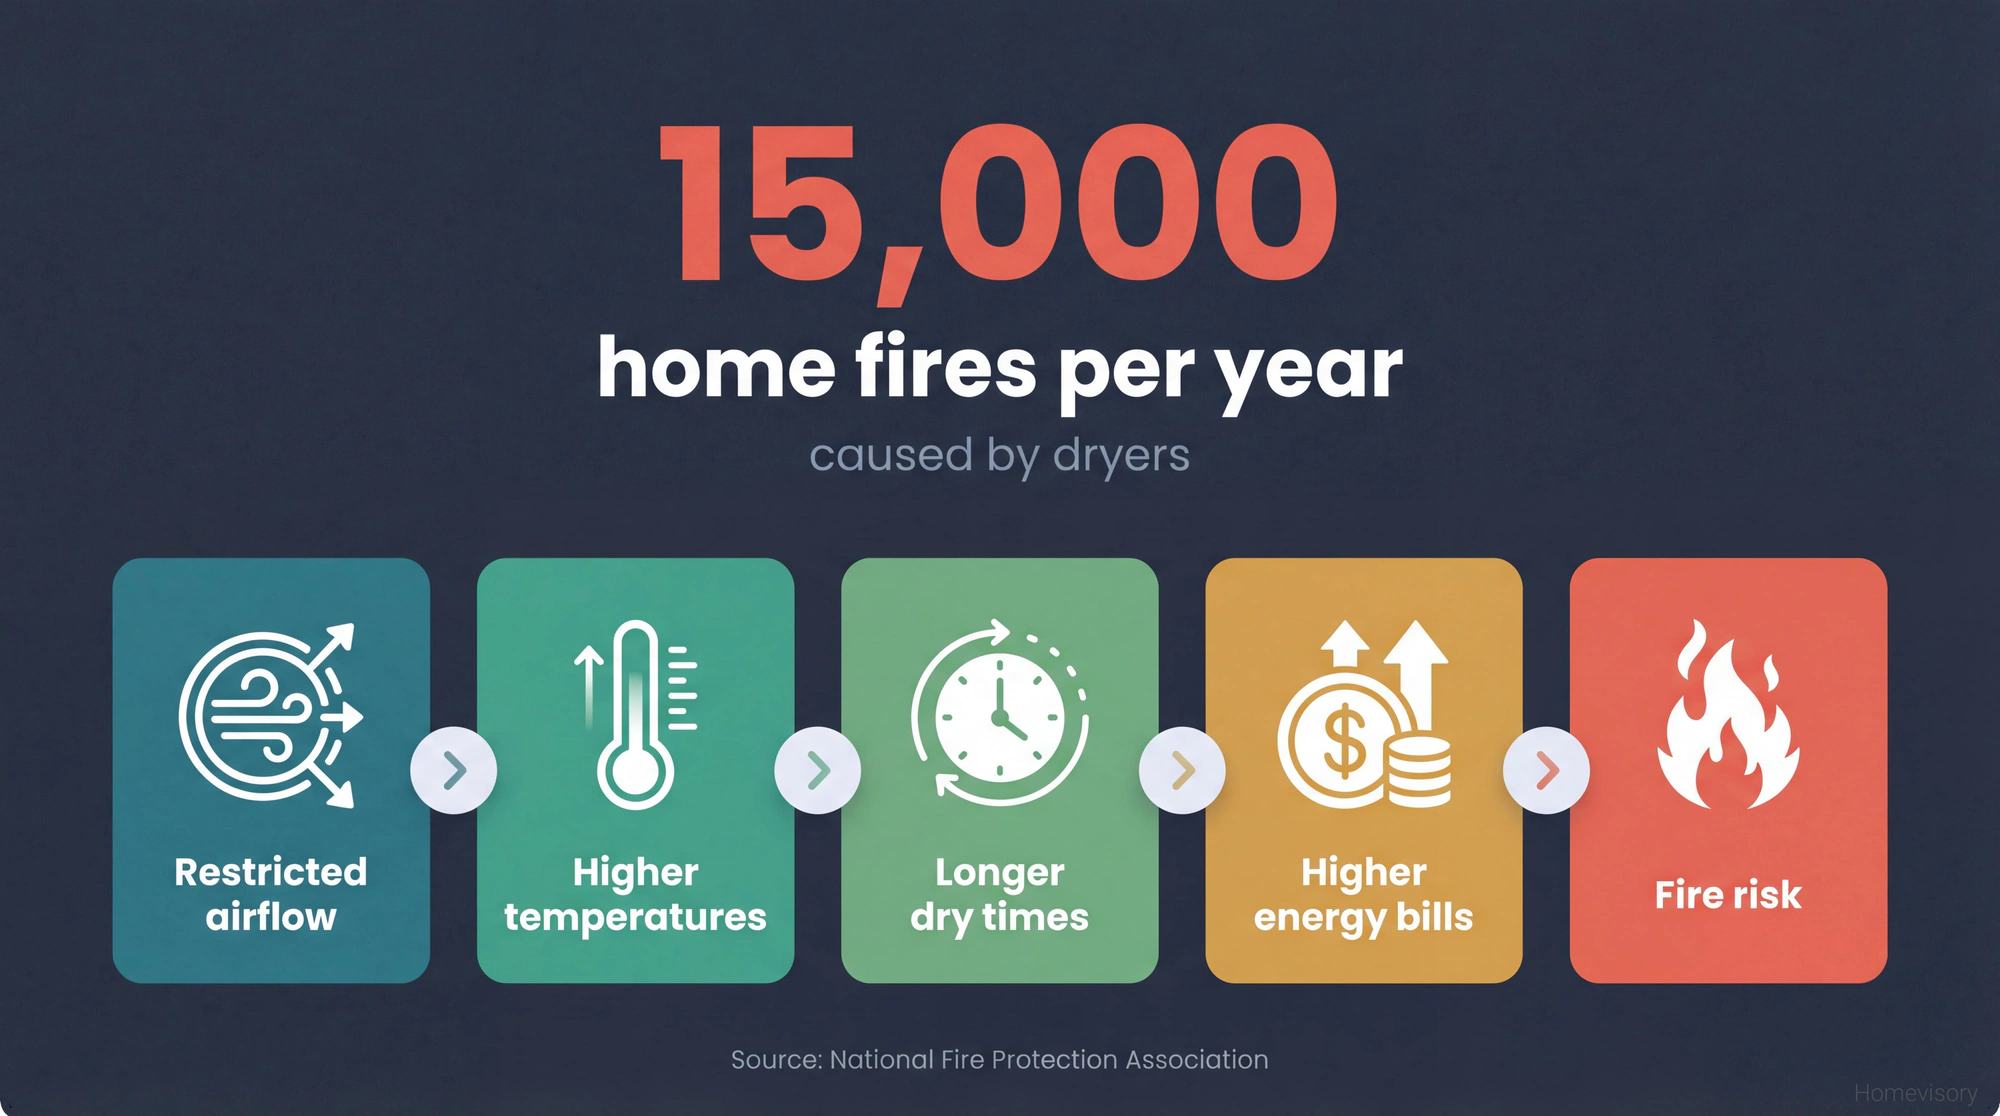
Lint is flammable. Very flammable. The National Fire Protection Association says dryers cause about 15,000 house fires every year and the leading cause is failure to clean. Not mechanical failure. Not electrical problems. Failure to clean.
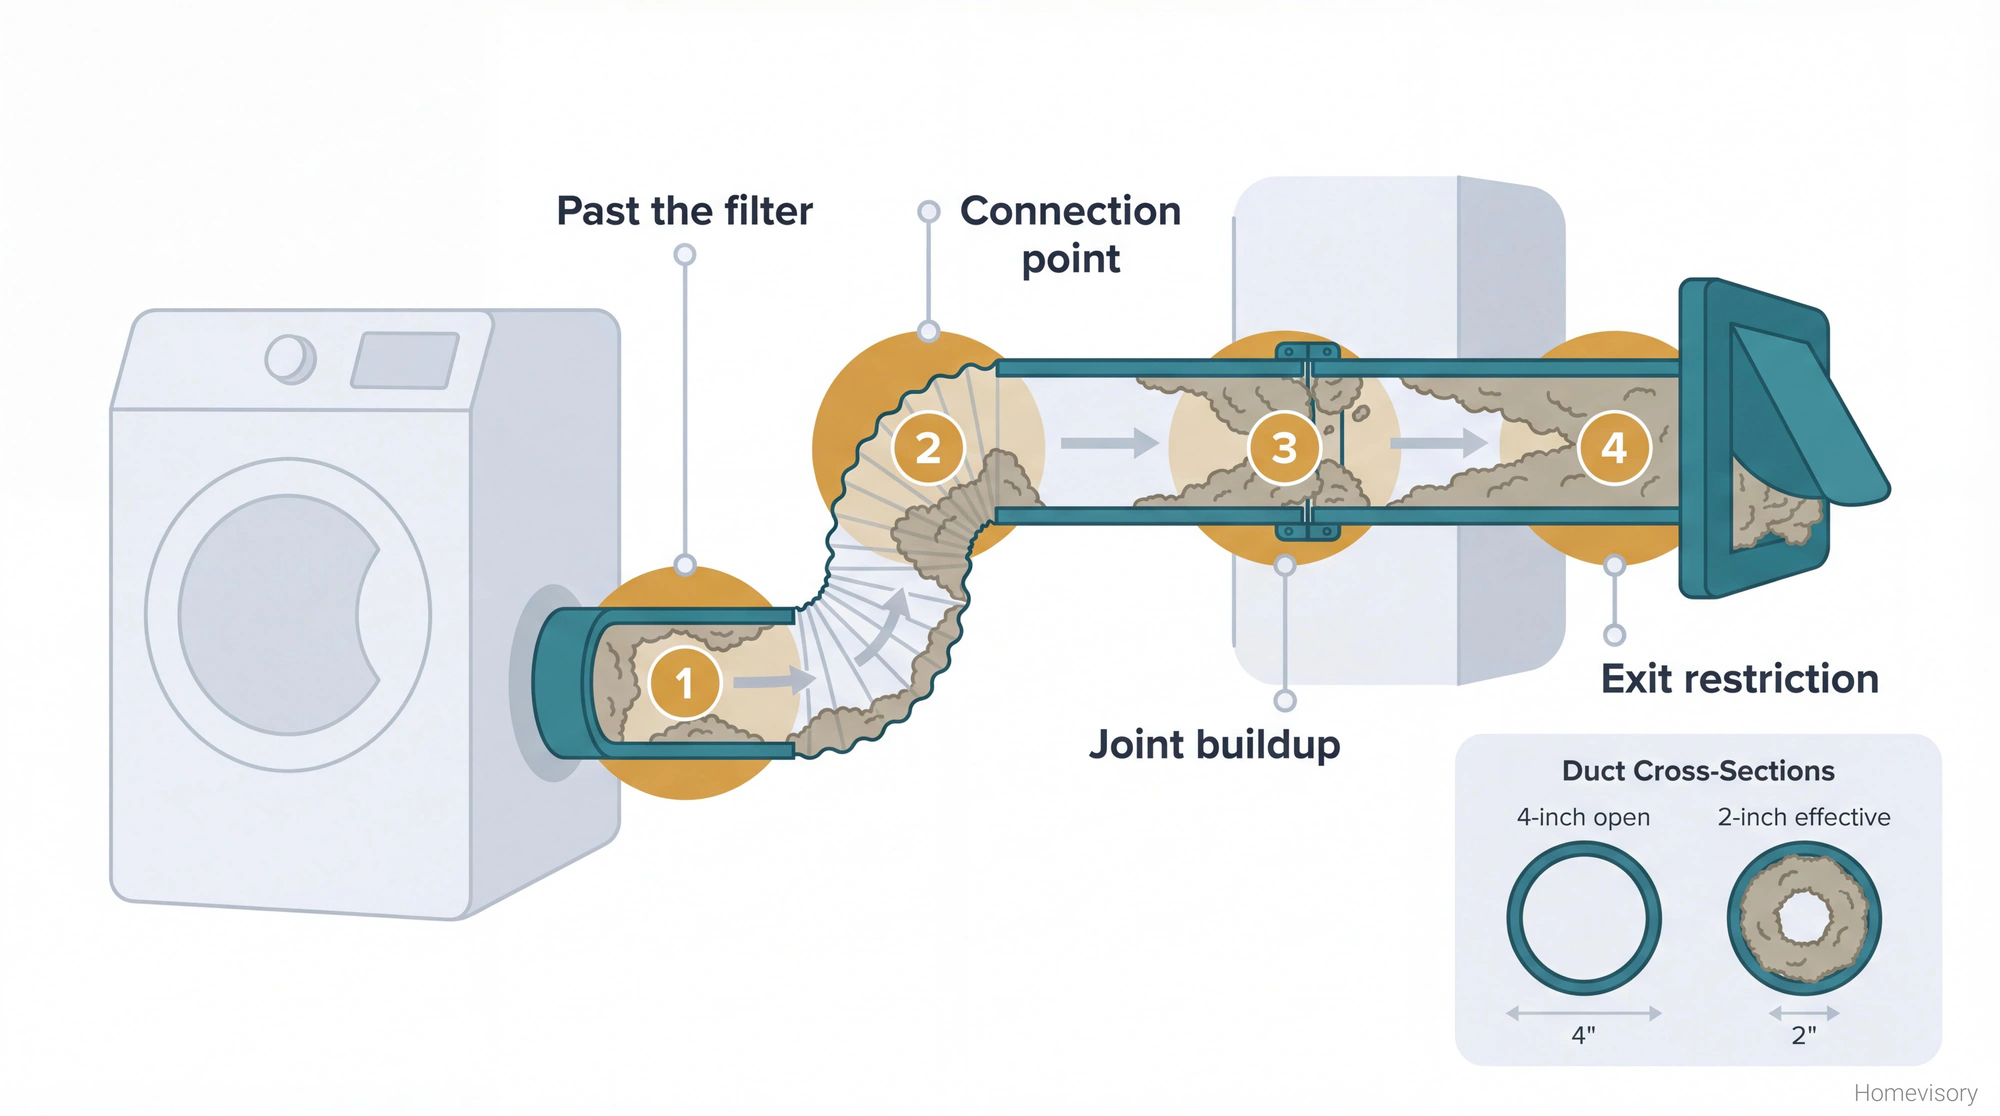
So heres what happens. Your lint filter is maybe 80-90% effective on a good day. The rest of the lint goes into the duct system. It sticks to the walls of the duct, especially in flexible duct because of those ridges I mentioned. It accumulates at the joints where sections connect. It builds up in the vent hood outside because thats where the air slows down before exiting. Over time you go from an open 4-inch duct to an effectively 2-inch duct because the walls are coated with fuzz.
Now your dryer is working harder to push air through a smaller opening. The exhaust temperature goes up. The drying time goes up. Your energy bill goes up. And all that lint is sitting there getting hotter and hotter.
I worked on a house in Dallas, must have been 2008 or 2009, where the homeowner called because they smelled burning when the dryer ran. I pulled the duct and it was maybe a quarter inch from being completely clogged. The outside of the vent hood had wasp nests blocking it too. The lint inside was actually warm to the touch and I’m not exaggerating when I say there was a layer that looked like felt. Like someone had intentionally packed it in there. This family had been running the dryer like that for who knows how long. If that lint had ignited the fire would have been inside the wall where they couldnt see it until it was too late. The kids were young. Elementary school. Anyway.
DIY Dryer Duct Repair for Common Problems
Most dryer exhaust repair you can handle yourself. Heres what to do for each problem.
Cleaning Out Lint Buildup
You need a dryer vent cleaning kit. They sell them at hardware stores, usually $20-40. Its a long flexible brush that attaches to a drill. The brush spins and scrapes the lint off the walls of the duct.
Steps:
Pull your dryer away from the wall and disconnect the duct from the back of the dryer. You’ll see a metal collar, the duct is usually held on with a clamp or foil tape.
Go outside and remove the vent hood cover or flapper. Some pop off, some have screws.
Run the brush through from both ends. From behind the dryer and from outside. The brush extends in sections, keep adding sections until you reach the middle.
Vacuum everything. The brush loosens the lint, you have to remove it.
Reconnect everything. Make sure connections are tight.
Run the dryer on air-only (no heat) for a few minutes to blow out any remaining debris.
You should do this once a year minimum. If you have a long duct run, every six months. If you have pets or a big family doing lots of laundry, every six months.
Cleaning kits work. Buy one. Moving on.
Fixing Crushed or Kinked Duct
This is the one that got me. If your flexible duct is crushed, you have two options.
Option one: replace the crushed section. Cut out the damaged part and splice in new duct. Use semi-rigid aluminum, not foil. Connect sections with foil tape (the good kind, rated for HVAC) and clamps.
Option two: replace the entire duct run with semi-rigid or rigid duct. This is what I ended up doing because my flexible duct was old anyway and I figured if I’m back there I might as well do it right.
The physics matter here. Your dryer is designed to push air through a certain duct size at a certain rate and when you reduce that capacity the whole system suffers. A 4-inch duct crushed to 2 inches isnt just half as effective, it’s way worse than that because of how airflow works and I wont get into the fluid dynamics but trust me when I say a kinked duct is worse than a slightly dirty open duct. Every bend in the duct adds resistance, something like 5 feet of equivalent length for a 90-degree turn, so if you have a long run with multiple bends you’re already working against the system before you add any damage. Keep runs as short as possible, minimize bends, use rigid duct for long runs.
Reconnecting Separated Sections
If your duct has come apart at a joint, you’ll know because your laundry room will be humid and warm when the dryer runs. You might also see lint on the floor or in the wall cavity.
Pull the dryer out. Find the disconnection. Reconnect using foil tape and a clamp. Not duct tape. Duct tape (the cloth kind) dries out and fails in a couple years. Use the foil HVAC tape.
If the sections dont fit together anymore because someone forced them or they’re damaged, replace that section. Cut out the bad part, splice in new duct, tape and clamp.
Vent Hood Problems
The vent hood outside has a flapper that opens when air pushes through and closes when the dryer is off. This keeps out weather, birds, and rodents.
Common problems:
Flapper stuck open. Clean out any debris or nests. Check if the flapper is bent or broken. Replace if needed, vent hoods are cheap, maybe $10-25.
Flapper stuck closed. Could be paint (previous owner painted over it), rust, or debris. Clean it. Apply a tiny bit of lubricant to the hinge if needed. If it’s rusted solid, replace the hood.
Flapper missing. Birds got to it or it fell off. Replace the hood.
Youre looking at maybe 15 minutes of work and a few dollars in parts. Unless the hood is on your roof. If its on your roof, get someone on a ladder. I’m not getting into roof work here.
When to Call a Professional
Some dryer vent repair is beyond DIY.
If your duct runs through finished walls and you cant access it, call someone. They have inspection cameras and the tools to clean or replace sections without tearing out drywall.
If your vent terminates on the roof and you’re not comfortable with heights, call someone.
If you’ve cleaned everything and the dryer still takes forever, there might be a problem with the dryer itself. Call an appliance tech. If your dryer runs but produces no heat, check out our guide on dryer not heating for troubleshooting tips.
If you smell burning or see scorch marks anywhere near the duct, call someone immediately. Don’t run the dryer until its been inspected.
The Tissue Problem
I have four kids. Had four kids. They’re mostly grown now but the tissue problem was real. Kleenex in pockets. Every load. Tissues get shredded in the wash and then dried in the dryer and those little white particles get everywhere including into the lint filter and past it into the duct.
If you have kids (or adults who apparently cant check their pockets), your dryer vent needs more frequent attention. Same goes for pet owners. The lint from pet hair is finer and gets past the filter more easily.
My system now is to clean the lint filter after every load, which you should be doing anyway, and clean the full duct system twice a year. Raquel reminds me. She puts it in her calendar and she puts it in mine.
What Homevisory Does Here
Look, remembering to clean your dryer vent twice a year is easy to say and easy to forget. Its the kind of task that seems fine to skip until it isn’t fine anymore.
Thats what we built Homevisory for. You put in your home details and it tells you what needs maintenance and when. Dryer vent cleaning, yes, but also furnace filters and gutter cleaning and water heater flushes and everything else that homeownership throws at you. You can sign up free with our Homevisory home task manager and let the system track this stuff so you dont have to keep it all in your head.
I fix houses. I’ve been fixing houses for thirty years. And I still use a reminder system because there’s too much to remember. That’s what we do here at Homevisory.