

Why This Matters More Than You Think
I’ll be honest with you. Dryer vent cleaning is one of those things I didn’t think about for years.
Decades, actually. You throw clothes in, they come out dry, the lint trap gets emptied, and thats the extent of it. At least thats what I thought until I walked into a rental property in Plano back in 2008 and smelled something that made my stomach drop.
The dryer exhaust vent hadnt been cleaned in probably six years. Maybe longer. The tenants had been complaining that clothes took two cycles to dry and the landlord kept saying the dryer was fine. The dryer was fine. The vent was a fire waiting to happen.
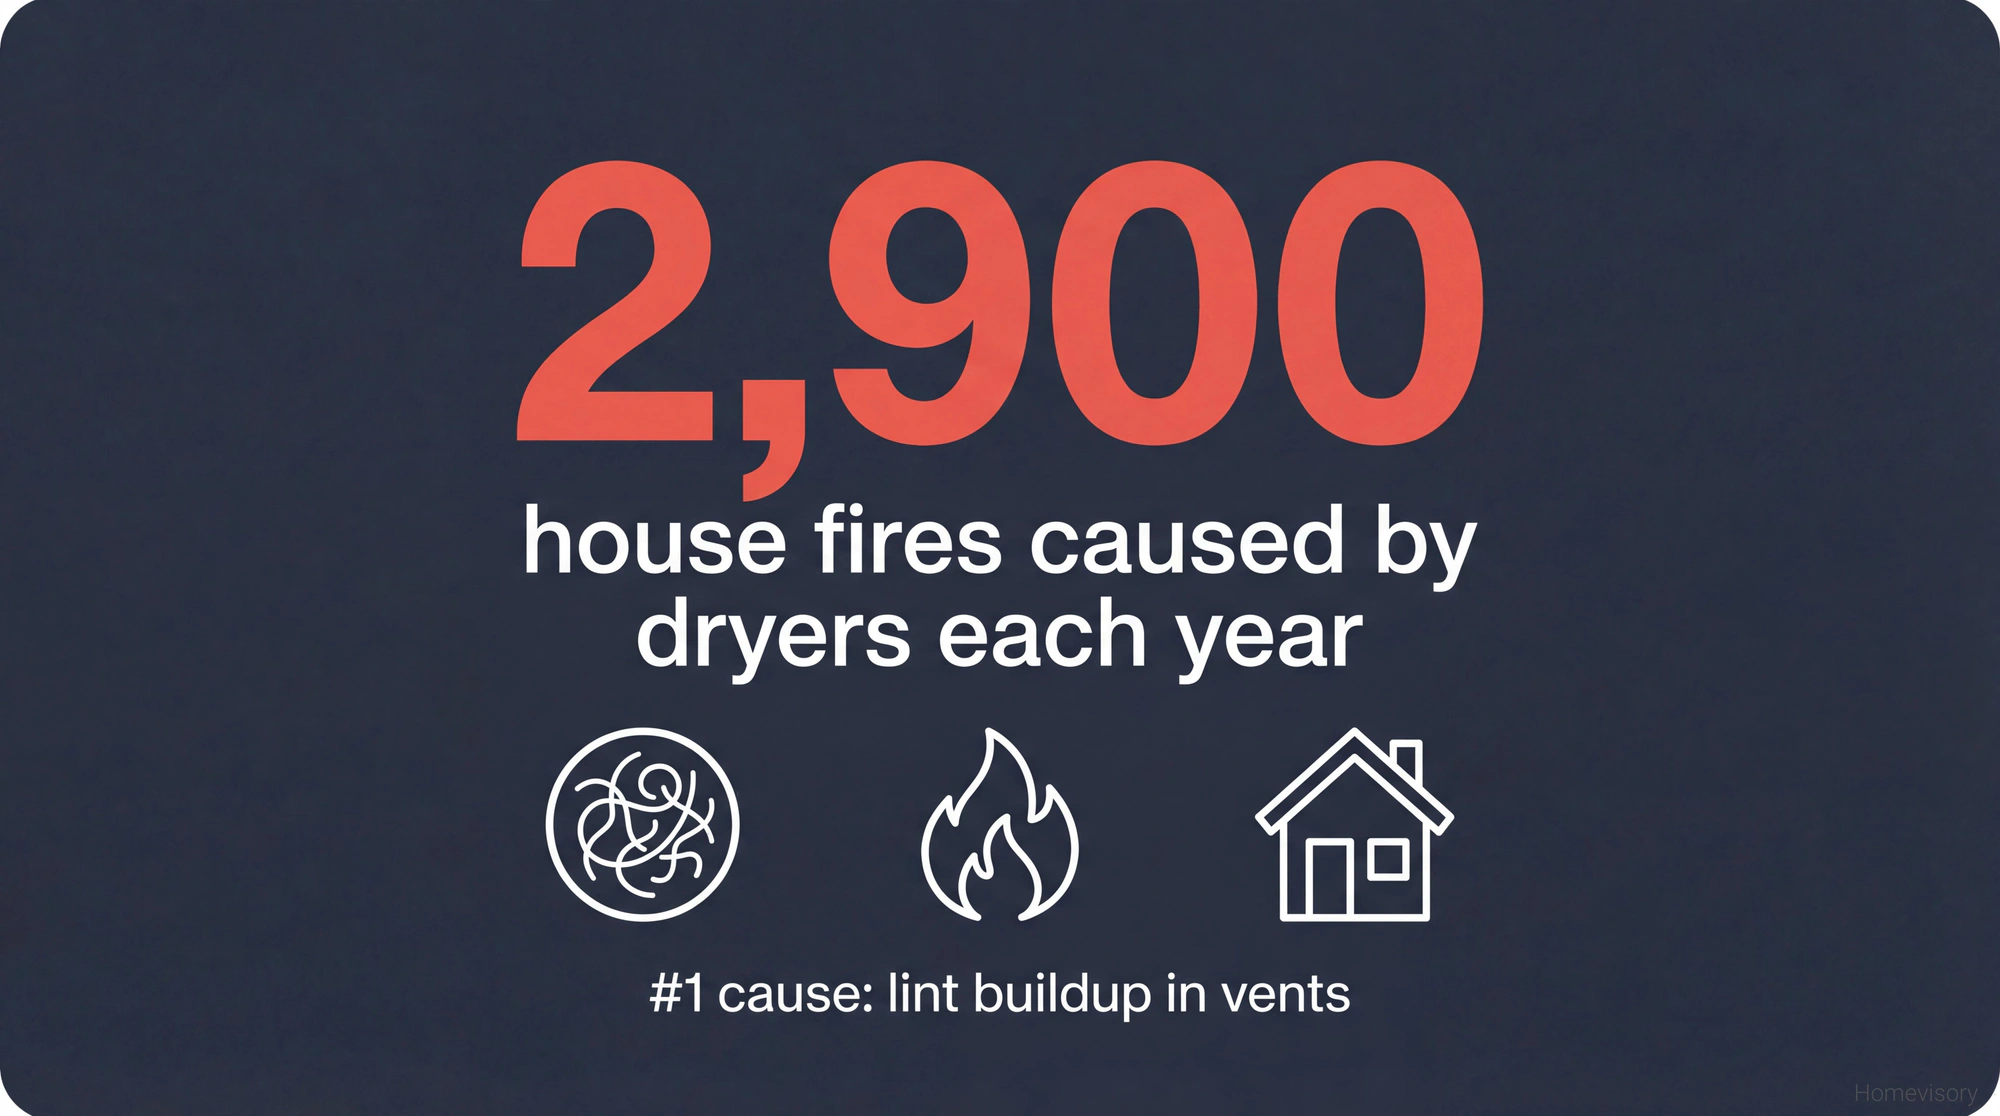
Every year, residential dryers cause around 2,900 house fires in the US. The leading cause isnt electrical failure or mechanical problems. Its lint buildup in the vent system. Lint is basically kindling. It’s fluffy, dry, and sits in a tube that gets hot. You do the math.
The Lint Trap Isn’t Enough
You already know to clean the lint screen after every load. Everyone knows this. Your mom told you this. The sticker on the dryer told you this. If youre not doing it, start doing it.
But heres what people miss: the lint trap only catches maybe 75% of the lint. The rest goes into the exhaust system. Into the vent pipe behind the dryer, through the duct that runs through your wall or floor, and out the exterior vent. Over months and years, that 25% accumulates. It coats the inside of the duct. It clogs the flapper on your exterior vent. It creates a fire hazard that you cant see because its hidden behind drywall.
Moving on.
How Often Should You Clean It
The standard recommendation is once a year for dryer vent cleaning. Thats the baseline.
But it depends on how much you use your dryer and what your setup looks like. I’ve got four kids. When they were all home, we were running that dryer constantly. Raquel would do multiple loads a day during sports seasons. All those towels, all those uniforms, all that lint. We cleaned our vent twice a year and it still had significant buildup.
If its just two people in a house doing maybe four loads a week, once a year is probably fine.
If your vent run is short, like three or four feet straight out the back of the dryer, once a year is probably fine.
If your vent run is long, like mine is now in Palm Beach where it goes up through the ceiling and across the attic and out the roof, you need to be more aggressive. Longer runs mean more surface area for lint to stick. More bends mean more places for lint to collect. More opportunity for problems.
Signs you need to clean it now regardless of schedule:
- Clothes take longer than one cycle to dry
- The dryer gets hot to the touch on the outside
- You smell something burning or musty when the dryer runs
- The exterior vent flapper doesnt open when the dryer is on
- It’s been more than a year and you cant remember the last time
That burning smell. Thats the one that should scare you. That means lint is getting hot enough to scorch. Youre one bad day away from an actual fire.
The Duct Material Problem
This is where I get worked up.
I know I get worked up about this. Raquel has heard this rant probably fifty times and she just nods now.
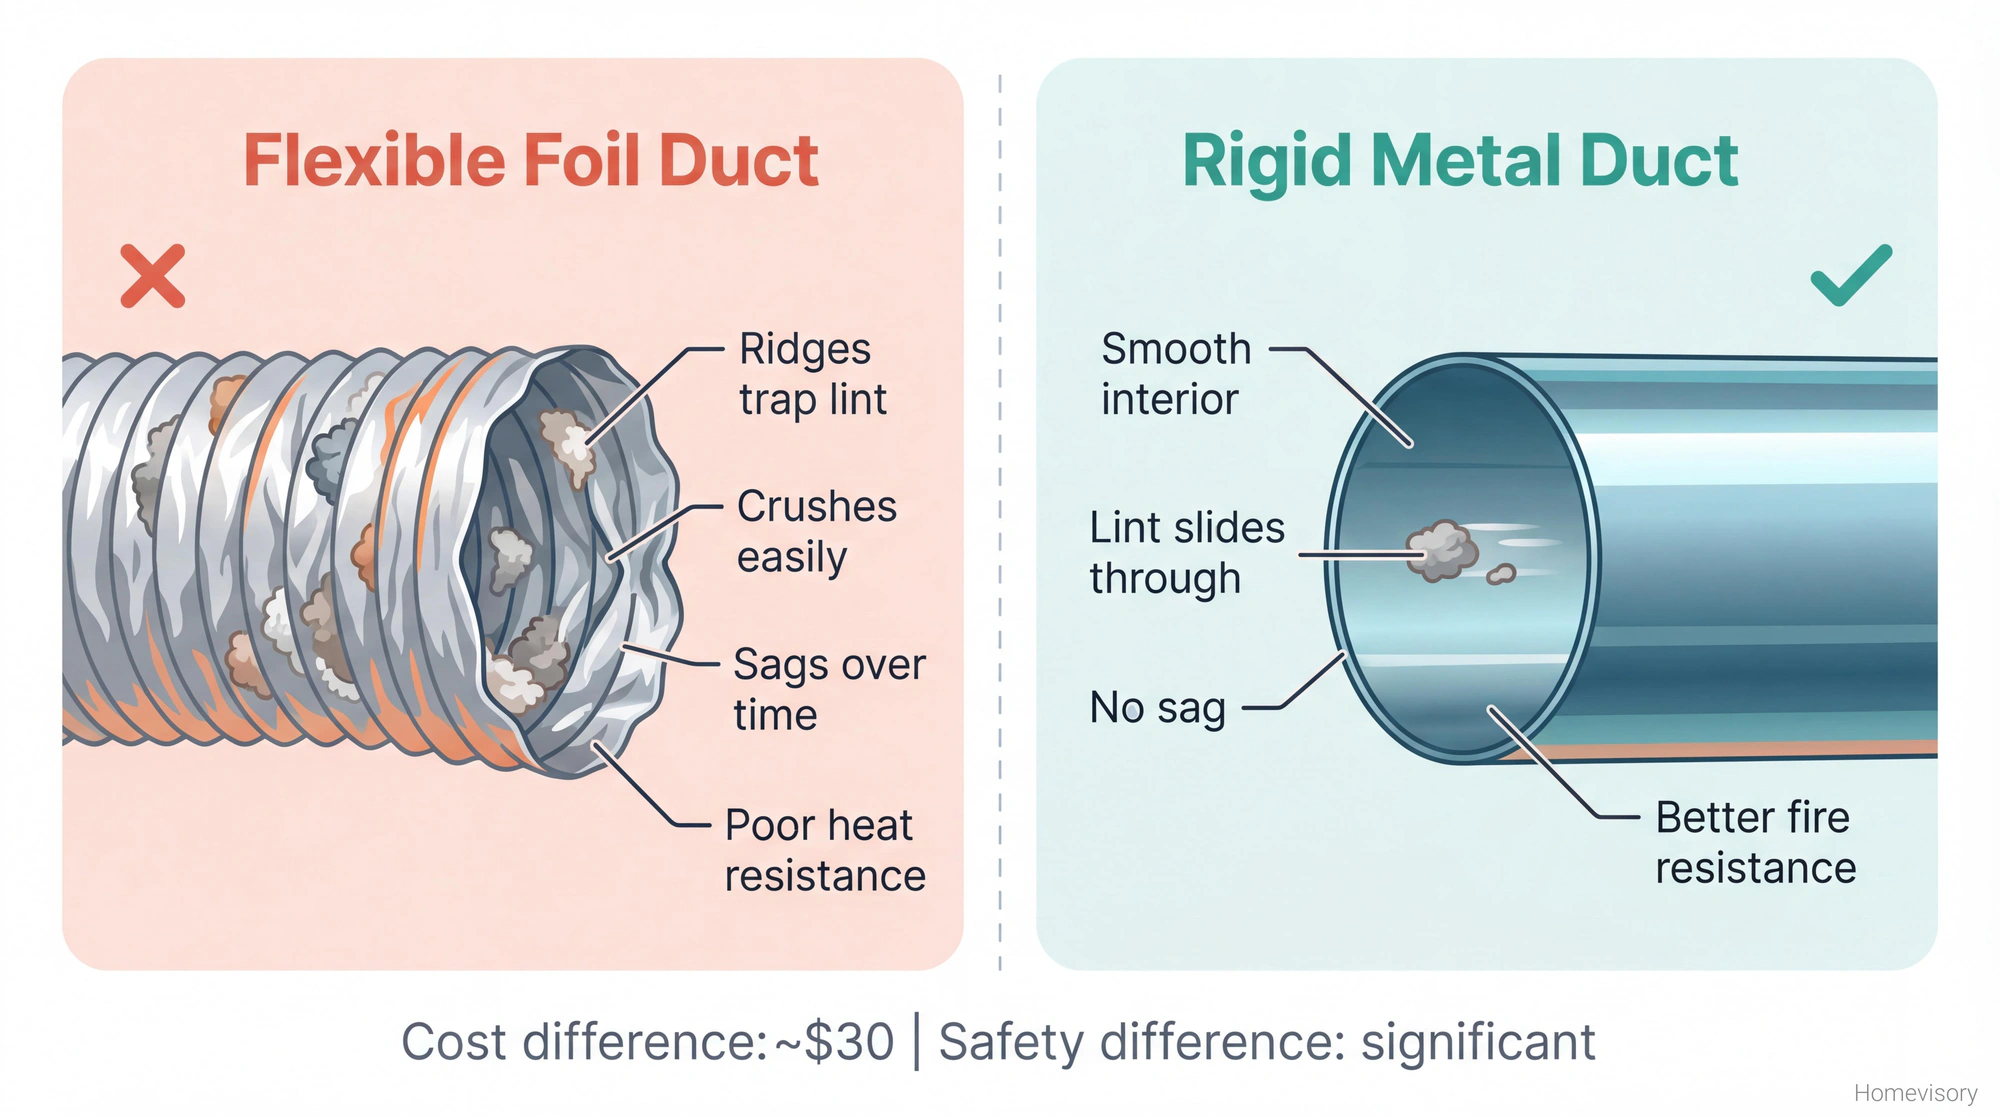
Most homes, especially homes built in the last thirty years, have the wrong duct material connecting the dryer to the wall. Builders install that flexible foil stuff because its cheap and easy. You can buy a four foot section at any hardware store for like eight dollars. You can stretch it, bend it, compress it to fit in tight spaces. Takes five minutes to install. Saves the builder maybe twenty dollars per house and fifteen minutes of labor. And its terrible. Its absolutely terrible for this application. The ridges inside the flexible foil duct catch lint like nobody’s business. The foil crushes if you push the dryer back too far. It sags over time which creates low spots where lint accumulates. It cant handle the heat as well as metal. The Consumer Product Safety Commission has been telling people for years to use rigid metal duct and people keep installing that foil garbage because it’s convenient and nobody thinks about it until something goes wrong.
Rigid metal duct, the smooth stuff, 4-inch diameter, costs maybe forty dollars for a decent run and takes a bit more work to install because you have to plan your route and cut pieces to length and connect them properly. But lint slides right through. No ridges to catch on. No sag. Better fire resistance. Its not even close.
If you have flexible foil duct right now, I’m not saying your house is going to burn down tonight. But next time you pull the dryer out to clean the vent, look at what youve got back there. If its that crinkly silver accordion stuff, consider replacing it. Rigid metal duct. Smooth interior. As short and straight as possible. Fewer bends. Each 90-degree bend is equivalent to adding five feet of length in terms of airflow resistance.
How to Clean Dryer Vent Yourself
You’ll need a dryer vent cleaning kit.
You can get one at any hardware store for $20-40. The basic kit is a long flexible brush that attaches to a drill. Some kits have multiple brush heads and extension rods that let you reach 10, 15, even 20 feet into the duct.
Heres the process:
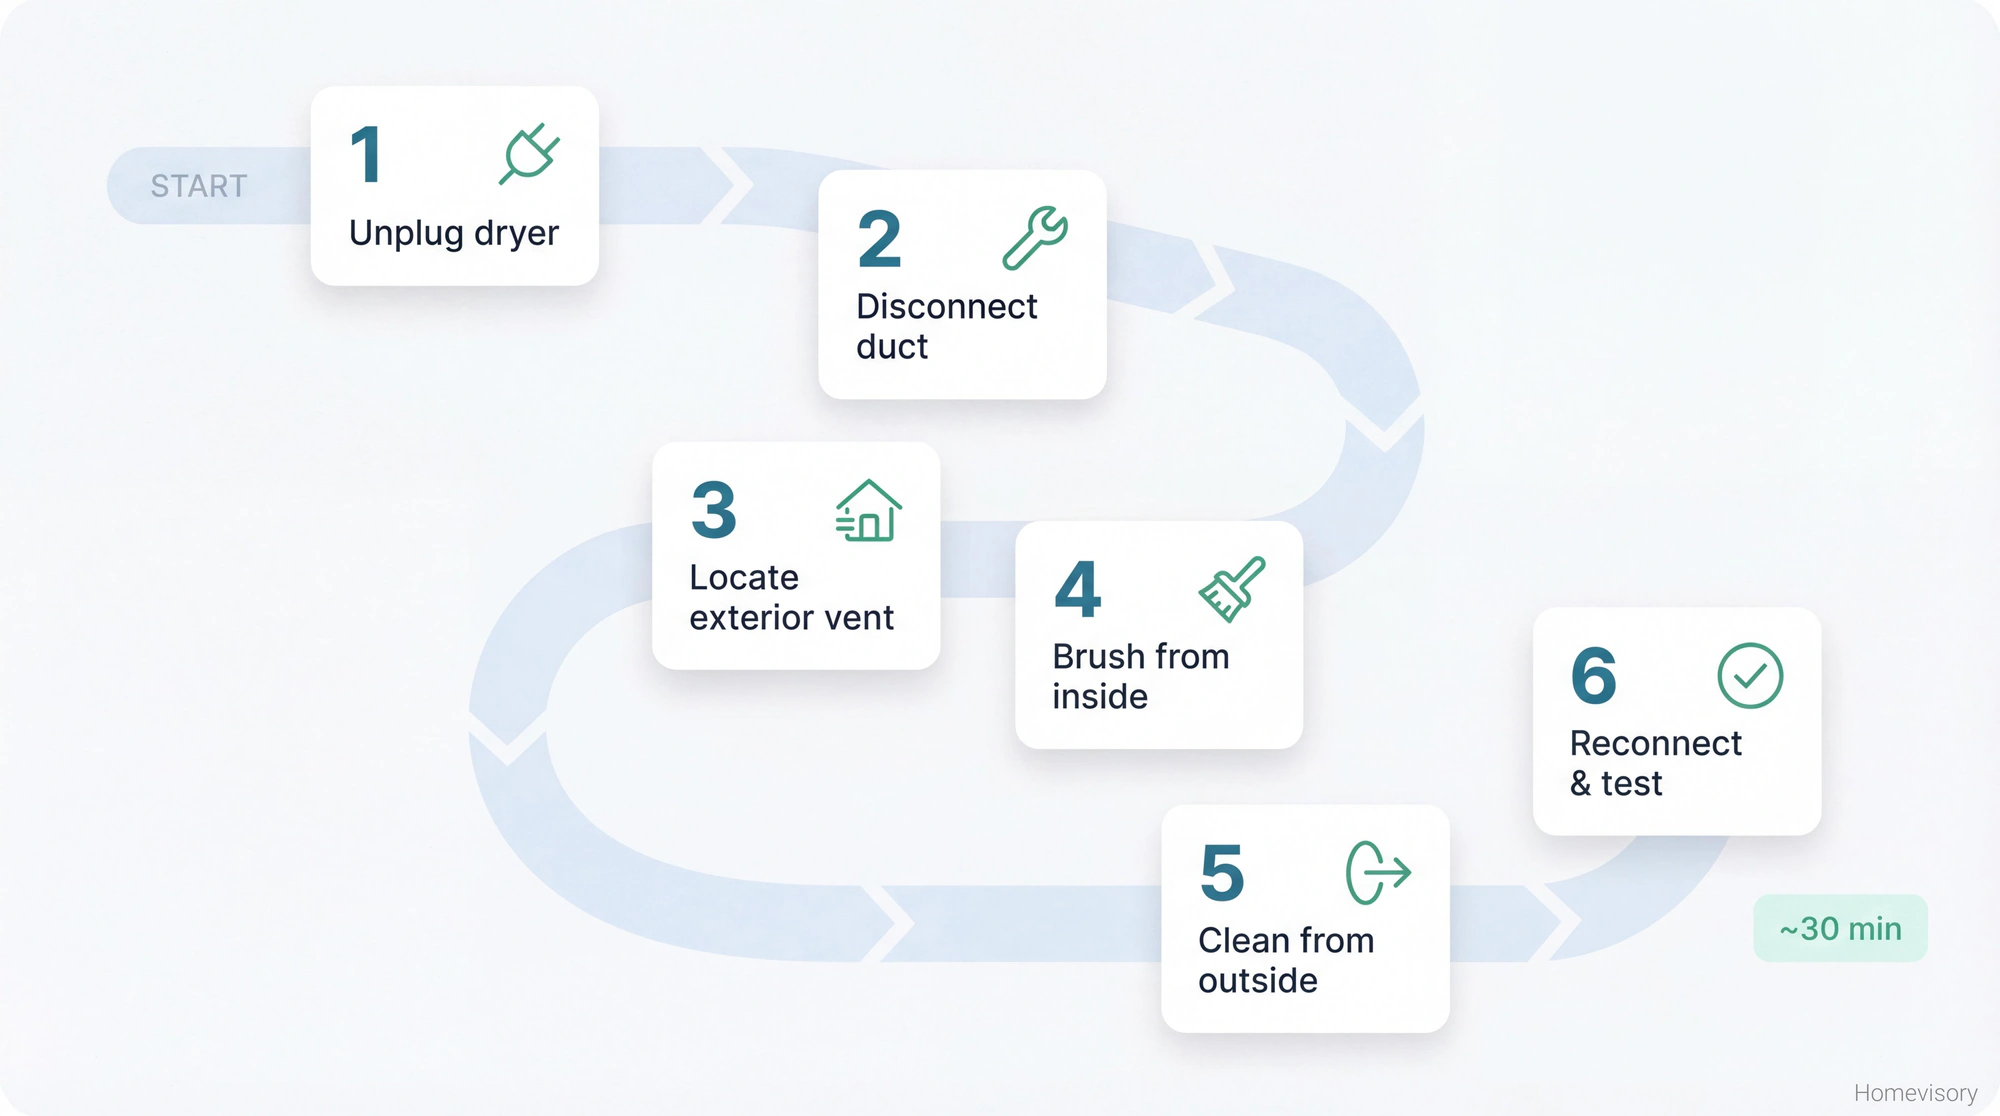
Unplug the dryer. If its gas, turn off the gas supply. I dont care if you think youll be careful. Unplug it.
Pull the dryer away from the wall. Look at what youve got. The vent connection is usually a 4-inch aluminum duct clamped to the back of the dryer with a hose clamp. Loosen the clamp and disconnect it.
Go outside and find your exterior vent. It’s usually on a side wall or sometimes the roof. If you cant find it, turn the dryer on for a minute and walk around outside feeling for warm air. Remove the cover if theres one and look inside. Youll probably see lint. Maybe a lot of lint.
Now clean. From both ends. Use the brush kit from inside, pushing it through the duct as far as it’ll go while spinning with the drill. Pull it back out. Repeat until you stop getting significant lint. Then do the same from outside. Use a vacuum to clean up the debris.
Reconnect everything. Make sure your clamps are tight. Plug it back in. Run the dryer empty for a few minutes and go outside to make sure air is flowing out the exterior vent. The flapper should be opening and you should feel warm air.
Whole thing takes 30 minutes if nothing goes wrong.
The Texas Incident
That rental property I mentioned. 2008, somewhere outside of Plano. I was doing an inspection for a landlord who wanted to renovate before selling. The tenant had already moved out.
The dryer vent ran about 15 feet, up through the laundry room ceiling, across part of the attic, and out a roof cap. When I disconnected the duct from the dryer, lint fell out like snow. I’m not exaggerating. There was probably two pounds of lint in that system. The duct was that flexible foil stuff, of course, and it was crushed in places and sagging everywhere else. In the attic section, there was a spot where the duct had disconnected from a joint and had been blowing hot moist air into the attic insulation. The insulation was damp and there was mold starting. Not a lot, but enough.
What scared me was the scorch marks. Inside the duct, near the dryer connection, the lint had actually scorched. You could see it. Brown discoloration on the accumulated lint. That was as close to a dryer fire as youll get without actually having one.
I called the landlord and told him I’d found a serious fire hazard and he needed to replace the entire duct run with rigid metal and have a professional verify the installation before he could sell the place. He complained about the cost. I told him the cost of a house fire was higher. He replaced it.
My dad Curtis used to say something about the equipment at the factory where he worked. He’d say machines need to breathe. If you choke a machine it dies slow. He wasnt talking about dryers, he was talking about industrial compressors or something, I dont remember exactly. He passed that kind of thing along without explaining the context. But it stuck with me. Machines need to breathe. A dryer needs to exhaust. If you choke the exhaust, something bad happens eventually. He was talking about something else entirely. But yeah.
Professional Cleaning
Some situations call for a professional. If your vent run is more than 15-20 feet, if it has multiple bends, if it goes through areas you cant access, if you found damage or disconnection, call someone. Clothes dryer vent cleaning services run maybe $100-150 for most homes. They have cameras, industrial vacuums, and tools that reach further than the DIY kits.
I’m not getting into how to vet contractors here. Thats a whole other article. Just make sure theyre actually cleaning the full run from dryer to exterior vent, not just vacuuming out the first few feet.
Quick Maintenance Between Deep Cleans
Between annual cleanings:
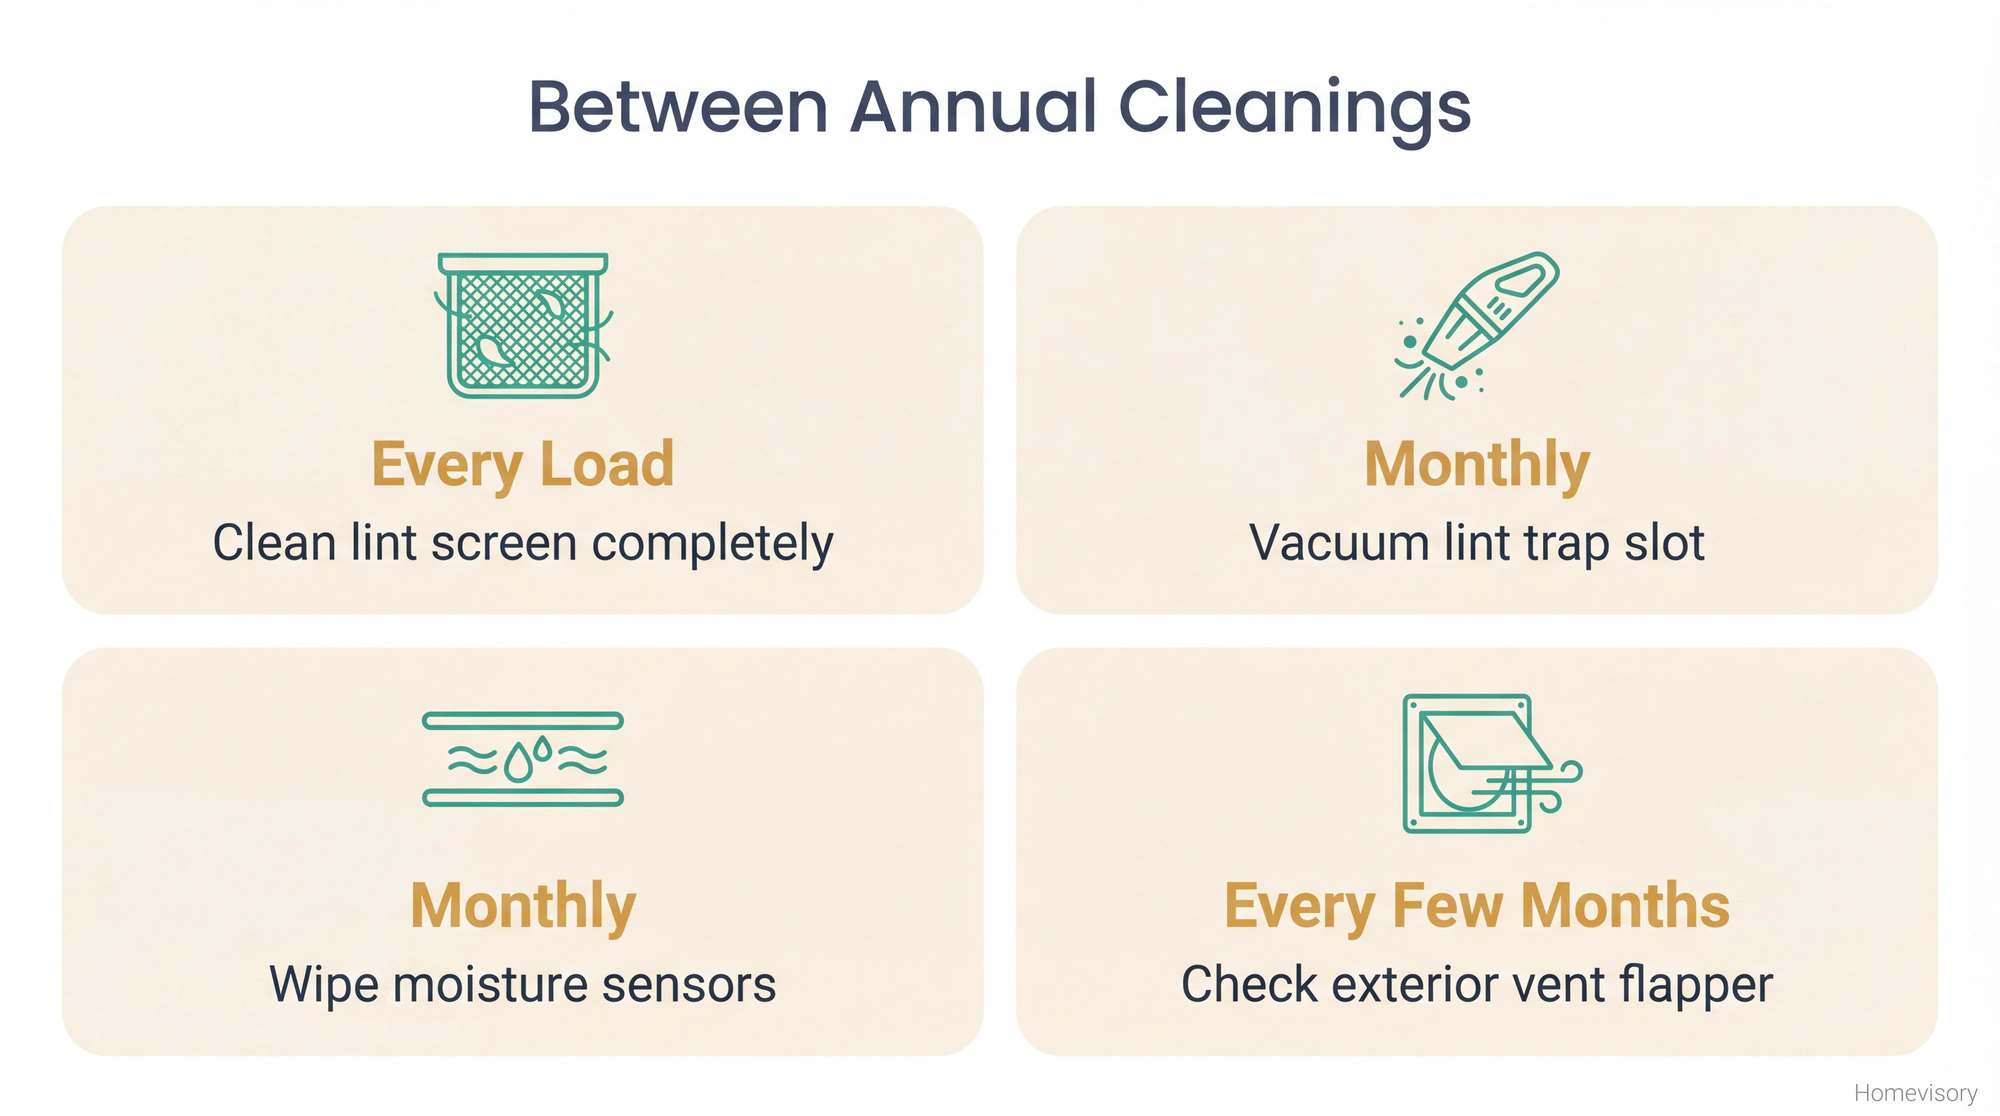
Clean the lint trap every single load. Scrape it with your hand, dont just pull off the surface layer.
Once a month, remove the lint trap and vacuum inside the slot where it sits. Lint accumulates down there.
Wipe down the moisture sensors inside the drum if your dryer has them. They look like two metal strips. If they get coated with dryer sheet residue, the dryer thinks clothes are dry when theyre not.
Check the exterior vent every few months. Make sure the flapper opens and closes freely. Make sure animals havent built nests in there. It happens. Birds love those vents.
What This Has to Do with Everything
Fire prevention isnt dramatic most of the time. Its not running into burning buildings. Its cleaning a vent once a year so there’s nothing to burn. Its spending forty minutes on a Saturday with a brush kit so your house is still standing on Sunday.
I’ve got Sparkplug and Ratchet wandering around the house. I’ve got Peach still living at home. I think about this stuff differently than I did twenty years ago. A dryer fire can start behind a wall where you cant see it and spread before you know whats happening.
Do the maintenance. Replace the crappy duct. Check the exterior vent. If your dryer’s not heating properly, a clogged vent is usually the first thing to check. And if the vent itself is crushed, disconnected, or damaged, that’s a separate fix you should handle before the next load. I’d add this to your annual home maintenance checklist so you don’t forget.
Thats what we do here at Homevisory. We remind you to do the boring stuff that keeps bad things from happening. If you want help staying on top of all this, dryer vents and everything else, sign up for Homevisory’s free home task manager. It’ll remind you when its time so you dont have to remember.