

Most people think replacing a toilet is a big deal. Its not. I’ve replaced dozens of them over the years, in client homes and my own, and the actual hands-on time is maybe two hours if you’re being careful. The problem is that people psych themselves out or they rush the parts that matter and then wonder why their bathroom smells like sewage three months later.
I watched my dad replace the toilet in our Atlanta house when I was maybe ten. He didn’t make a production out of it. Just turned off the water, pulled the old one, put the new one down, and we were flushing again before dinner. I remember thinking it was some kind of magic, how he knew exactly what to do. It wasn’t magic. He’d just done it before. I dont know why that stuck with me. Anyway.
If youre thinking about how to replace a toilet yourself, this is everything you need to know. The whole process, start to finish, including the parts that actually matter and the parts people obsess over for no reason.
Why Replace Instead of Repair
Toilets last a long time. The EPA says most toilets are expected to serve reliably for about 25 years. But if yours is cracked, wobbling no matter what you do, constantly running, or just old enough that it’s using way more water than it should, replacement makes sense.
The math on water alone is worth considering. Older toilets can use up to six gallons per flush compared to today’s federal standard of 1.6 gallons. That adds up. The EPA says replacing old toilets with WaterSense models could save the average family about $170 a year in water costs. Thats $3,400 over the lifetime of the toilets.
A good rule of thumb from the pros: if repair costs exceed 50% of the price of a new toilet, just replace it. Makes sense to me.
What You Need Before You Start
Tools:
- Adjustable wrench
- Channel-lock pliers
- Putty knife or scraper
- Bucket and towels (more than you think)
- Rubber gloves
- Hacksaw (in case the bolts are corroded)
- Level
Parts:
- New toilet (obviously)
- Wax ring or wax-free seal
- New closet bolts (do not reuse the old ones)
- New water supply line (spend the extra $8)
- Possibly a new flange if yours is damaged
I’m not getting into toilet shopping here. Measure your rough-in, thats the distance from the wall to the center of the floor bolts, and buy a toilet that matches. Most are 12 inches. Some older homes are 10 or 14. Check before you buy. Pick one that fits and move on.
Removing the Old Toilet
Turn off the water supply valve behind the toilet. Flush to empty the tank. Hold the handle down to get as much water out as possible. Then use a bucket or sponge to get the rest out of the tank and the bowl.
Whatever. Just get it empty.
Disconnect the water supply line from the tank. Have towels ready because water will drip. Now remove the caps covering the closet bolts at the base, and unscrew the nuts. These bolts are often corroded. If they spin without loosening, youre going to need the hacksaw. Cut through them. Its faster than fighting.
Here’s where I should mention: be careful lifting the old toilet. I had a bathroom mirror slide off a vanity once while I was doing demo work and it cost me eleven stitches. Toilets are heavy and awkward. Lift with your legs, not your back. Have someone help if you need it. Rock the toilet gently side to side to break the wax seal, then lift straight up and carry it out.
Put a rag in the open drain hole. Sewer gas smells terrible and you dont want anything falling in there.
The Part Everyone Gets Wrong
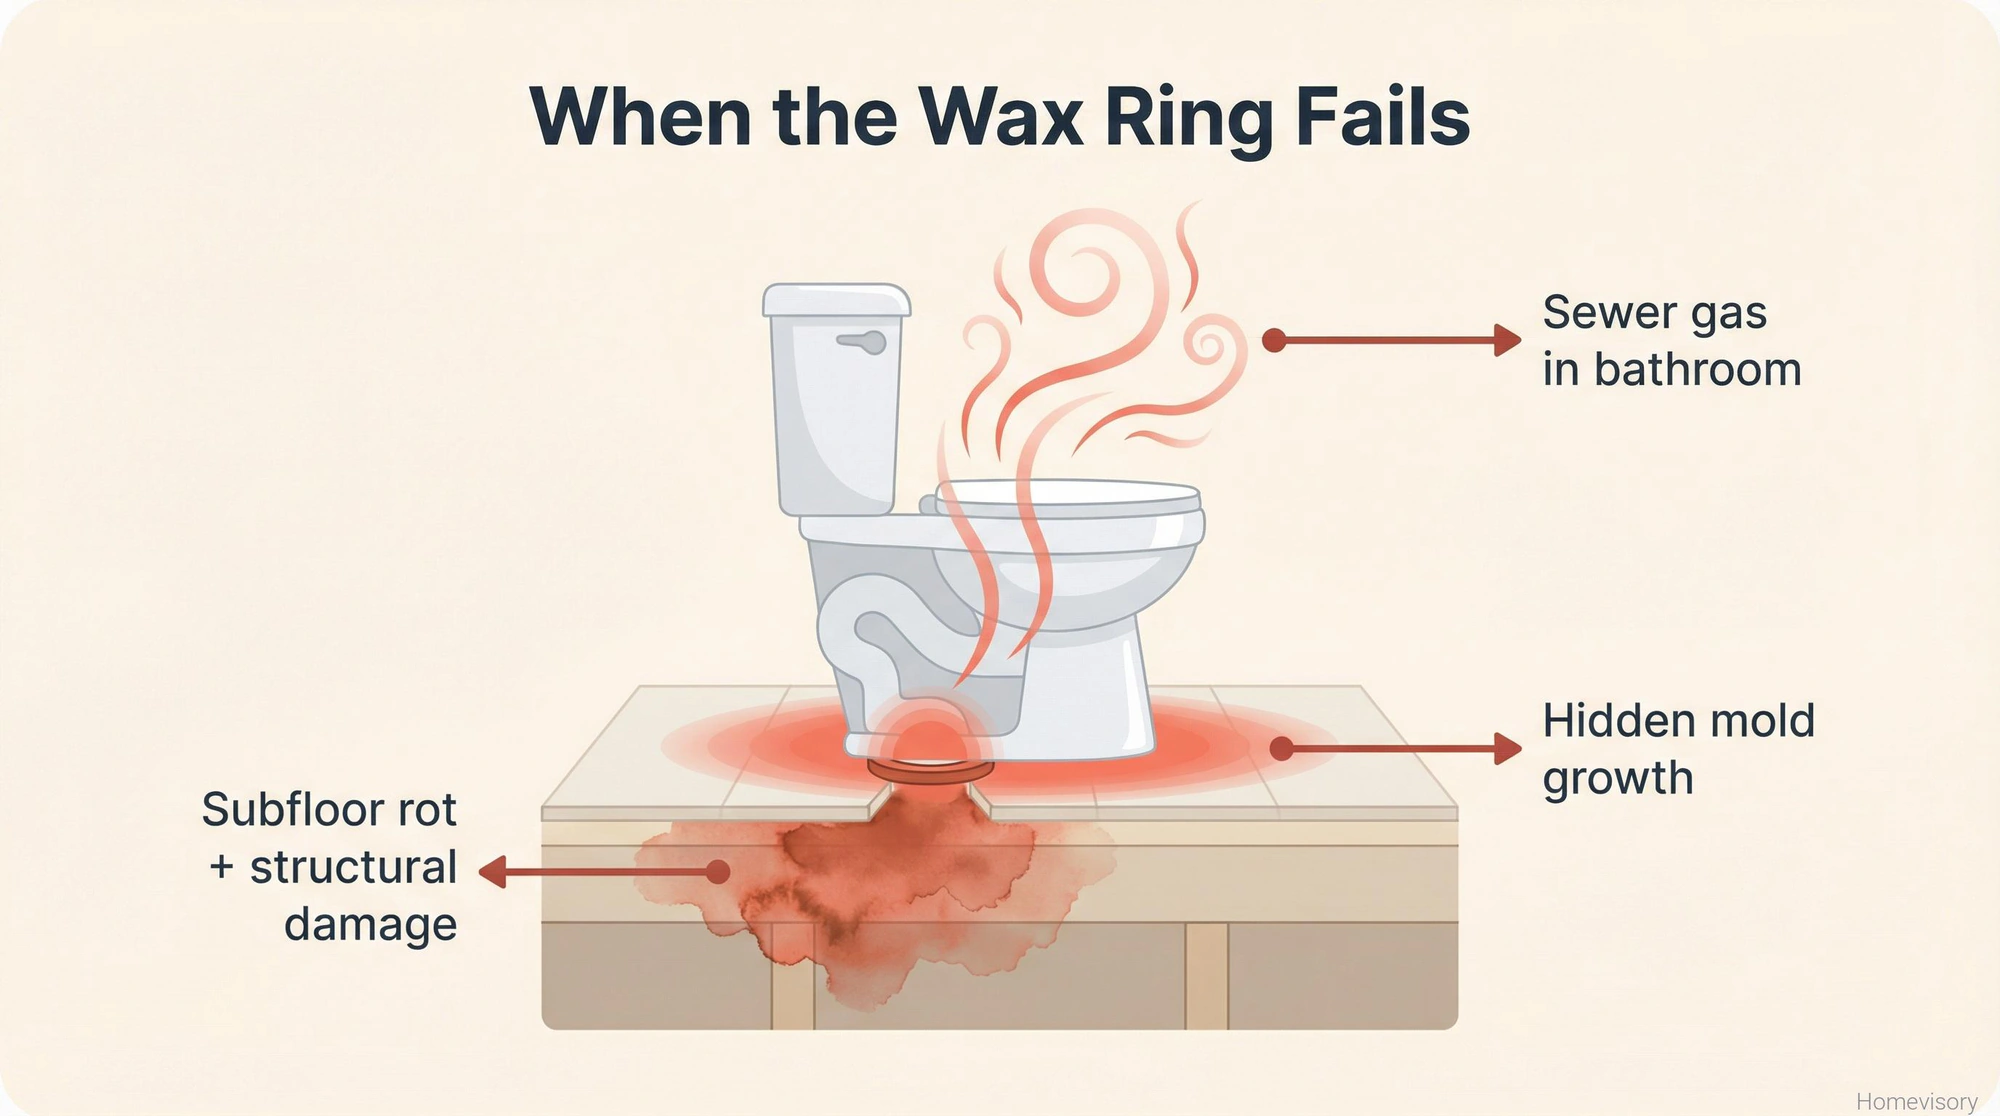
This is where I have to spend some time because this is where every DIY toilet replacement goes sideways. The wax ring. How to replace a wax ring on toilet installations is the single most important part of this whole job and people treat it like an afterthought.
The wax ring creates the watertight seal between your toilet and the sewer drain. If this seal fails, you get water damage under your floor, you get sewer gas in your bathroom, you get mold growing in places you can’t see. If you’re already dealing with a toilet leaking at the base, the wax ring is almost always the culprit. I know all of this from experience. Not from toilet work specifically but from the shower tile shortcut I took in my own bathroom in 2011. I tiled directly over old tile to save time. Eleven months later the grout cracked and tiles started popping off and when I pulled everything out the subfloor was soft and dark from water damage. Water finds every mistake you make. Raquel made me sleep on the couch because I “smelled like mold” after that demolition. I’m not making that mistake again and neither should you. The wax ring is not optional and you dont skip it and you dont cheap out on it.
When you remove the old toilet, scrape off every bit of the old wax from the flange and from the bottom of the toilet if youre reusing it for some reason. Use the putty knife. Get it clean.
How to Replace a Toilet Flange
Before you set the new toilet, inspect the flange. This is the ring mounted to the floor that the toilet bolts into. If its cracked, rusted, or broken, you need to replace it. One of the most common unexpected repairs is the cost to replace toilet flanges, which runs $145 to $300 on average if you hire it out. But you can do it yourself for under $20 in parts.
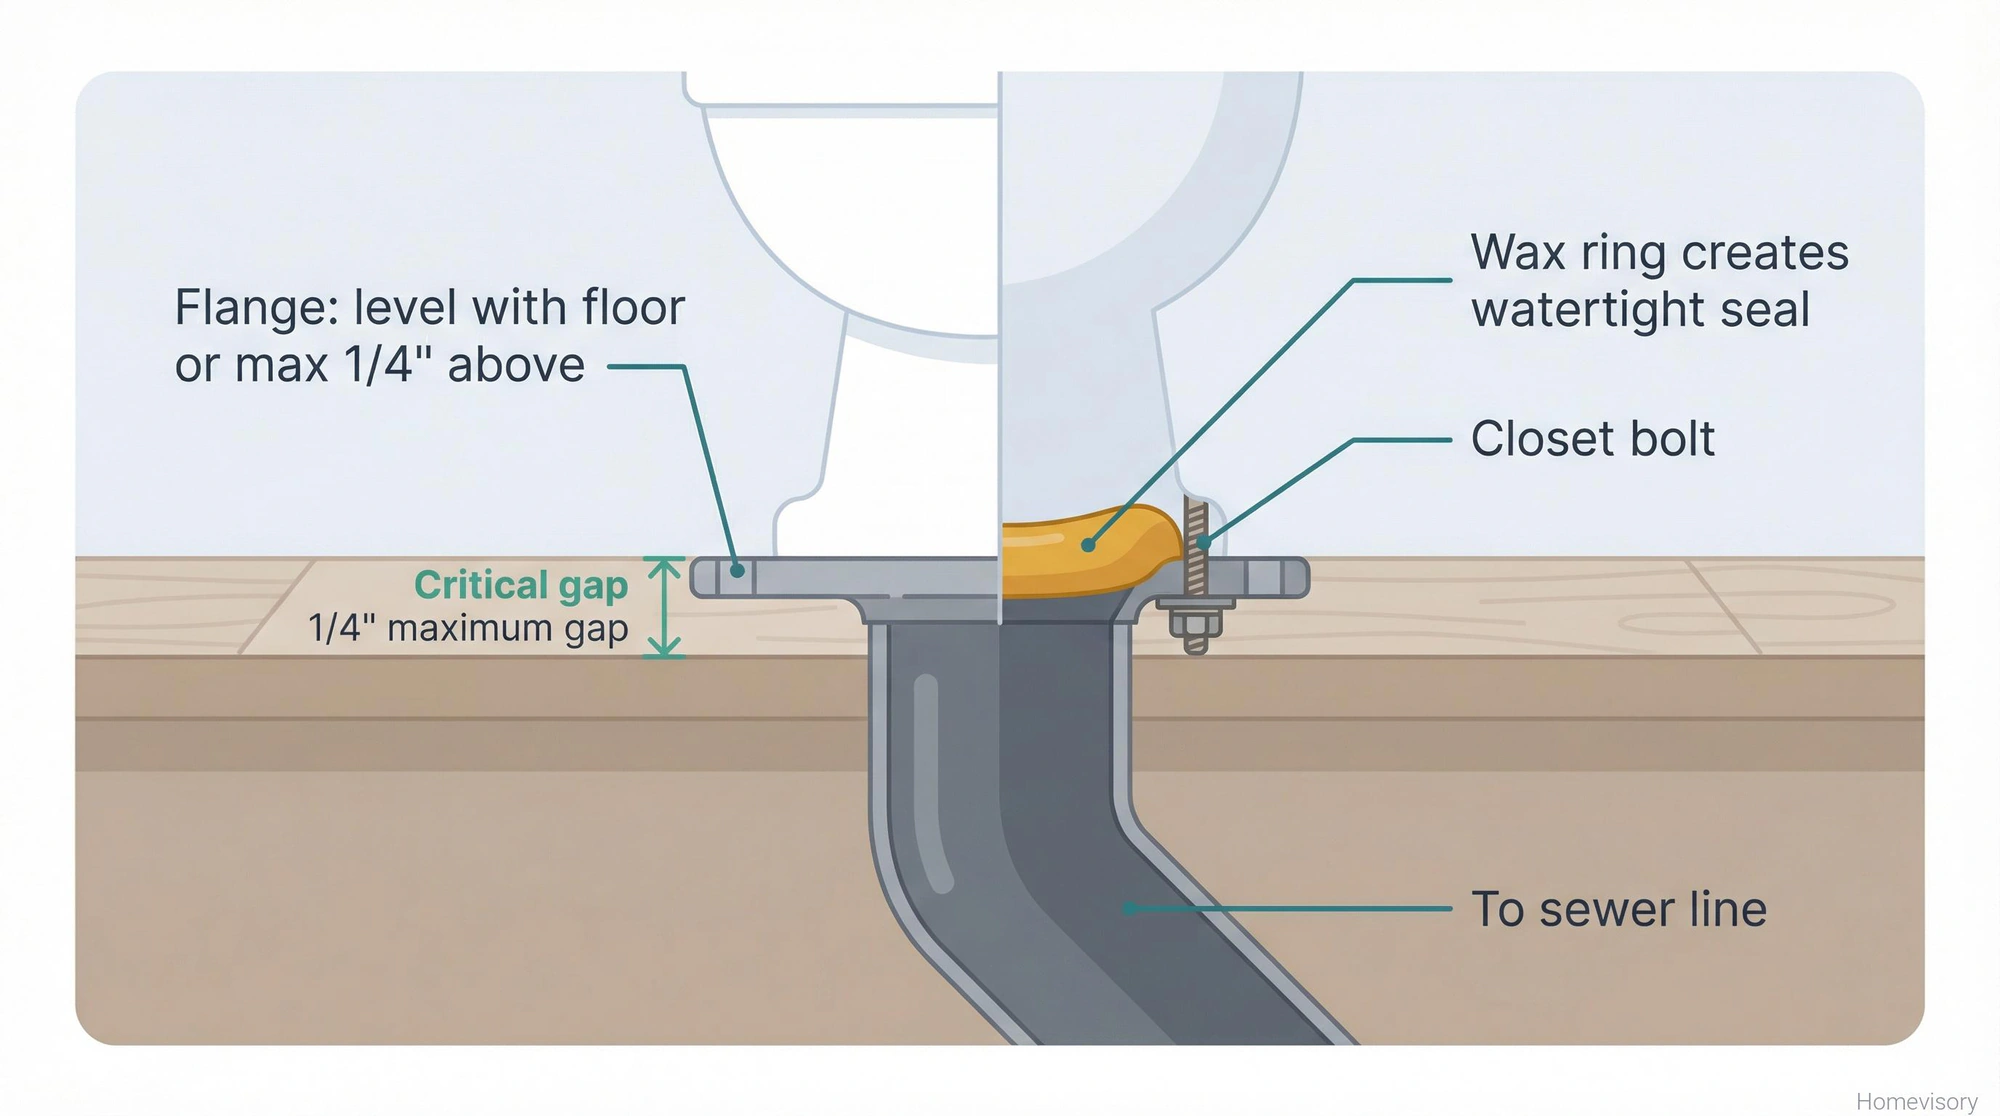
How to replace a toilet flange depends on what type you have and how badly its damaged. Most flanges are PVC now. The old one might be cast iron or brass. If just the ring is cracked but its still solidly attached, you can use a repair ring that fits over it. If the whole thing needs to come out, youre looking at cutting the old one free and gluing or screwing a new one in place.
The flange should sit on top of the finished floor, or no more than 1/4 inch above it. If your flange is too low because someone added new flooring on top of old flooring, you need a flange extender. This is critical. The wax ring needs something to seal against. If theres a gap, the seal will fail.
Mr. Davis, my old woodshop teacher, used to say “measure twice, cut once.” He was talking about lumber but it applies here. Check that flange height before you set the toilet. Check it twice. Because once that toilet is down and bolted, you dont want to find out you missed something.
Installing the New Toilet
Insert new closet bolts into the flange slots. Position them so theyre parallel to the wall behind the toilet. Some people use plumber’s putty or a little tape to hold them upright. Whatever works.
Now the wax ring. Press it onto the bottom of the toilet, centered over the outlet, with the rounded side facing the toilet. Some people put it on the flange instead. Both work. I put it on the toilet because I can see exactly where its positioned before I set the bowl down.
Wax ring or wax-free seal? Both work. The wax-free ones are a little more forgiving if you need to reposition the toilet. The traditional wax rings have been used for a hundred years and they work fine. Pick one. Moving on.
Lift the toilet, line up the holes in the base with the closet bolts, and lower it straight down. Dont twist or rock it once its down or youll compromise the seal. Press down firmly with your body weight to compress the wax ring.
Put the washers and nuts on the closet bolts and tighten them evenly, alternating side to side. Snug, not gorilla tight. Porcelain cracks. Use a level to make sure the toilet is level. If it rocks slightly, use plastic toilet shims under the base, then trim them flush.
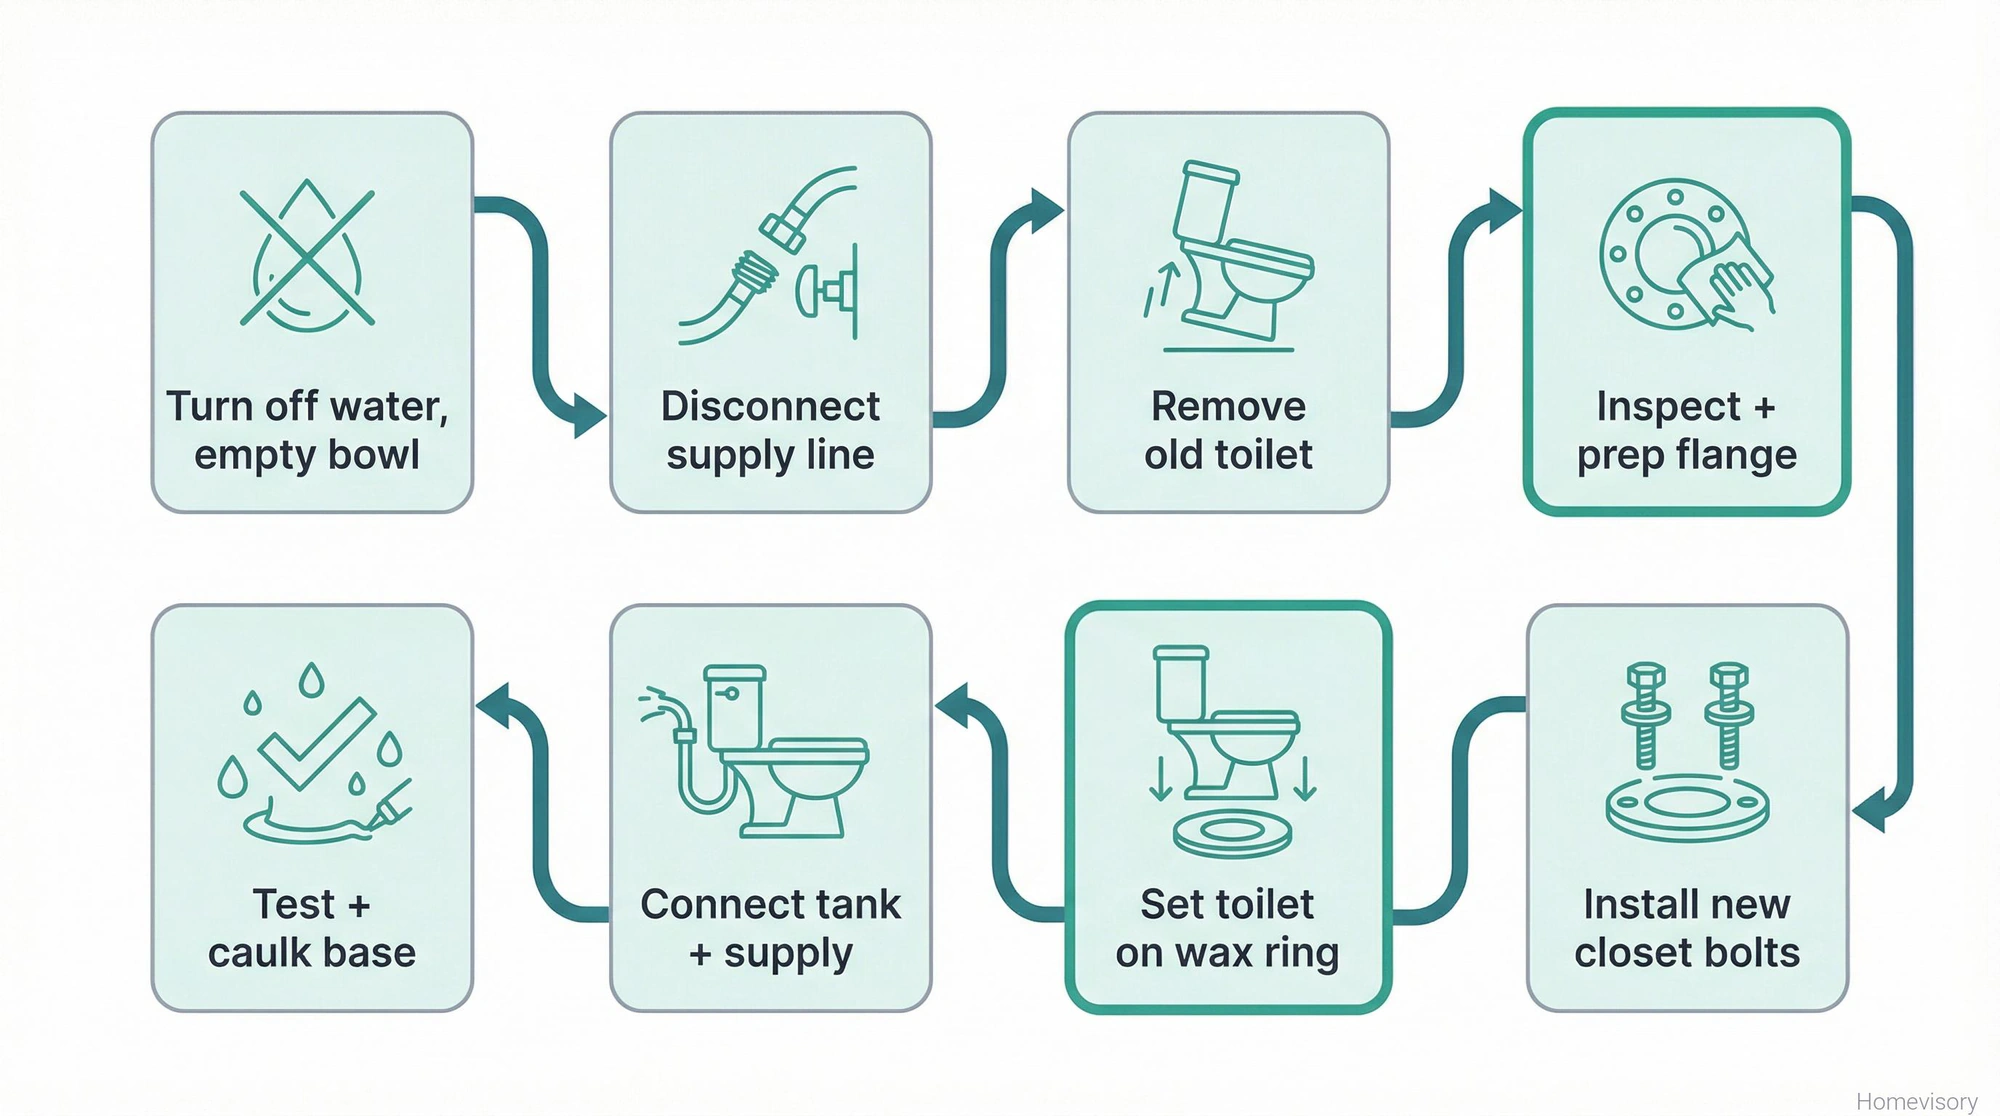
Hooking Up the Tank
If your toilet came in two pieces, now you attach the tank to the bowl. Theres a rubber gasket that goes between them and bolts that go through from inside the tank. Hand-tighten plus a quarter turn. Check for leaks before you crank on them.
Connect the new water supply line. Always use a new braided stainless steel line. The old plastic or chrome ones crack and fail. Its like $8. Just do it.
Turn the water back on slowly. Let the tank fill. Flush a few times. Check everywhere for leaks. The base, the tank-to-bowl connection, the supply line connection. If you see dripping, tighten things a quarter turn at a time until it stops.
The National Standard Plumbing Code requires at least 21 inches of clear space in front of a toilet and 15 inches from the centerline to any adjacent wall. If your bathroom barely fits those measurements, keep that in mind when positioning.
What It Would Cost to Hire This Out
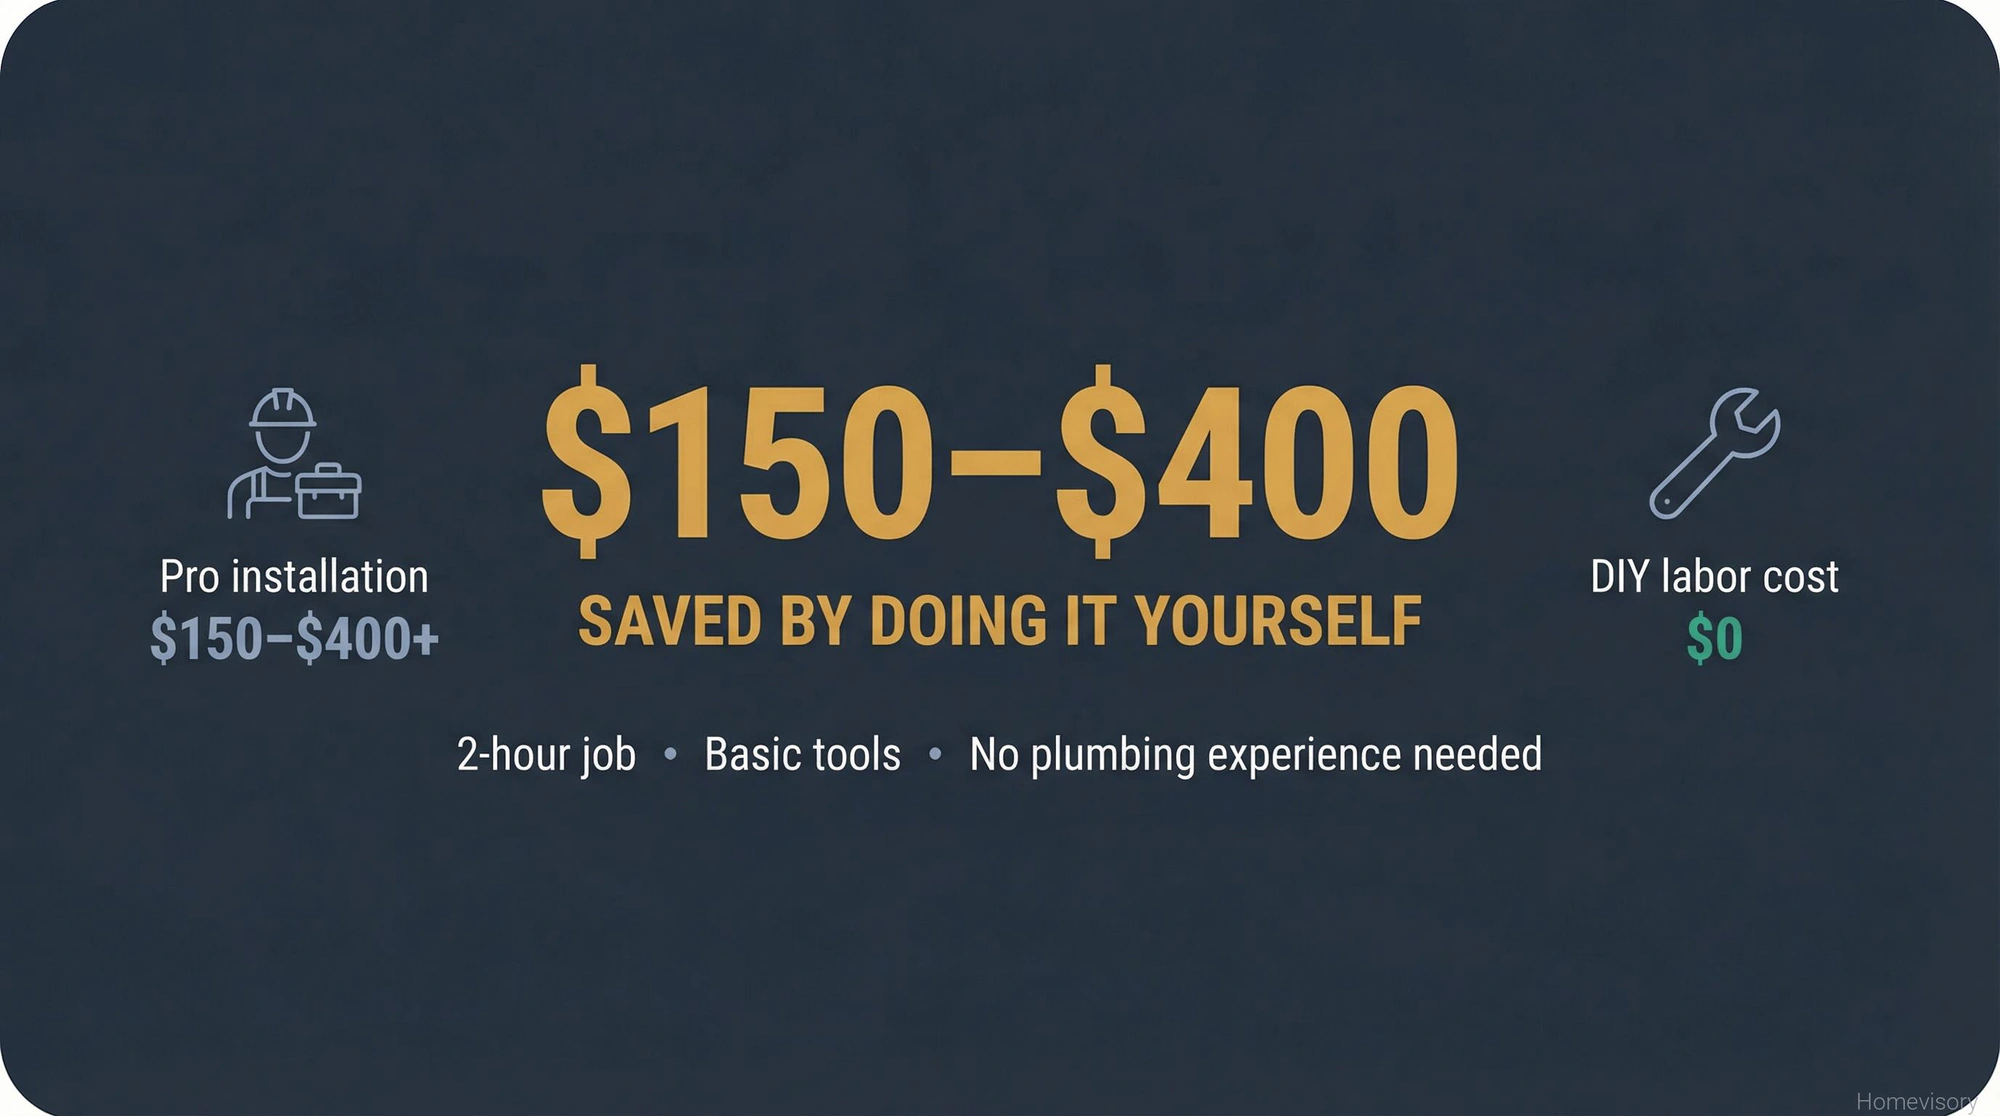
Just for reference: the labor cost to have a toilet professionally installed ranges from about $150 to $400 or more, on top of the toilet itself. Most standard toilet replacements take about one to three hours if nothing goes wrong.
So youre looking at saving $150-400 by doing it yourself. That’s real money. And this is genuinely not hard. I’ve seen people panic about this job and pay someone to do something they absolutely could have handled with a YouTube video and two hours.
This is not hard. If you can tighten a nut with a wrench, you can replace a toilet.
After Installation
Apply a bead of caulk around the base where it meets the floor. Some people skip this. I dont. It looks cleaner and it keeps dirty mop water from getting under the toilet. Leave a small gap at the back if you want, so you can spot a leak if one ever develops.
Flush it a dozen times over the next couple days and check the base for any moisture. If the wax ring sealed properly, there wont be any.
Done.
At Homevisory, we built a system to help you track every maintenance task for your home, including the stuff that’s easy to forget. Toilet installation is a one-time project, but knowing when to check your supply lines, inspect your wax seal, and maintain your bathroom fixtures is ongoing. Sign up free with our Homevisory home task manager and let us help you stay on top of it. Thats what we do here at Homevisory.
If youre not replacing the whole toilet and just need to fix a specific problem, our complete toilet repair guide covers everything from running toilets to leaks at the base.