
Why You’re Probably Doing This Wrong
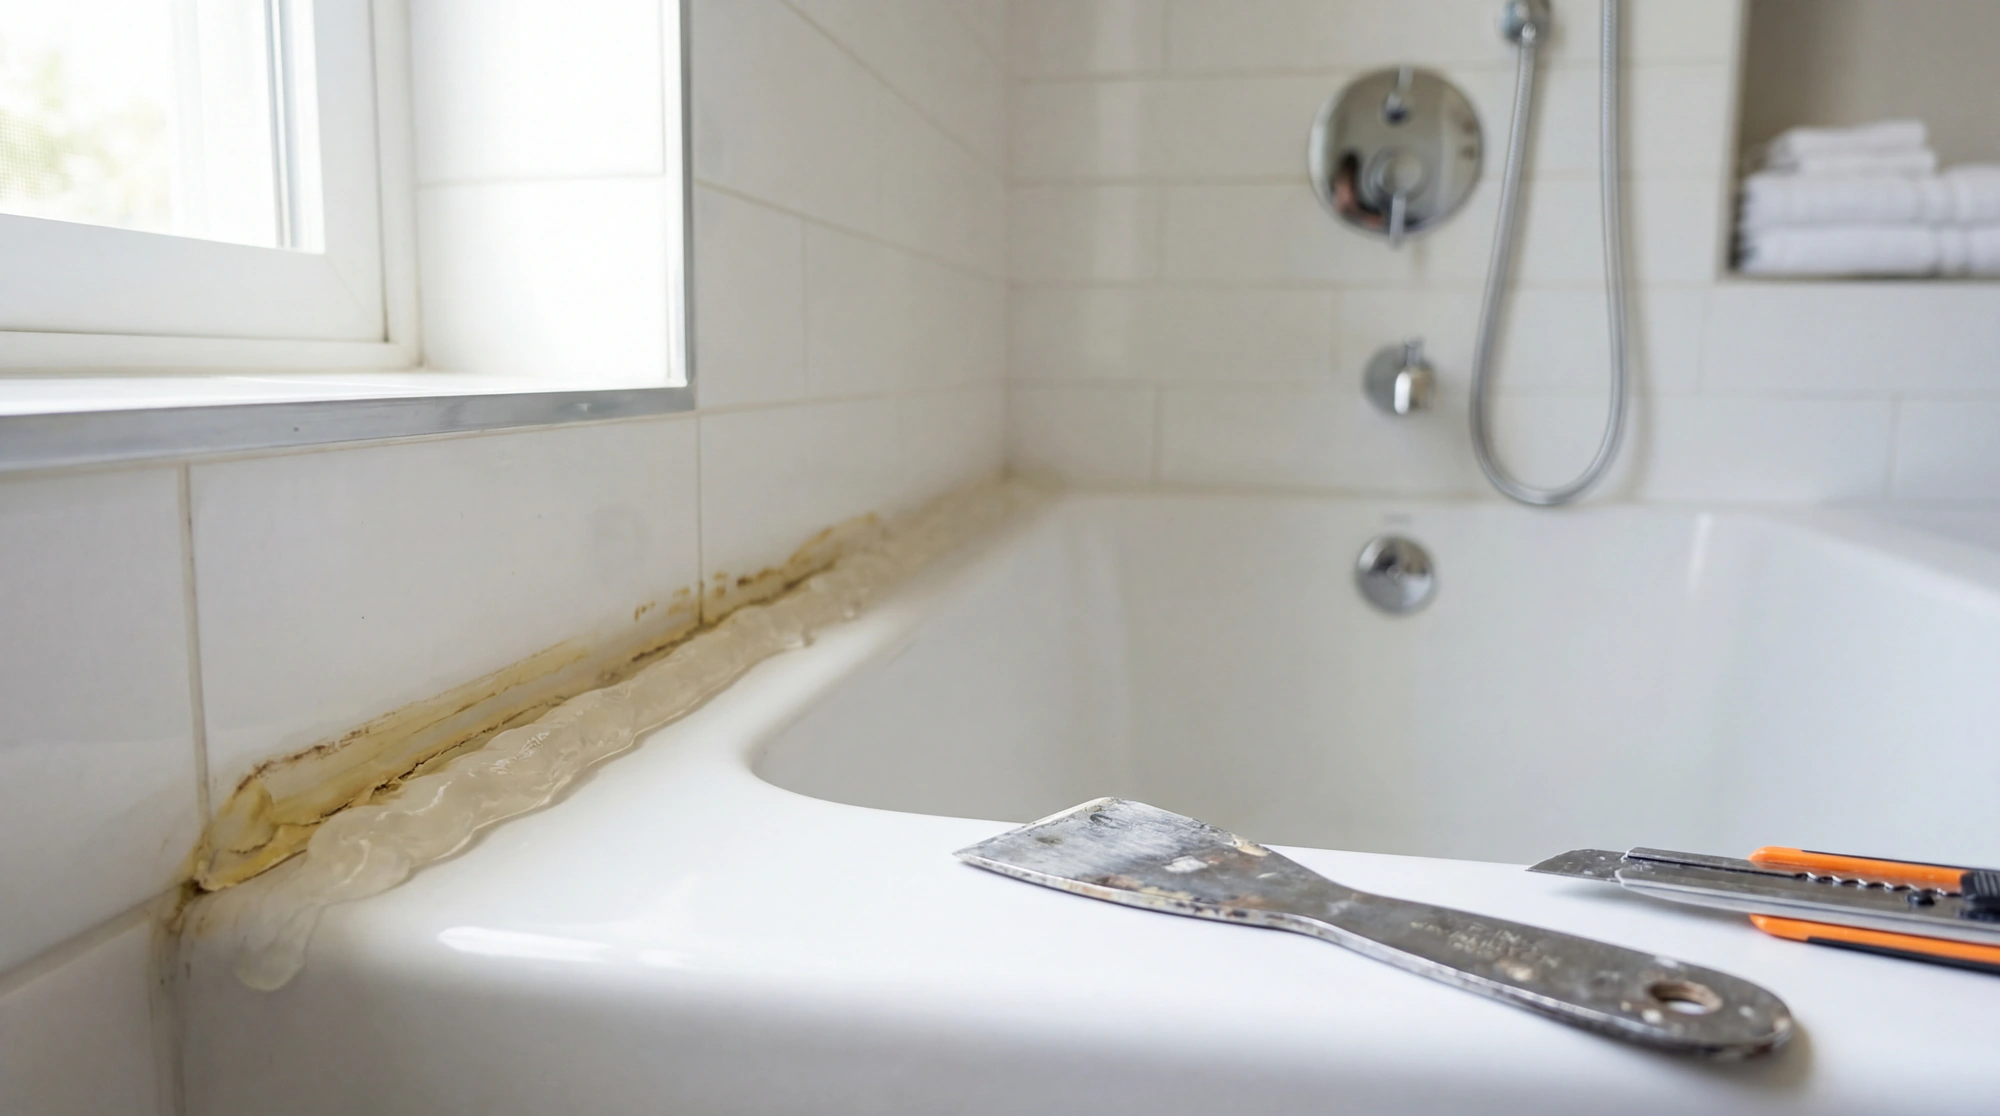
Most people who ask me how to remove silicone caulk are asking because they already tried once and made a mess. They grabbed a utility knife, started hacking at it, maybe got half of it off, and now theyre looking at a ragged edge of old caulk thats bonded to the surface like it was welded there. Or worse, they scratched the tub.
The thing about silicone caulk is that its designed not to come off. Thats the whole point. You put it there because you want a waterproof seal that lasts for years. So when you decide you want it gone, youre working against the product’s entire purpose. This isnt like peeling tape. This is a fight, and the caulk has home field advantage.
But you can win. You just have to be patient.
The Tools You Actually Need
There are fancy caulk removal tools out there. Oscillating multi-tools with scraper attachments. Specialty curved blades. Things that look like medieval dental instruments. Some work. Some dont. I use a five-in-one painter’s tool and a utility knife. Moving on.
Heres what you need:
- Utility knife with fresh blades (not the dull one in your junk drawer)
- Five-in-one painter’s tool or a stiff plastic scraper
- Caulk remover gel (DAP makes one, so does 3M)
- Rubbing alcohol or mineral spirits for cleanup
- Old toothbrush
- Rags you dont care about
- Patience
The last one costs nothing but most people refuse to spend it.
The Part Everyone Skips
This is where I’m going to spend more time than you probably want because this is where everyone fails. The softening process. If you skip this section or skim it because you think you can just muscle through old silicone caulk with a blade, go ahead. I’ll see you back here in an hour when youre frustrated and the caulk is still there.
My dad worked in a factory in Atlanta for years and he used to say you have to wait for the machine to cool down before you work on it. He wasnt talking about caulk. He was talking about some industrial press that would burn you if you touched it too soon. But the principle applies to everything that involves waiting. You dont rush a process that has a required wait time just because youre impatient.
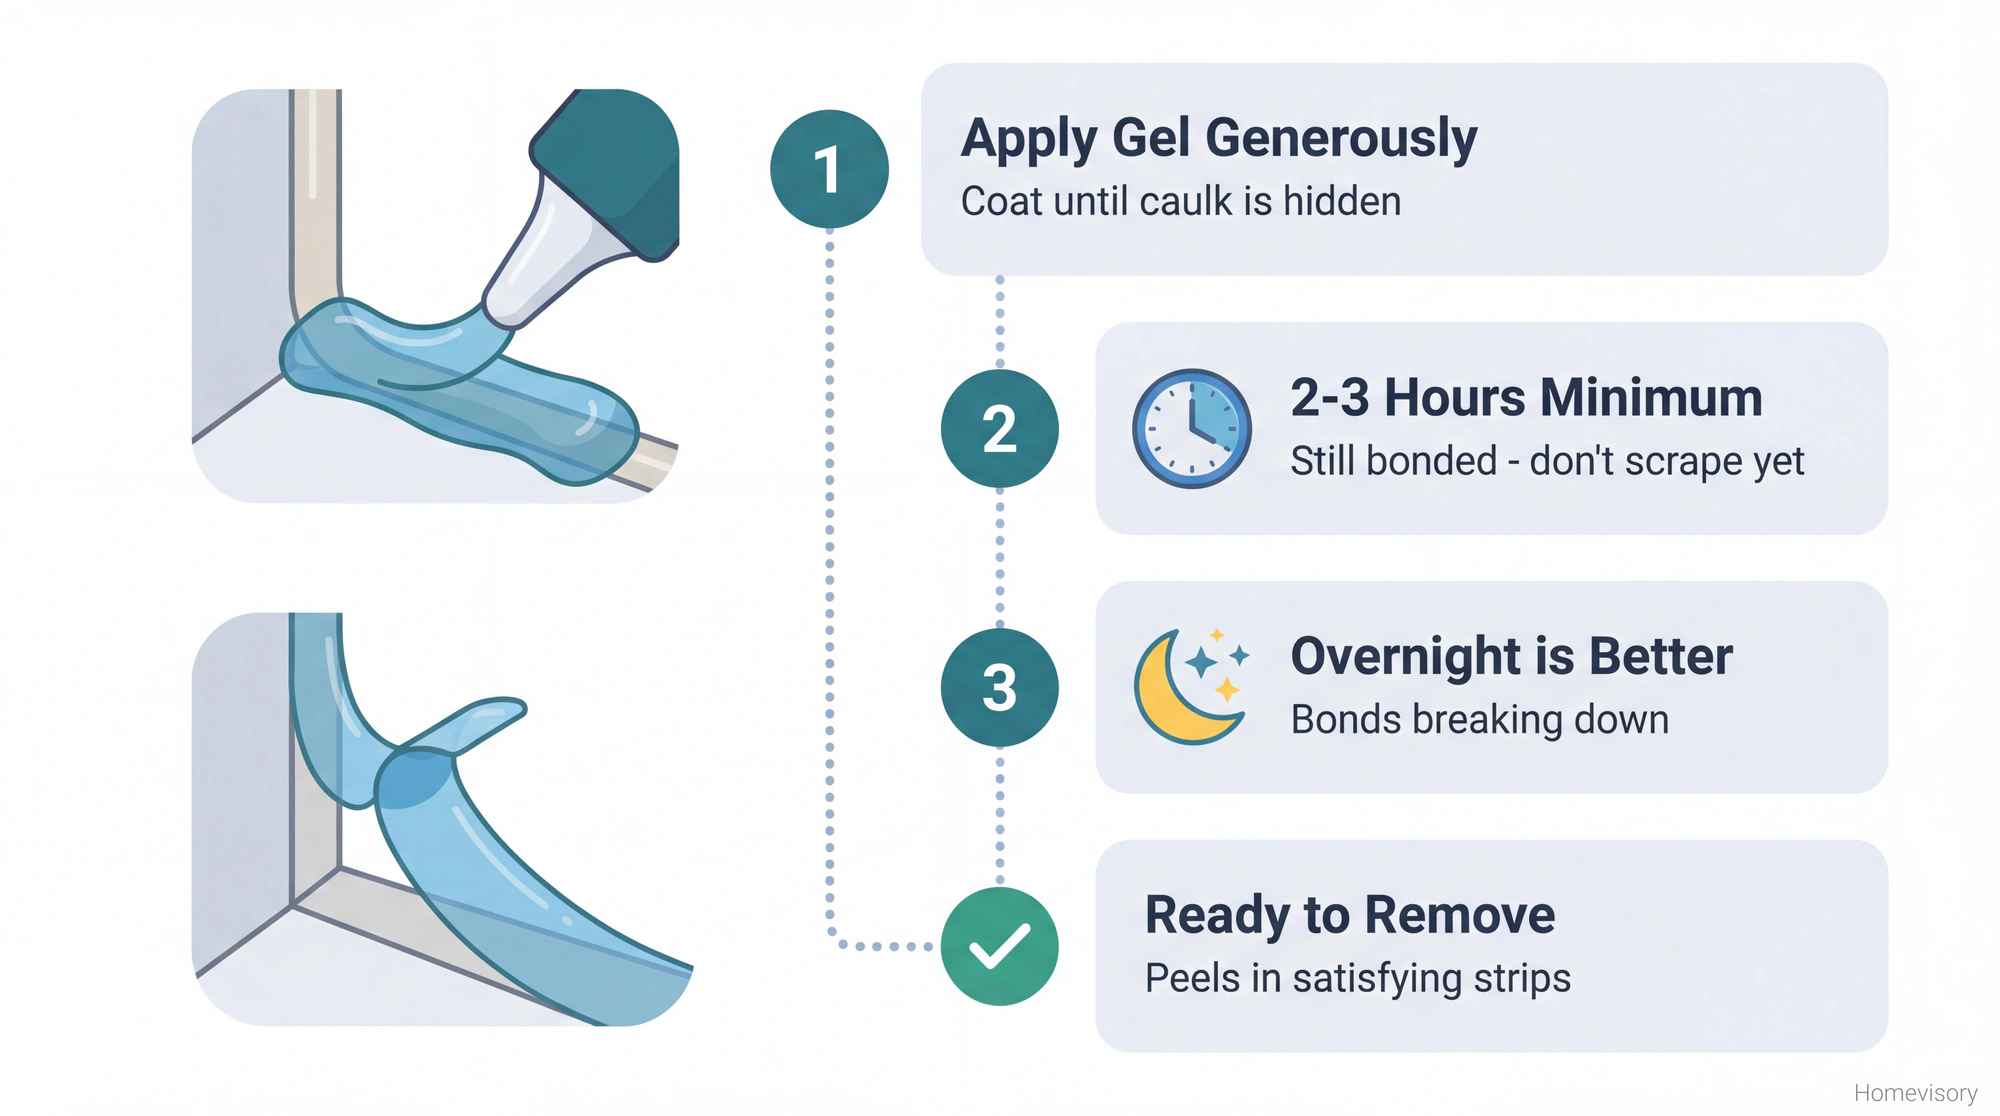
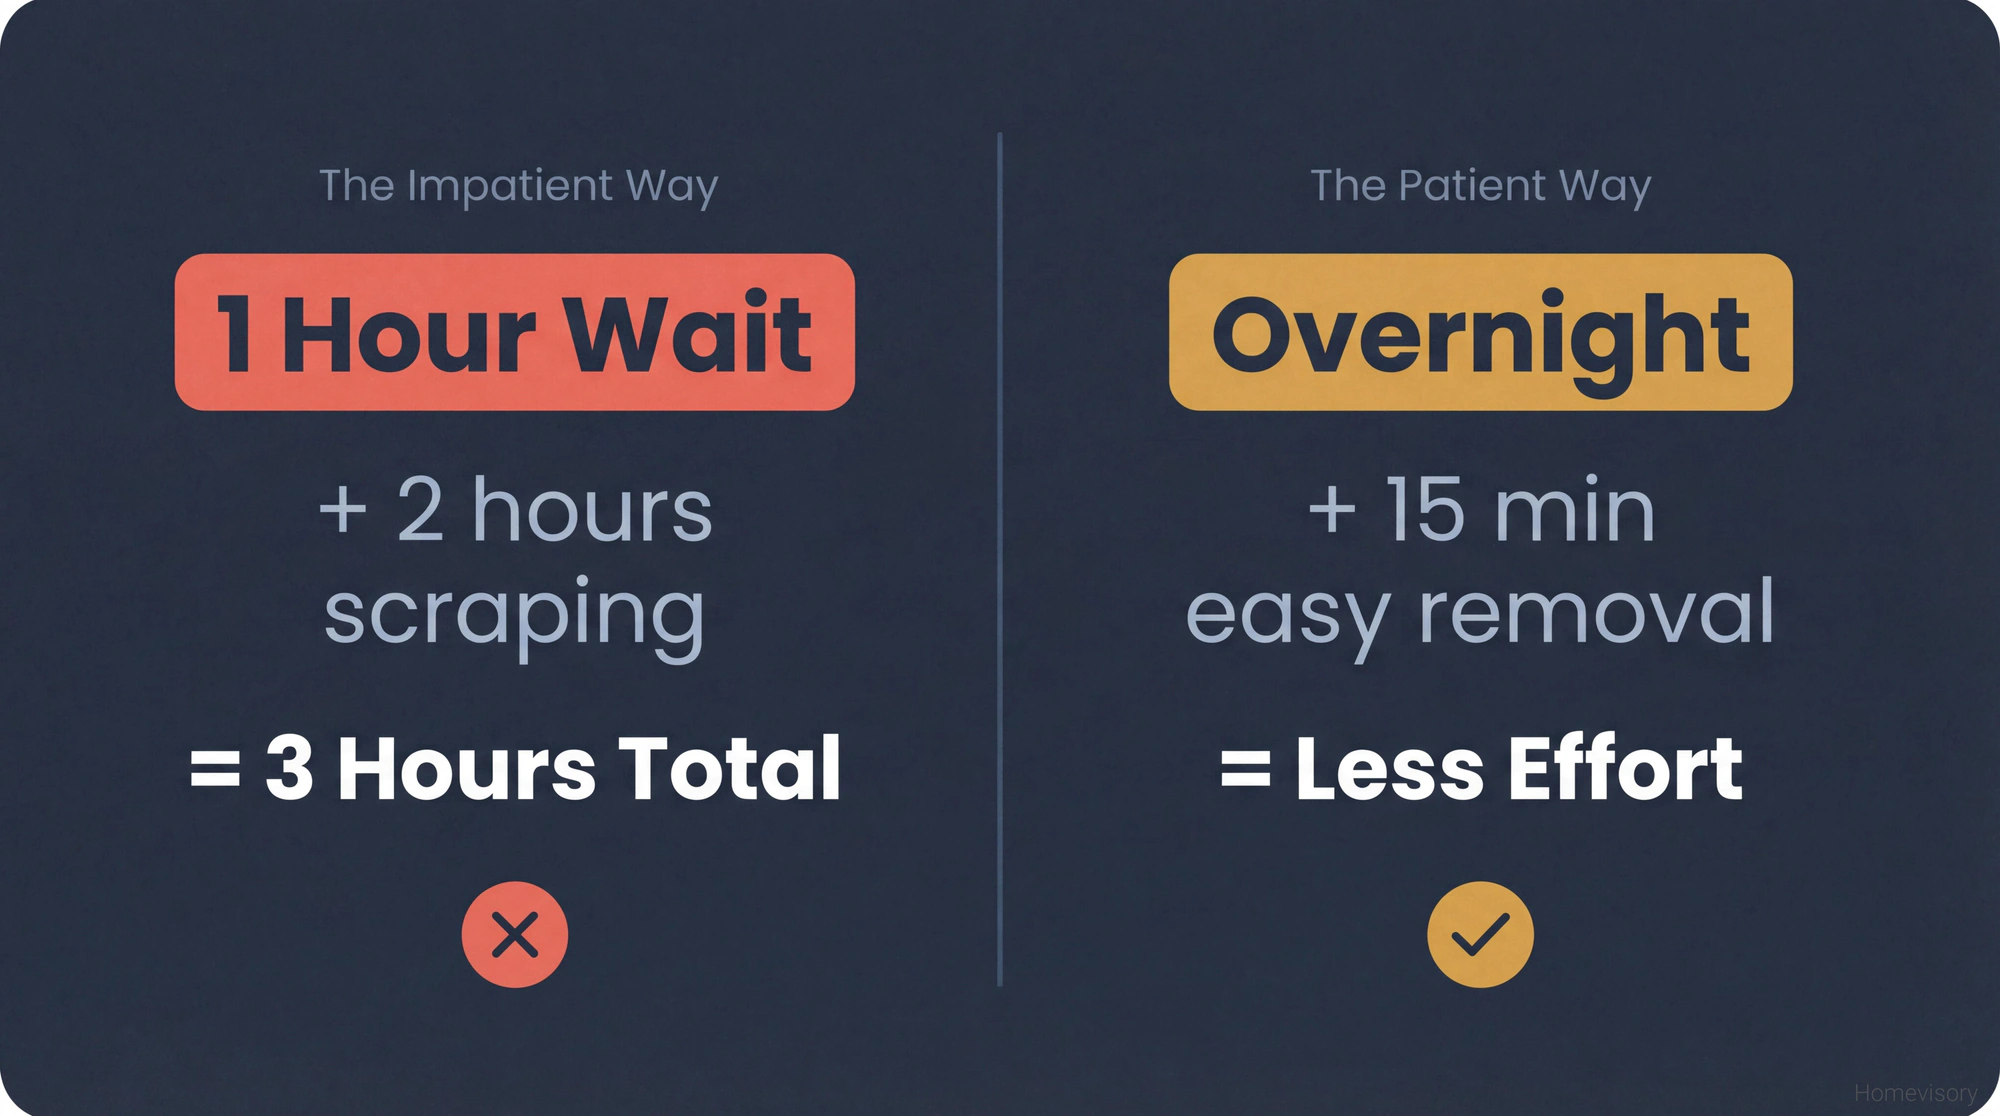
Caulk remover needs time to penetrate and break down the silicone bond. The bottle says 2-3 hours. Thats the minimum. I leave it overnight when I can. I’ve had jobs where I applied the remover at 4pm, went home, came back the next morning, and the caulk peeled off in long satisfying strips like string cheese. I’ve also had jobs where someone on my crew got impatient after an hour, started scraping, and we were picking out little bits of silicone for another two hours. One approach takes patience. The other takes patience AND extra work. The math is not complicated here.
Apply the caulk remover gel in a thick line directly over the old caulk. Really coat it. If you can still see the caulk through the gel, add more. Cover it with plastic wrap if you want to keep it from drying out, especially in a bathroom with good ventilation. Then leave. Go do something else. Stop checking on it.
How to Remove Caulk From Shower Surrounds
This is where I have personal experience I wish I didnt have.
Back in 2011 I did something stupid in my own bathroom. I tiled directly over old tile because I was trying to save time on a personal project. Not for a client. For me. Eleven months later the whole thing failed, grout cracked, tiles popped off, water got behind everything. When I finally demoed it, the caulk situation was a nightmare because there were multiple generations of it. The original caulk from whenever the house was built. A layer someone added later. My layer on top of that.
Removing caulk from a shower when theres only one layer is straightforward. Softener, wait, scrape. But when you find multiple layers, or when the caulk has failed and water got behind it, youre dealing with something thats basically fused to the surface. You have to get all of it. If you leave any residue, your new caulk wont bond right and youll be doing this again in a year.
After the softener has done its job, start with the utility knife. Run the blade along both edges of the caulk bead, cutting it free from the surfaces on each side. Youre not trying to remove it yet. Youre just breaking the seal. Then switch to the scraper or the five-in-one and get under the caulk, pushing it away from the surface. It should come up in strips or chunks. If its still fighting you, it needs more time with the softener. I mean it. Apply more gel and wait another few hours.
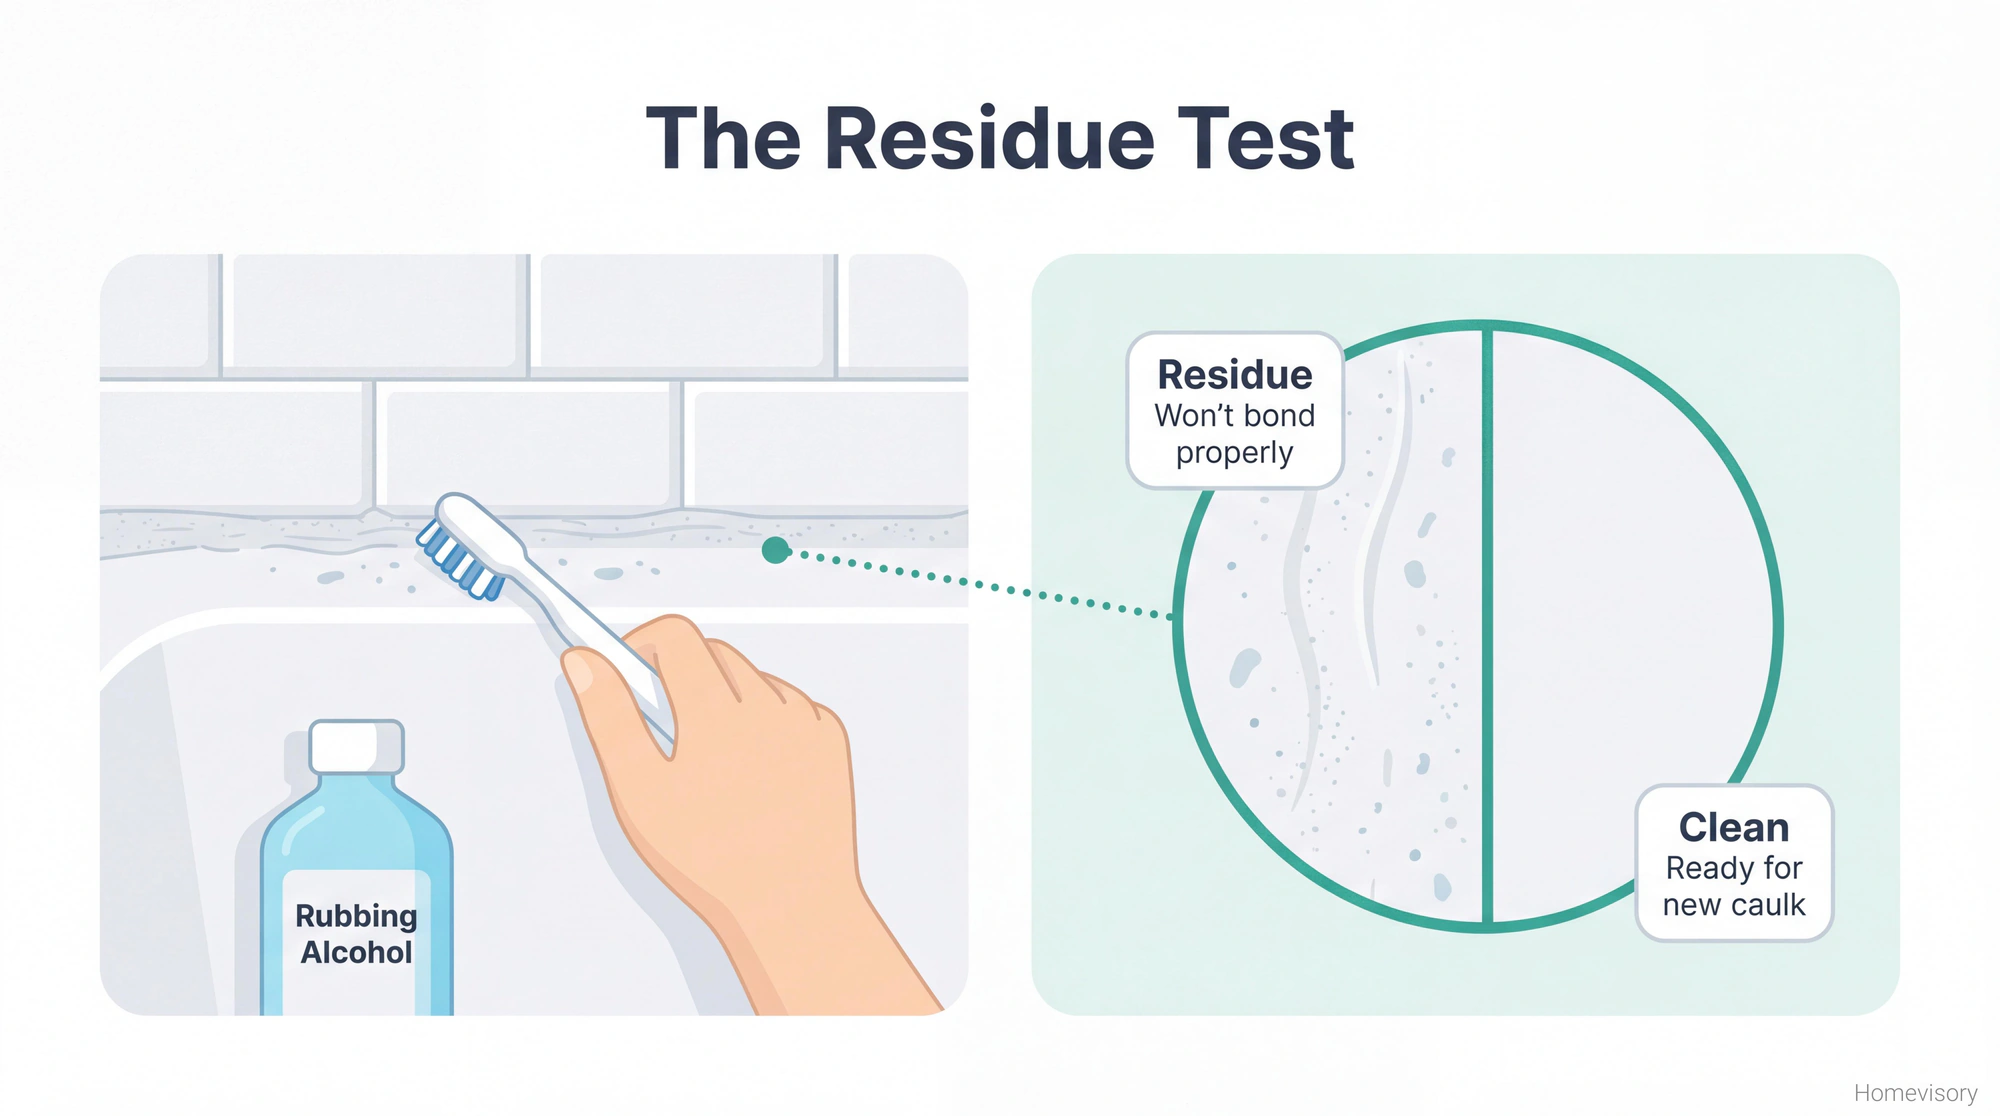
For the residue, and there will be residue, this is where the old toothbrush comes in. Apply a little rubbing alcohol and scrub the surface. You want it completely clean before you recaulk or the new stuff wont stick.
Caulk removal is prep work for a bigger job. Our complete bathroom cleaning guide covers the full picture — grout, tubs, mold prevention, and everything else that keeps your bathroom watertight.
Silicone vs Latex Caulk
Quick distinction because it matters for how to remove old caulk.
Latex caulk is easier. Its water-based, less flexible, and it doesnt bond as aggressively. You can often scrape it off with just a putty knife and some effort. Warm water helps soften it.
Silicone caulk is the difficult one. Its waterproof, flexible, bonds to everything, and laughs at your scraper. Thats why you need the chemical softener. If you dont know which type you have, assume its silicone and treat it accordingly. Better to over-prepare than to waste an hour scraping something that wont scrape.
There are also hybrid caulks now, silicone-modified latex, which have properties of both. Treat those like silicone.
The Heat Gun Thing
I’m not getting into heat guns here. You can burn yourself. You can scorch the surface. You can warp plastic tub surrounds. For most bathroom jobs you dont need one, and for the jobs where heat actually helps, youre probably better off calling someone who does this regularly. If you insist on trying it, low heat, keep it moving, and dont blame me when you melt something.
A Word About That Client
I had a client once, this was in Texas, who had caulked over old caulk three times. Three times. Each time the caulk failed, he just added more on top. When I finally opened up that shower corner it was like looking at geological strata. I could have dated each layer if I’d had the right equipment. The oldest stuff at the bottom was hard as a rock. The middle layer was that weird in-between state where its not soft but not hard either. The top layer was his most recent attempt, maybe six months old, already pulling away from the tile because it was bonded to old failing caulk instead of the actual surface.
He asked me why his caulk kept failing. I showed him the cross-section. He said he thought adding more caulk would seal it better. I told him thats not how caulk works. You cant fix a foundation problem by adding more paint.
Whatever. The point is, when youre learning how to remove caulk, you have to remove all of it. Dont add new caulk over old caulk. It doesnt work.
After Its All Out
Once the old caulk is gone and the surface is clean, let it dry completely before you recaulk. Im talking 24 hours minimum in a bathroom. The surface needs to be bone dry or the new caulk wont adhere properly and youll be doing this all over again next year.
While youre waiting, inspect what was behind the caulk. If you see any black spots, thats mold. If the surface feels soft, thats water damage. Either of those means you have a bigger problem than caulk removal, and you should deal with it now before you seal it back up.
I helped my dad caulk something when I was a kid. The tub or the kitchen sink, I cant remember which. Maybe it was both. He made me clean the old caulk out with a screwdriver because we didnt have proper tools. Took forever. He kept saying I missed spots and making me go back over it. I remember being annoyed because I wanted to be done and go outside. I dont know. Maybe thats why I care so much about the prep work now.
Anyway.
The Homevisory Approach
The thing about caulk removal is that its not hard, its just tedious. And people skip the tedious parts and then wonder why the job didnt turn out right. Thats true for most home maintenance. The actual skills arent complicated. The discipline to do every step, including the boring ones, is whats rare.
Thats what we do at Homevisory. We help you stay on top of all these tasks, including the ones that are easy to forget or postpone, so you dont end up with a bigger problem down the road. The free Homevisory home task manager keeps track of everything, from seasonal maintenance to little stuff like inspecting your caulk before it fails. You can sign up at no cost and start getting reminders that actually help you take care of your home the right way.
Because removing old caulk once is enough. Nobody wants to do it twice.