
What Nobody Tells You About Installing a Water Softener
I’ve been asked how to install a water softener more times than I can count and the answer is always the same: it depends. Depends on your water, depends on your house, depends on whether you’re comfortable cutting into your main water line or not. Some people hear “water softener” and think its a weekend project. For some of you it will be. For others, you’re going to get three hours in, realize you need a permit, and call a plumber anyway.
Thats fine. No shame in it. But let’s figure out which camp you’re in before you start buying equipment.
Why Hard Water Matters (And Why Most People Ignore It)
Hard water isn’t dangerous. You can drink it, cook with it, bathe in it. The problem is what it does to everything else. If you’re not sure whether you need a softener, start with our hard water solutions guide for the full picture, or read how to fix hard water for all your options. Your water heater, your pipes, your dishwasher, your washing machine, your shower heads, your coffee maker. Calcium and magnesium build up inside everything and slowly choke the life out of your appliances.
I grew up on well water in Texas. My parents had hard water so bad you could feel it on your skin after a shower. That sticky, film-like residue that soap doesn’t quite wash off. My mom Shirley would scrub the shower every week and within three days there’d be white spots on the glass again. She blamed us kids for not wiping down the doors. It wasn’t us. It was the water.
They finally got a softener installed when I was in high school. The difference was immediate. Anyway.
Step One: Test Your Water Before You Do Anything Else
You need to know two things before you start shopping for equipment:
- How hard is your water (measured in grains per gallon or GPG)
- What else is in your water (iron, manganese, sediment)
If you’re on city water, call your municipal water department. They’ll send you a water quality report or tell you where to find it online. If you’re on well water, you need a test kit or a lab analysis. The kits from the hardware store work fine for hardness. They’re like $15.
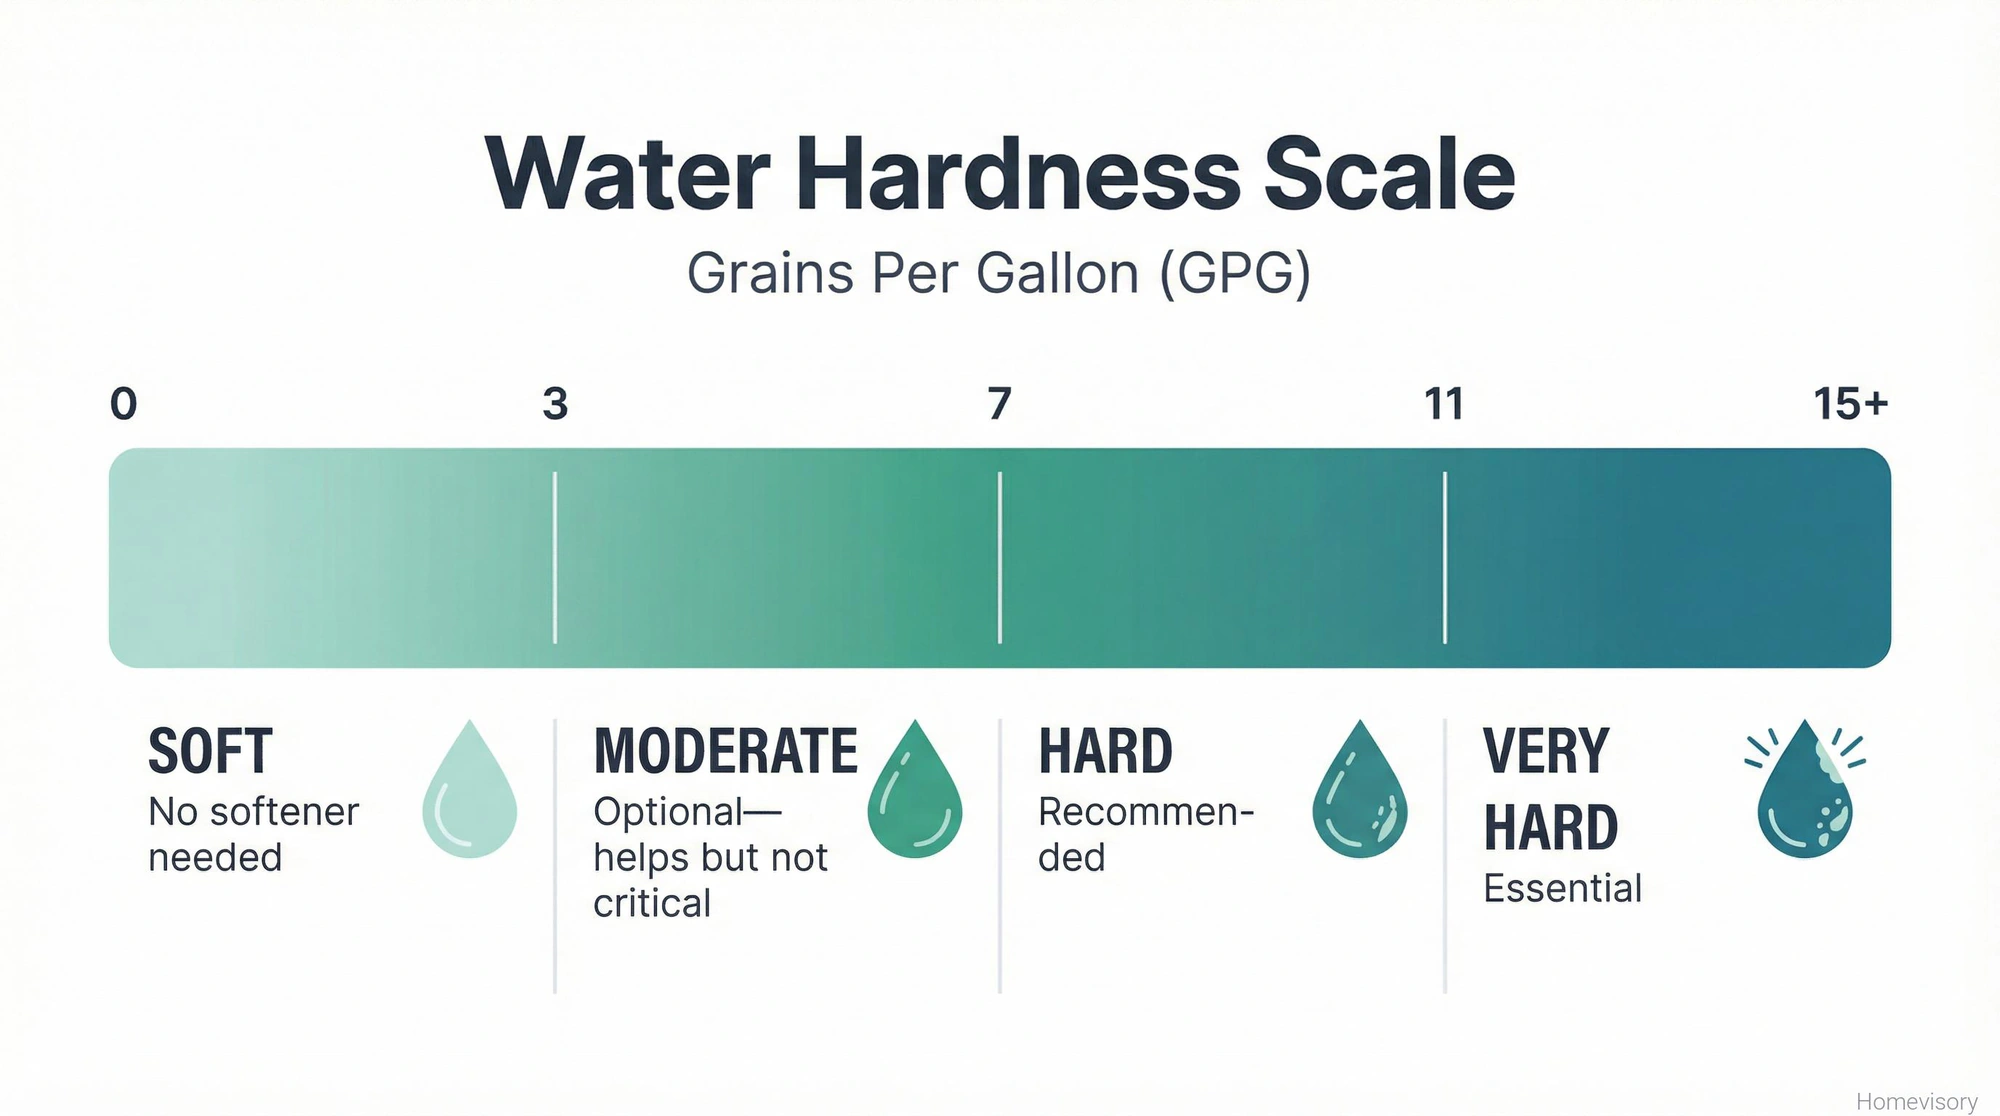
Hardness levels:
- 0-3 GPG: Soft. You probably don’t need a softener.
- 3-7 GPG: Moderately hard. A softener would help but isnt critical.
- 7-11 GPG: Hard. You should probably get one.
- 11+ GPG: Very hard. You definitely need one.
Most of the U.S. has hard water. Not everywhere. But most places. If you’re on well water, the selection process is different because of iron and other contaminants — our guide on the best water softener for well water covers what to look for.
How to Size a Water Softener (This Is Where People Mess Up)
Here’s where I’m going to spend some time because I’ve seen this go wrong so many times. The sizing question, how to size a water softener correctly, is the difference between a system that works great for fifteen years and one that runs constantly and dies in five.
Water softeners are rated in “grains” of capacity. You’ll see numbers like 24,000, 32,000, 48,000, 64,000. That number tells you how much hardness the system can remove before it needs to regenerate. Regeneration is when the system flushes the resin bed with salt water to clean it out and start fresh.
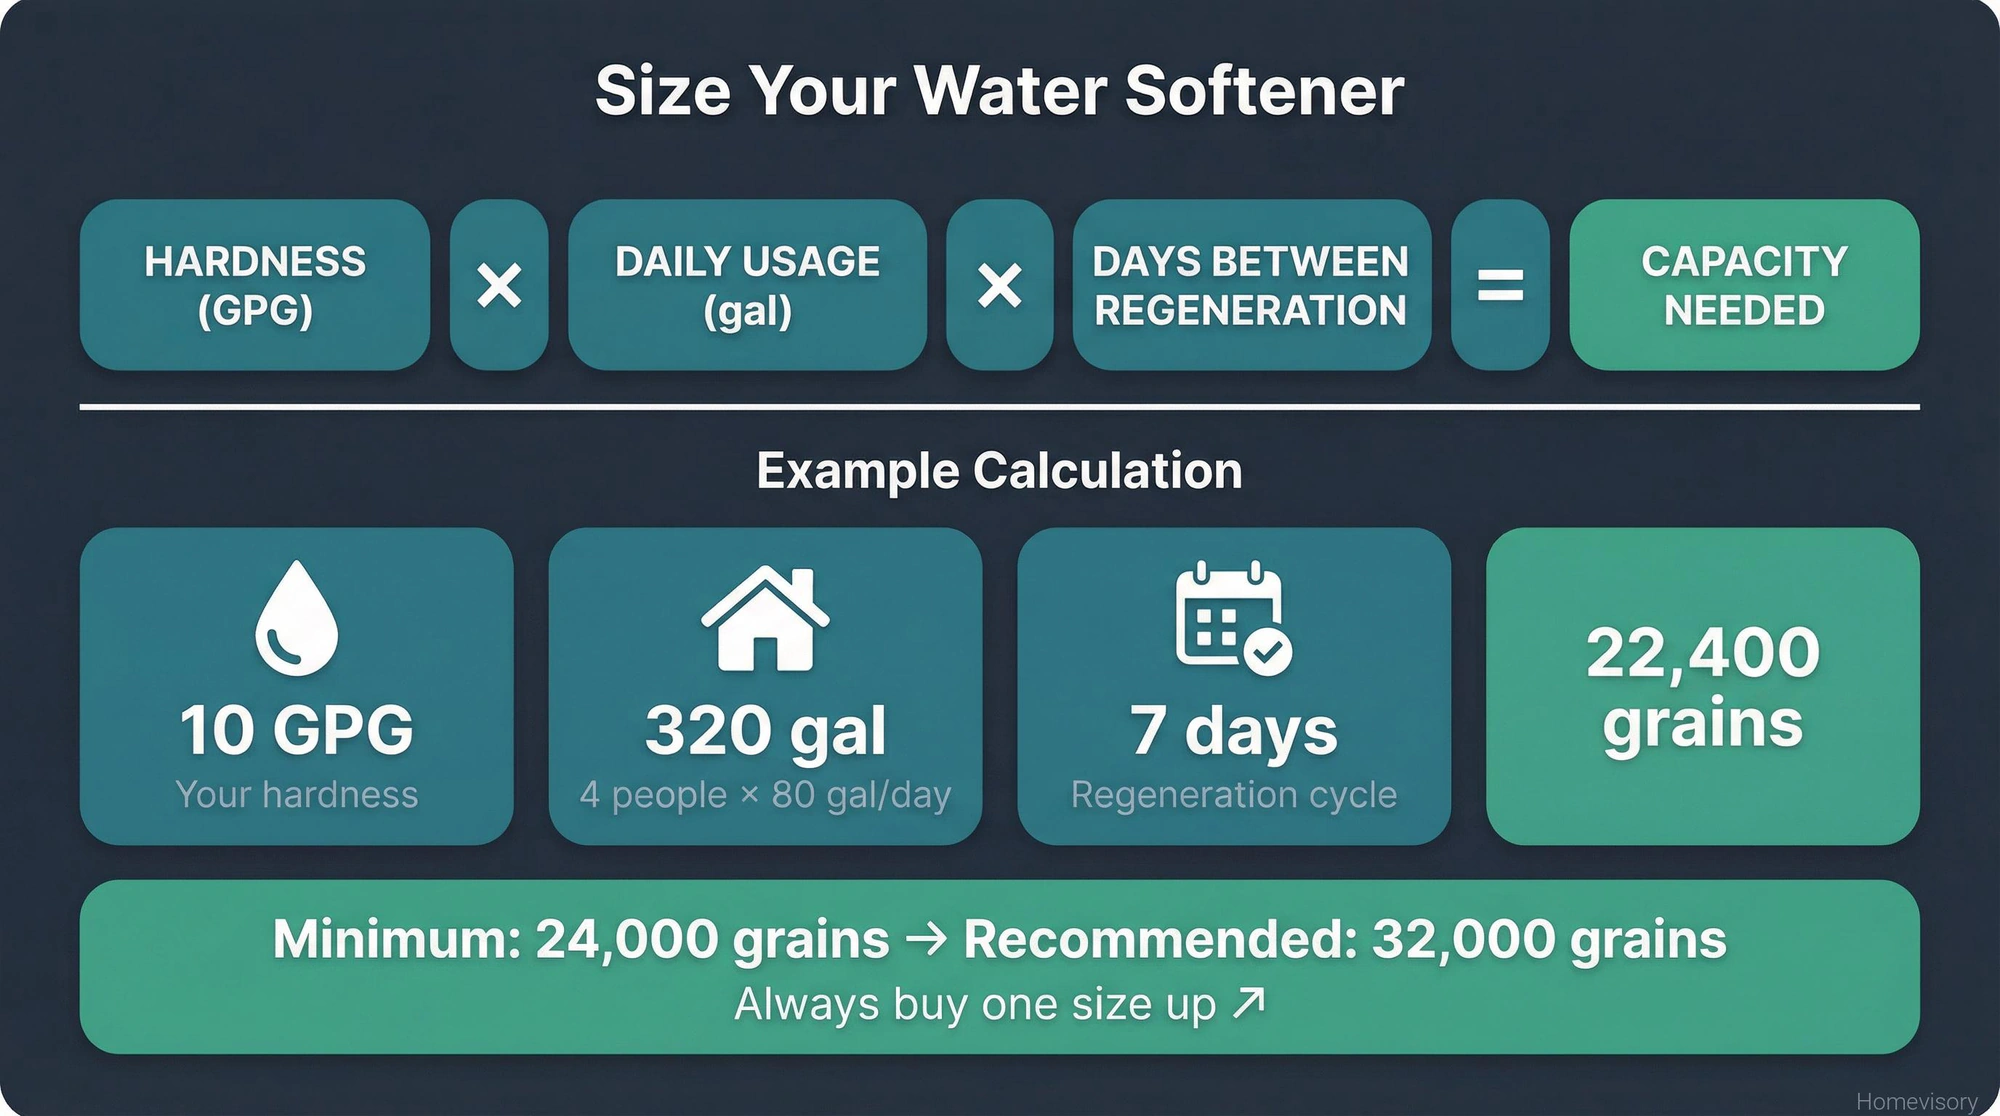
The formula is simple. Multiply your hardness (GPG) by your daily water usage (gallons) by the number of days between regenerations. Most systems regenerate every 7-10 days. Some do it more often.
So let’s say you have 10 GPG hardness, your family uses 80 gallons per person per day, there’s four of you, and you want to regenerate every 7 days:
10 GPG × 320 gallons/day × 7 days = 22,400 grains
That means you need at least a 24,000 grain system. But here’s where people get into trouble and I’ve seen this happen more times than I want to admit. They see the 24,000 grain unit for $700 and the 32,000 grain unit for $850 and they think they’re being smart by saving $150. What they don’t realize is that a system running at 90% capacity regenerates more often than one running at 60% capacity. More regeneration means more salt, more water waste, more wear on the system. A 32,000-grain unit might cost around $700, while a 64,000-grain model could reach $1,500, and thats a real range to consider based on your actual needs.
Mr. Davis, my woodshop teacher back in Atlanta, used to say “measure twice, cut once.” Same principle here. Calculate your capacity needs, then buy one size up. Future you will thank present you.
I knew a guy in Plano, this was 2008 or 2009, he installed a 24,000 grain system for a family of six with 15 GPG water. The math didn’t work from day one. That system was regenerating every three days. Every three days! Most households spend $40 to $120 per year on softening salt, but he was going through salt so fast he might as well have been running a commercial laundromat. Replaced the whole system within two years.
Types of Water Softeners
There are basically three types and I’m not going to spend forever on this because you can read product descriptions yourself.
Salt-based ion exchange systems: The traditional kind. They work. They’ve worked for decades. They require salt, they produce wastewater during regeneration, and they need to be hooked up to a drain.
Salt-free systems: These don’t actually soften water. They condition it so the minerals don’t stick to surfaces as much. The Department of Energy notes that salt-free water softeners are generally much easier to install than salt-based systems. Most of them just hang on your waterline and you’re done. But they won’t give you that “soft” feeling in the shower.
Dual-tank systems: Two resin tanks so one can regenerate while the other is working. Good for large families or high water usage. More expensive.
Pick one. Moving on.
Do You Need a Permit?
Probably. Many municipalities require a plumbing permit for water softener installation, with permit fees typically ranging from $50 to $150. Call your local building department before you start. I know nobody wants to hear this. I know permits feel like bureaucratic nonsense. But they exist because water softeners discharge wastewater and your municipality has rules about where that water can go.
Some places have banned salt-based softeners entirely because of environmental concerns. California has restrictions in certain areas. Check before you buy.
The codes usually require:
- Discharge to sanitary sewer (not storm drain, not septic in some places)
- Air gap at discharge point
- Backflow prevention
According to the City of Riverside Building & Safety Division, water softeners must discharge to the sanitary sewer system with a minimum 1” air gap. That’s not optional. That’s code.
And look, I’ve seen the statistics. One source claims 78% of homeowners violate plumbing codes when attempting DIY water softener installation. I don’t know if that number is exactly right but it sounds about right based on what I’ve seen. People skip the permit, discharge into a laundry drain without an air gap, and hope nobody notices.
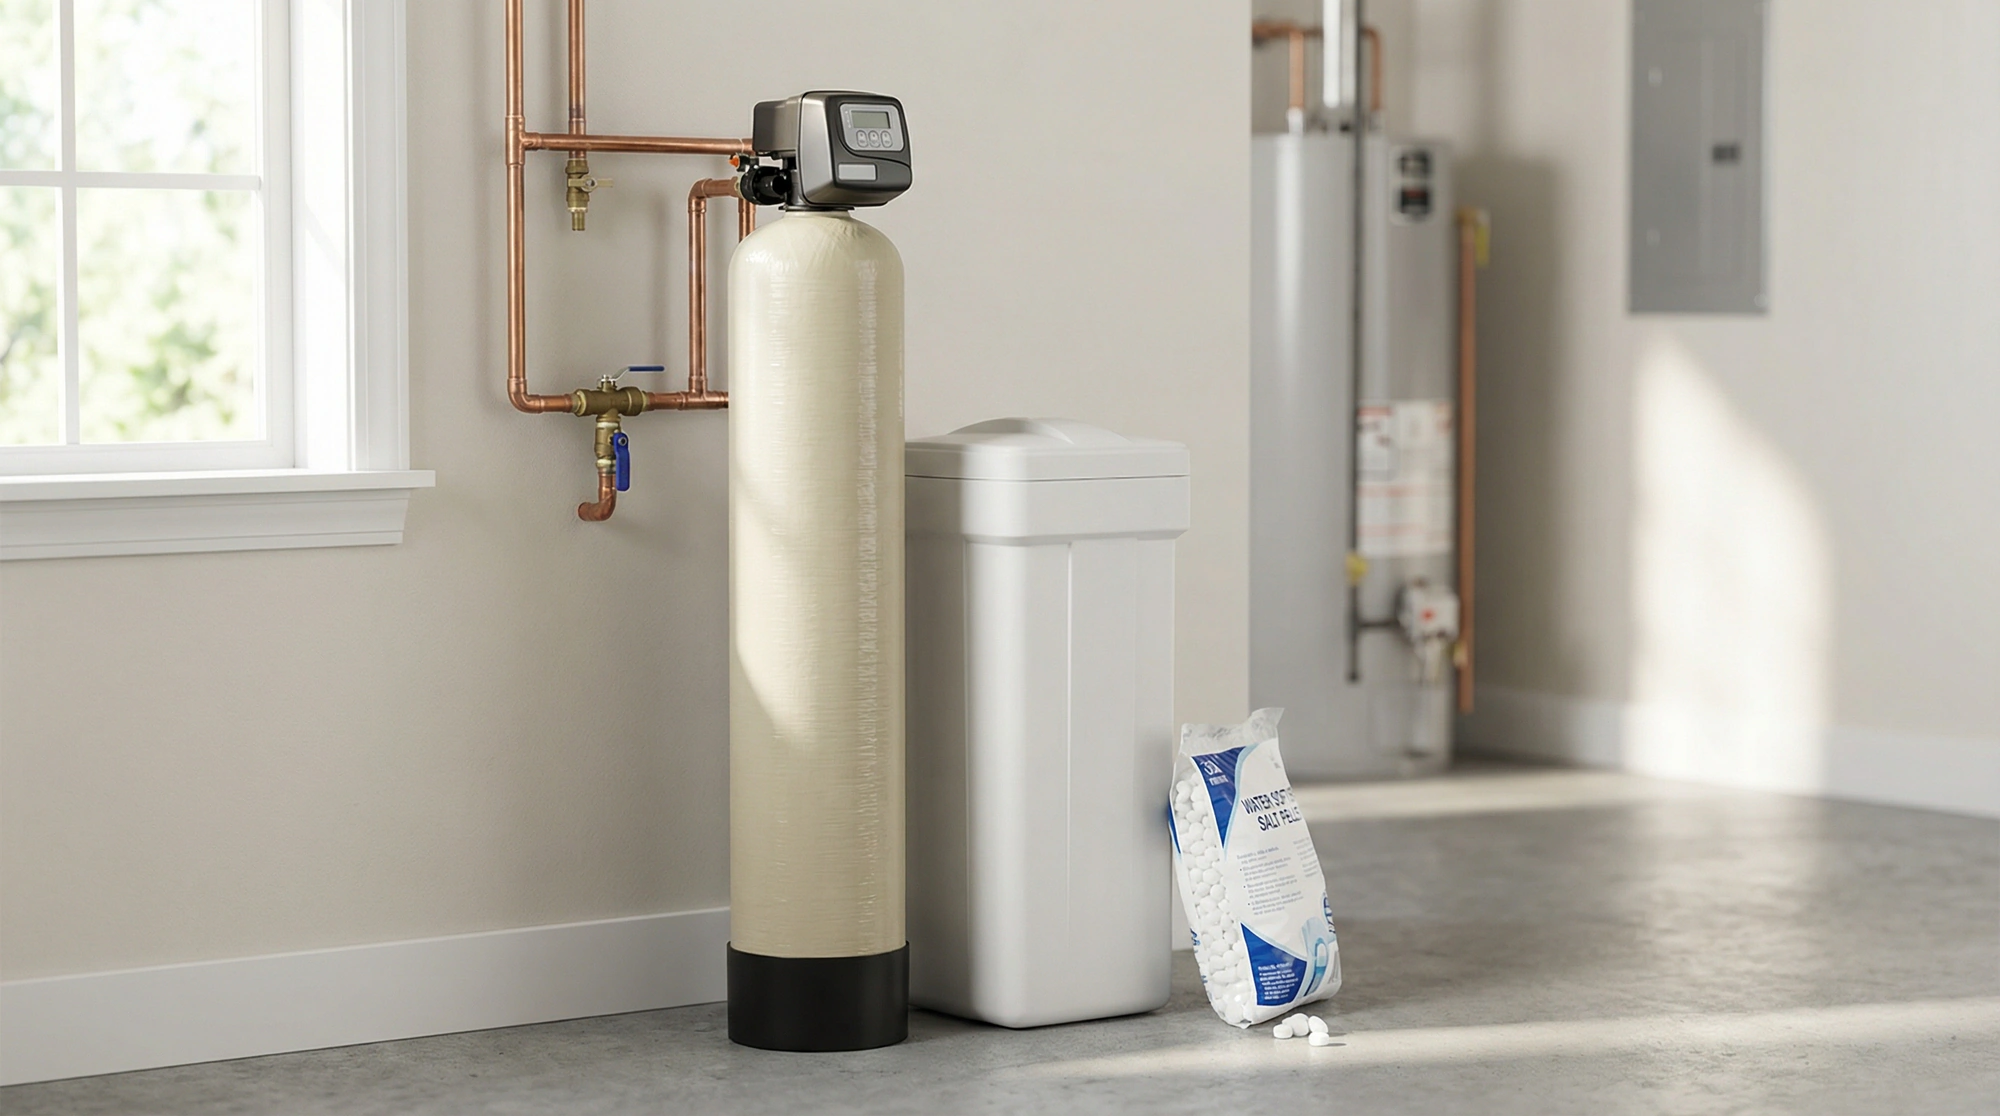
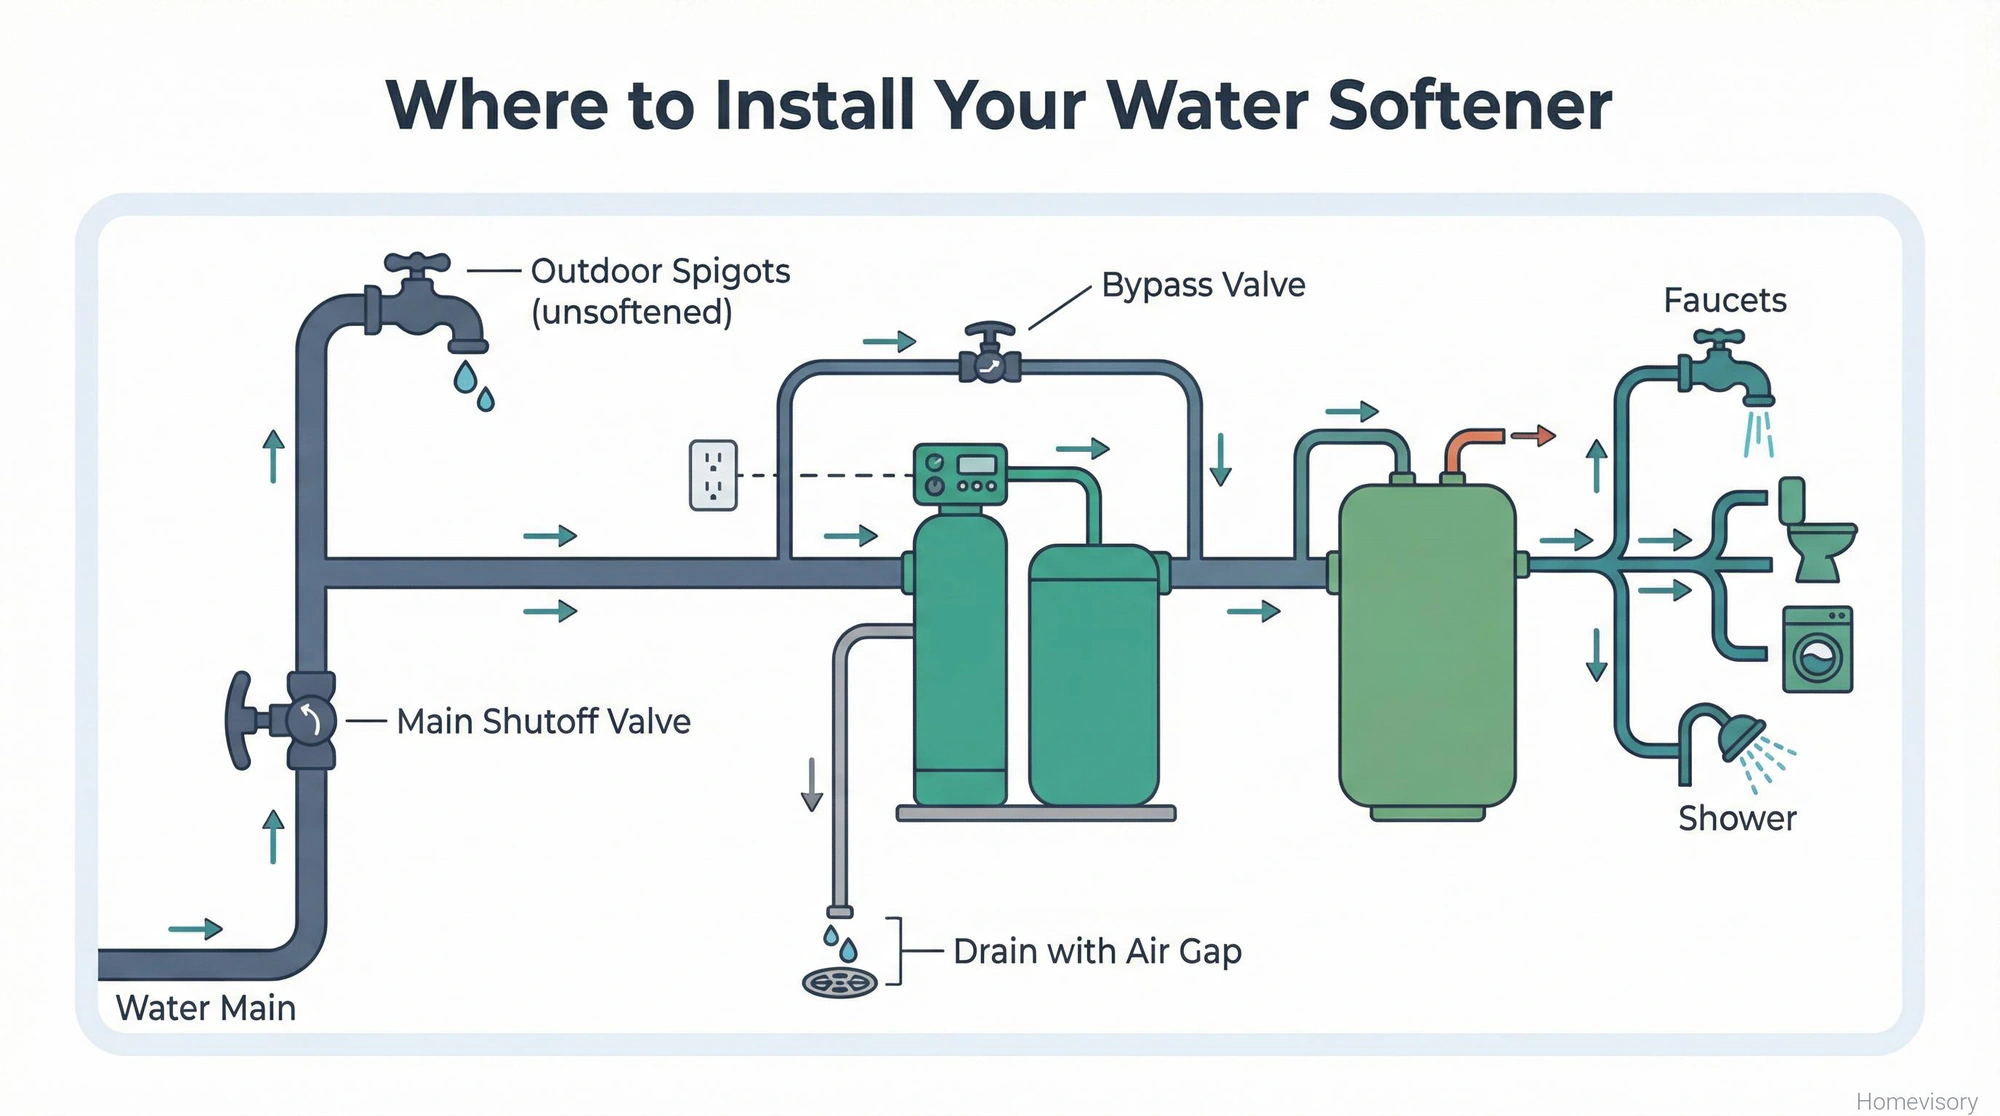
Where to Install It
The softener goes on your main water line, before the water heater but after the main shutoff. This way all your hot and cold water gets softened except for outdoor spigots (you don’t need soft water for your lawn and you don’t want to waste salt on it).
You need:
- Access to a drain (floor drain, laundry standpipe, utility sink)
- Access to an electrical outlet (120V, for the timer/control head)
- Enough space for the tanks plus room to add salt
- A flat, level surface
Most people put them in the garage, basement, or utility room. The closer to your main shutoff the better.
The Actual Installation (And When to Call Someone)
Here’s where I’m going to lose some of you and thats okay.
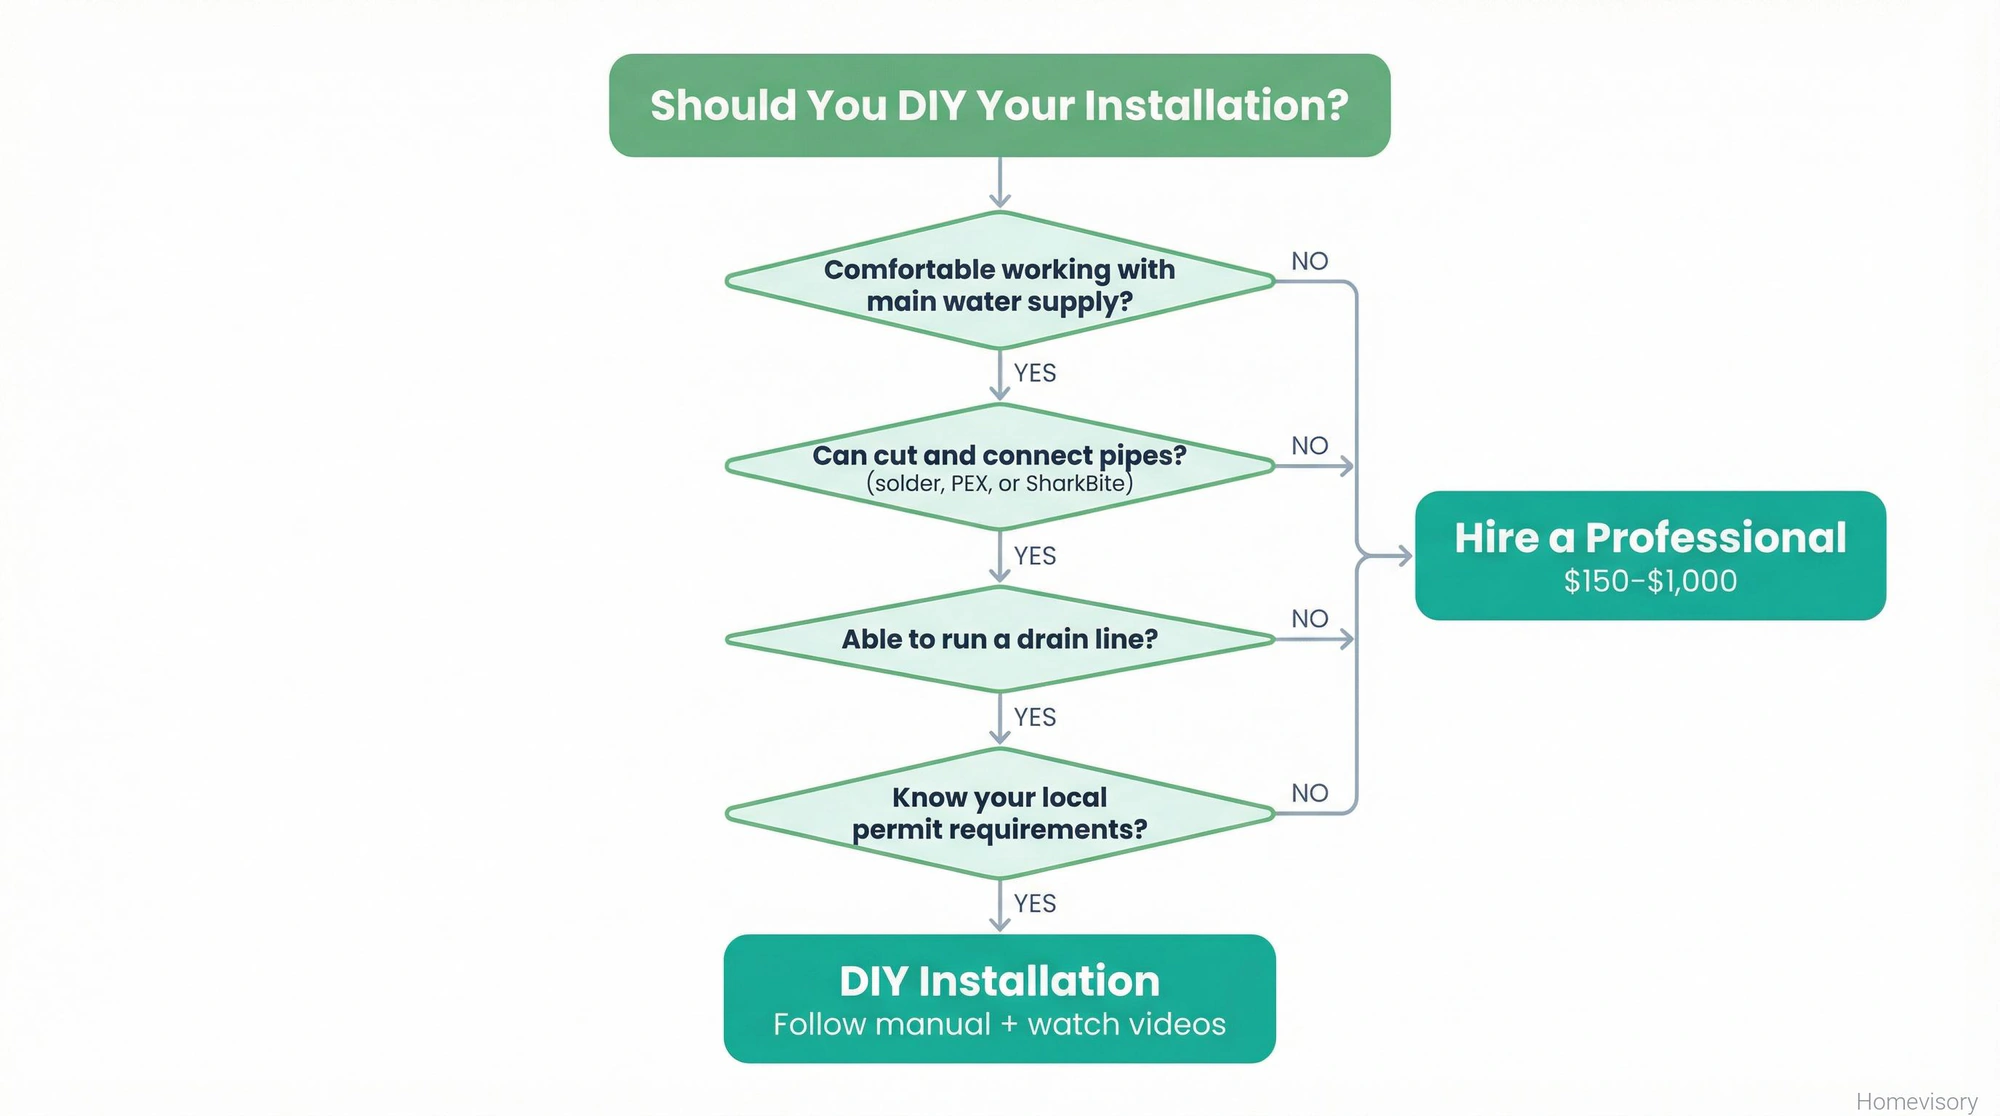
If you’re comfortable with these things, you can probably do the install yourself:
- Cutting and soldering copper pipe (or using PEX/SharkBite fittings)
- Working with your home’s main water supply
- Running a drain line
- Basic electrical (plugging things in, basically)
If any of those made you nervous, professional installation costs $150 to $1,000 depending on complexity. That’s money well spent if you’re not confident. Water damage from a bad connection isn’t something you want to experience.
The basic steps:
- Turn off main water supply
- Drain existing pipes (open lowest faucet in house)
- Cut into main line where you want to install
- Install bypass valve (ALWAYS install a bypass, trust me)
- Connect inlet and outlet to softener
- Run drain line to appropriate discharge point with air gap
- Run overflow line
- Turn water back on, check for leaks
- Add salt, run initial regeneration cycle
I’m not going to give you step-by-step plumbing instructions here. If you need those, you need more help than a blog post can provide. Watch videos. Read your manual. Or call someone.
Certification Matters
Whatever you buy, make sure its certified. All residential cation exchange water softeners sold in the United States must be certified to the general requirements of NSF/ANSI 44. This isn’t some nice-to-have. This is the baseline standard that means the equipment actually does what it claims.
NSF/ANSI 44 certification covers cation exchange water softeners specifically, verifying they reduce hardness by replacing calcium and magnesium with sodium or potassium ions. If you can’t find the NSF certification on the product, keep shopping.
Salt Types and How Much You’ll Use
Three main types:
- Rock salt: Cheapest. Most impurities. Requires more cleaning of your brine tank.
- Solar salt: Middle ground. Evaporated from seawater. Less residue.
- Evaporated salt: Most expensive. Purest. Least maintenance.
I use evaporated salt. It costs more but I clean my brine tank once a year instead of three times. Worth it to me.
My dad Curtis worked in a factory that had industrial water softeners. Same principle as residential, just bigger. He used to say the cheapest salt cost them the most money in maintenance. Industrial or residential, some things don’t change.
Maintenance After Installation
A water softener isn’t a set-it-and-forget-it appliance. You need to:
- Check salt level monthly, add as needed (keep it at least 1/4 full)
- Clean brine tank annually (drain it, scrub out salt mush and residue)
- Check for salt bridges (when salt clumps and forms a crust above the water)
- Replace resin every 10-15 years (or sooner if you have high iron or chlorine)
Salt bridges are the most common problem. The salt looks fine from the top but there’s actually a hollow space underneath with no salt in the water. Poke the salt with a broom handle every few months. If it breaks through a crust, you had a bridge forming.
What This All Costs
Real numbers, as of 2025:
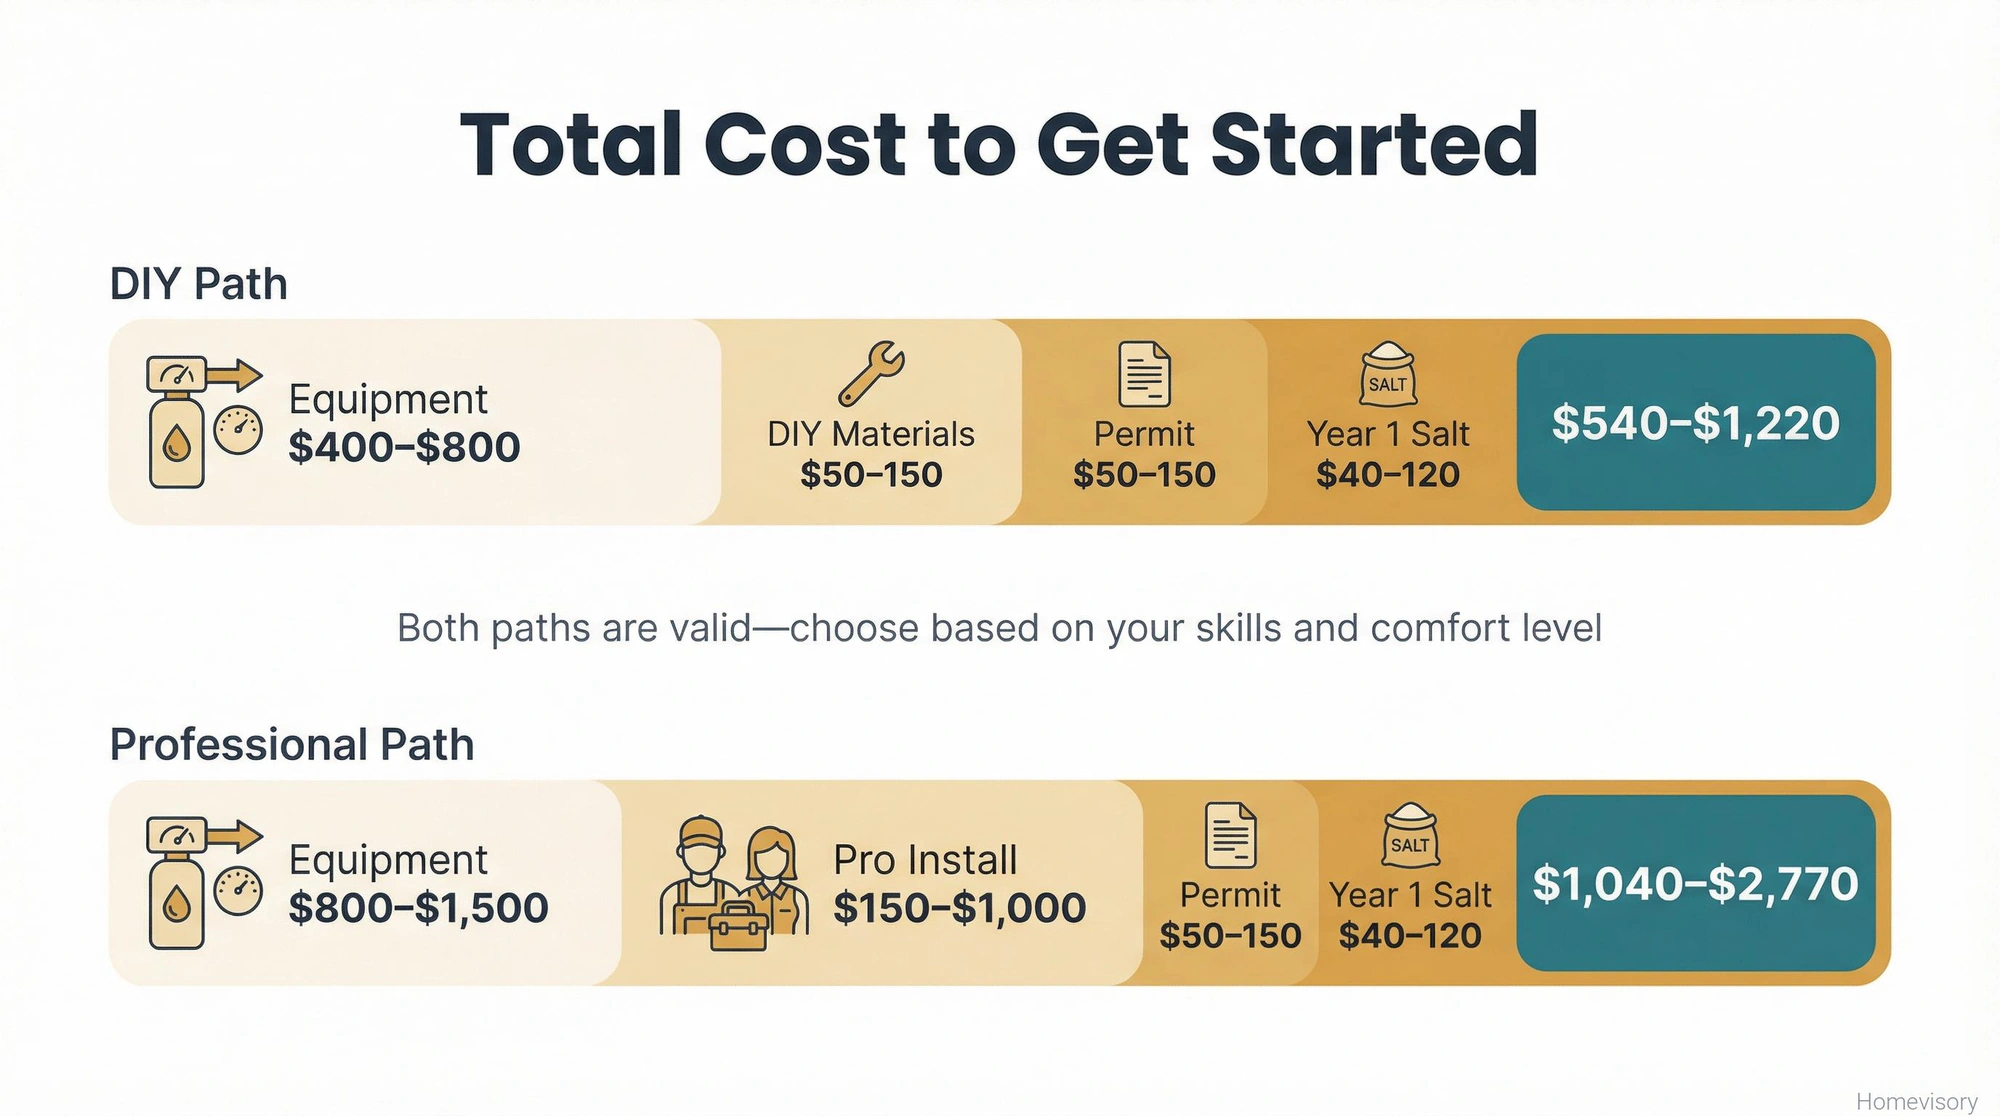
- Water softener unit: $400-1,500 depending on capacity and features
- Most water softeners cost between $800 and $3,000 when you factor in installation
- DIY installation materials: $50-150 (fittings, drain line, etc.)
- Professional installation: $150-1,000
- Annual salt cost: $40-120
- Permit: $50-150 (if required)
So you’re looking at somewhere between $500 and $2,500 to get set up, depending on how much you do yourself and what equipment you choose.
Is It Worth It
If you have hard water, yes. Your water heater will last longer. Your pipes won’t scale up. Your dishwasher will actually get dishes clean. Your soap will lather properly. Your clothes will feel softer. Your skin won’t feel like it has a film on it after every shower.
Is it a weekend project. For some of you. For others its a phone call to a plumber and that’s fine too.
If you want help tracking when to check your salt levels, clean your brine tank, and schedule all the other maintenance tasks that come with homeownership, that’s what we built Homevisory for. The Homevisory home task manager is free and it’ll remind you about this stuff so you don’t have to remember it yourself. That’s what we do here at Homevisory.