
Why Would You Clean a Toilet Tank
Most people have never looked inside their toilet tank. I get it. The bowl is right there, thats the part guests see, thats the part that seems dirty. But the tank is where the magic happens and if you ignore it long enough, the magic stops.
The inside of your toilet tank is constantly wet. Its dark. Its warm. Thats basically a spa day for mold, mildew, mineral deposits, and bacteria. Research from the National Center for Biotechnology Information found that biofilms in toilets can measure up to 20 micrometers thick and harbor bacteria like Salmonella for weeks, even with regular bowl cleaning. The bowl gets cleaned every week in most homes. The tank gets cleaned never.
And then people wonder why their toilet runs constantly or why it smells weird even after they scrub the bowl. Why their flapper deteriorates after three years instead of lasting ten.
The tank.
How to Clean Toilet Tank the Right Way
I’m going to walk you through this step by step because theres a right way and a way that damages your components. I’ve seen both.
What You Need
- Rubber gloves (non-negotiable)
- White distilled vinegar (gallon jug)
- Spray bottle
- All-purpose bathroom cleaner or dish soap
- Scrub brush with long handle
- Old toothbrush
- Sponge
- Towels you dont care about
The CDC recommends wearing gloves for all cleaning tasks and washing your hands with soap and water for at least 20 seconds after. I know people who clean toilets barehanded and I dont understand them.
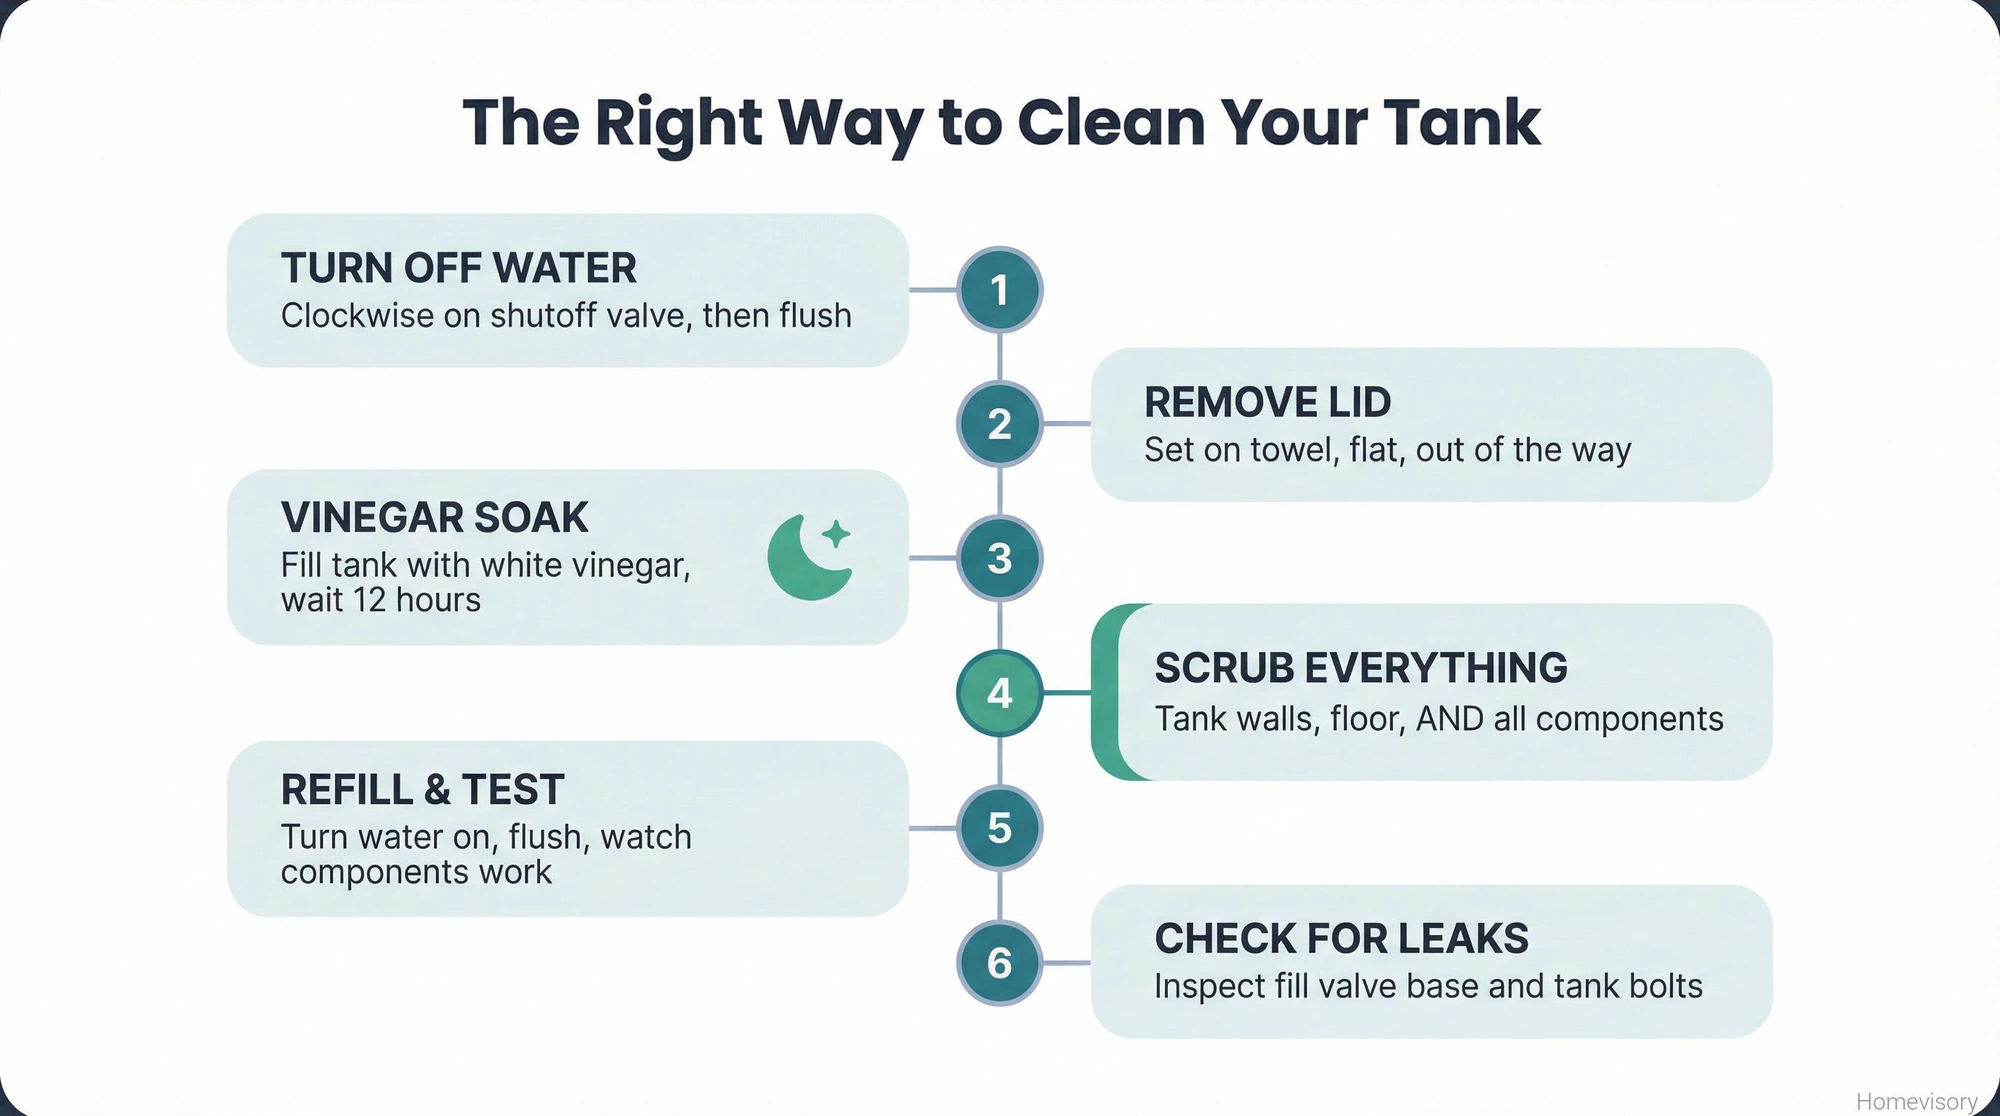
Step 1: Turn Off the Water
Theres a shutoff valve behind the toilet, usually on the left side coming out of the wall or floor. Turn it clockwise until it stops. Then flush the toilet to drain most of the water from the tank.
If your shutoff valve is stuck or corroded, thats a different problem and you should fix that first. A stuck shutoff valve during a real emergency, like a supply line burst, is a disaster waiting to happen.
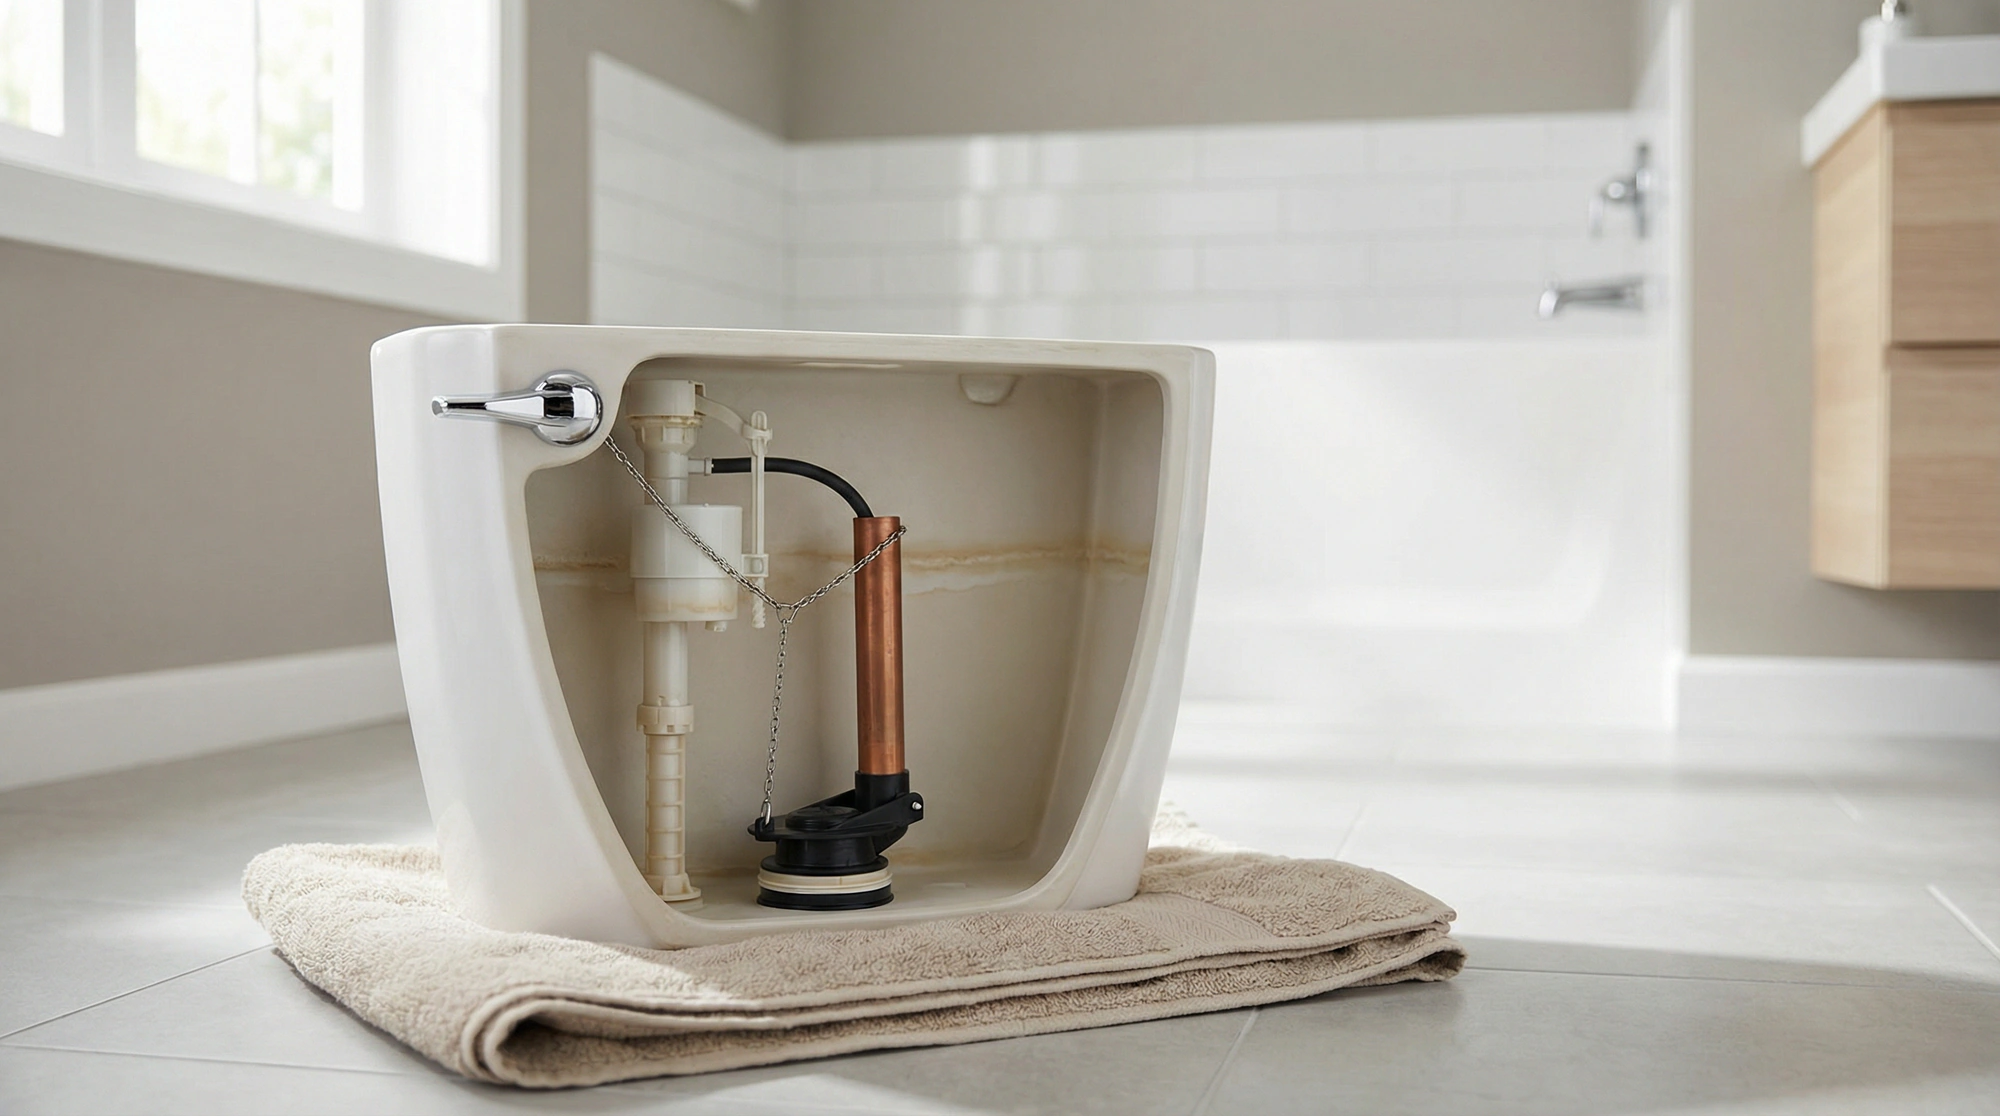
Step 2: Take the Lid Off and Look
Lift the tank lid straight up and set it somewhere safe. Not the floor where youre going to kick it. Not balanced on the edge of the tub. On a towel, flat, out of the way. Those lids are heavy and they shatter.
Now look inside. What do you see. Brown stains. Orange rust. Black slime along the water line. Green buildup on the components.
All of that is fixable.
Step 3: The Vinegar Soak
If theres still water in the tank, which there should be because you can’t flush it all out, add white vinegar until the water level rises to about an inch below the top rim. If the tank is mostly empty, fill it with straight vinegar.
This Old House recommends letting vinegar sit in the tank for 12 hours. I usually do this overnight. Start before bed, finish in the morning.
Vinegar is acidic enough to dissolve mineral deposits and kill most bacteria and mold without damaging the rubber components inside your tank. This matters. Bleach will disinfect but it degrades rubber flappers and gaskets over time. I’ve replaced flappers for people who swore they only used bleach “a few times” and the rubber was cracked and brittle like it had been sitting in the sun for a decade.
Step 4: Scrub Everything
After the soak, its scrubbing time.
Drain the vinegar by flushing, then use your long-handled brush to scrub the walls and floor of the tank. The buildup should come off easily after soaking. For stubborn spots, spray more vinegar directly and let it sit for a few minutes.
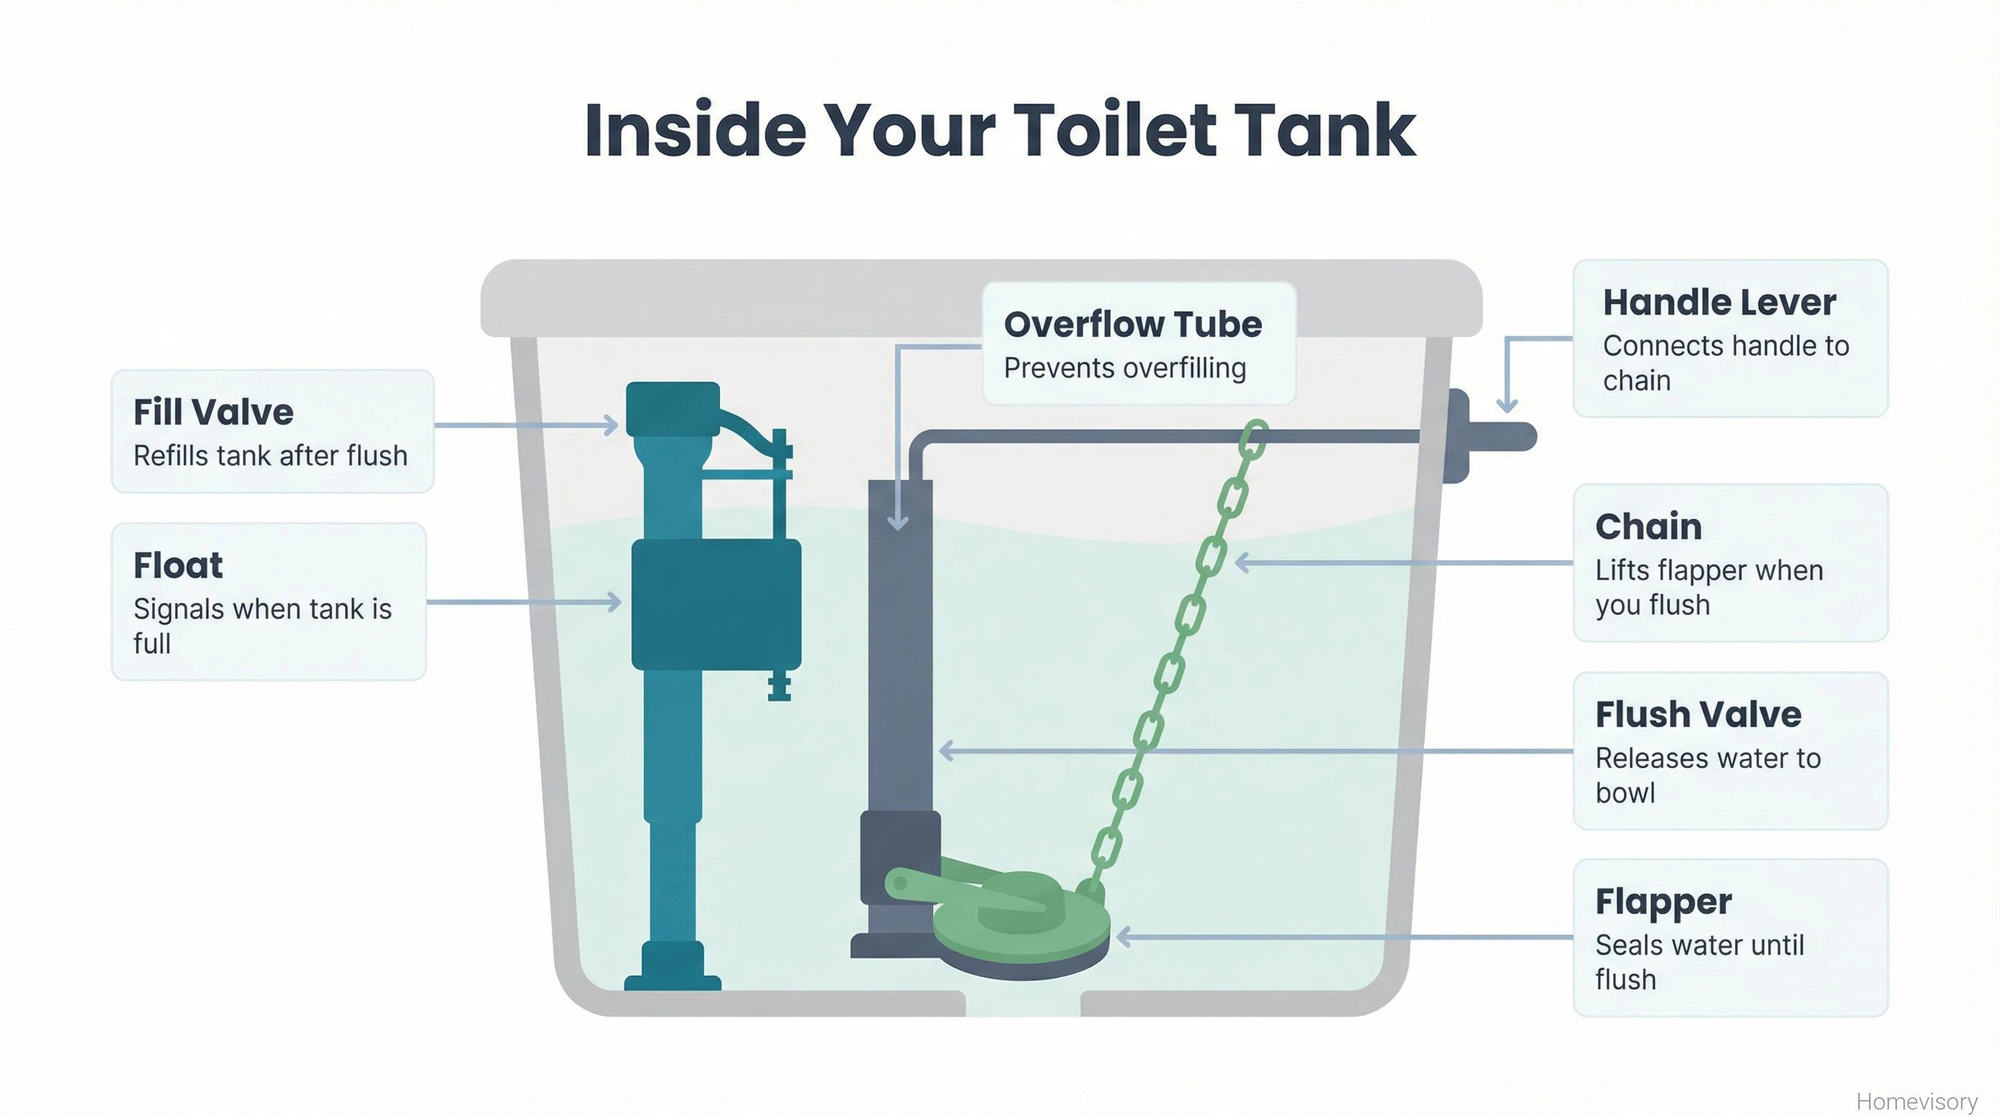
Here’s where most people stop and it drives me crazy. The components. Your toilet tank has a fill valve, a flapper, a flush valve, an overflow tube, a chain, and a float of some kind depending on the model. All of these need attention. Mr. Davis, my woodshop teacher back in Atlanta, used to say you can’t finish what you can’t see. He was talking about checking the back of a wood joint before you glued it, the part that faces the wall that nobody looks at. Same principle here. Use the old toothbrush to get into the crevices around the fill valve. Check under the flapper for buildup. Wipe down the chain. If the float ball or float cup has grime on it, clean that too. The tank components are what actually make your toilet flush correctly. If theyre covered in mineral deposits, they cant do their job. I spend more time on this part than most people spend on the entire job because I’ve seen what happens when you dont, youre calling a plumber in two years wondering why your toilet runs nonstop and youre wasting up to 30 gallons of water per day on a slow leak you dont even notice.
Step 5: Refill and Test
Turn the water supply back on. Let the tank fill. Flush a few times and watch the components work. Is the flapper seating properly? Is the fill valve shutting off at the right level? Does the chain have the right amount of slack?
This is also a good time to check for leaks. Look at the base of the fill valve and around the tank bolts.
What About Drop-In Tank Tablets
I’m not getting into the debate about drop-in tablets. Some people swear by them. Some plumbers hate them. The bleach-based ones absolutely damage rubber components over time, thats not opinion, thats chemistry. If you want to use them, use the ones without bleach. Or just clean your tank twice a year like a normal person.
Moving on.
How Often to Clean
Experts recommend cleaning your toilet tank twice per year to remove grime and prevent mildew and bacteria accumulation. Twice a year minimum. More if you have hard water. Thats it.
If you live somewhere with heavy mineral content in the water, you’ll see buildup faster. Palm Beach water is different from Atlanta water is different from Chicago water. I’ve lived in all of them. Adjust accordingly.
My dad Curtis used to check the toilet tank every Sunday morning before church. He’d lift the lid, look inside, nod or shake his head, and then we’d go to his room to get his tie. I never asked what he was looking for. Probably should have. Anyway.
Why This Actually Matters
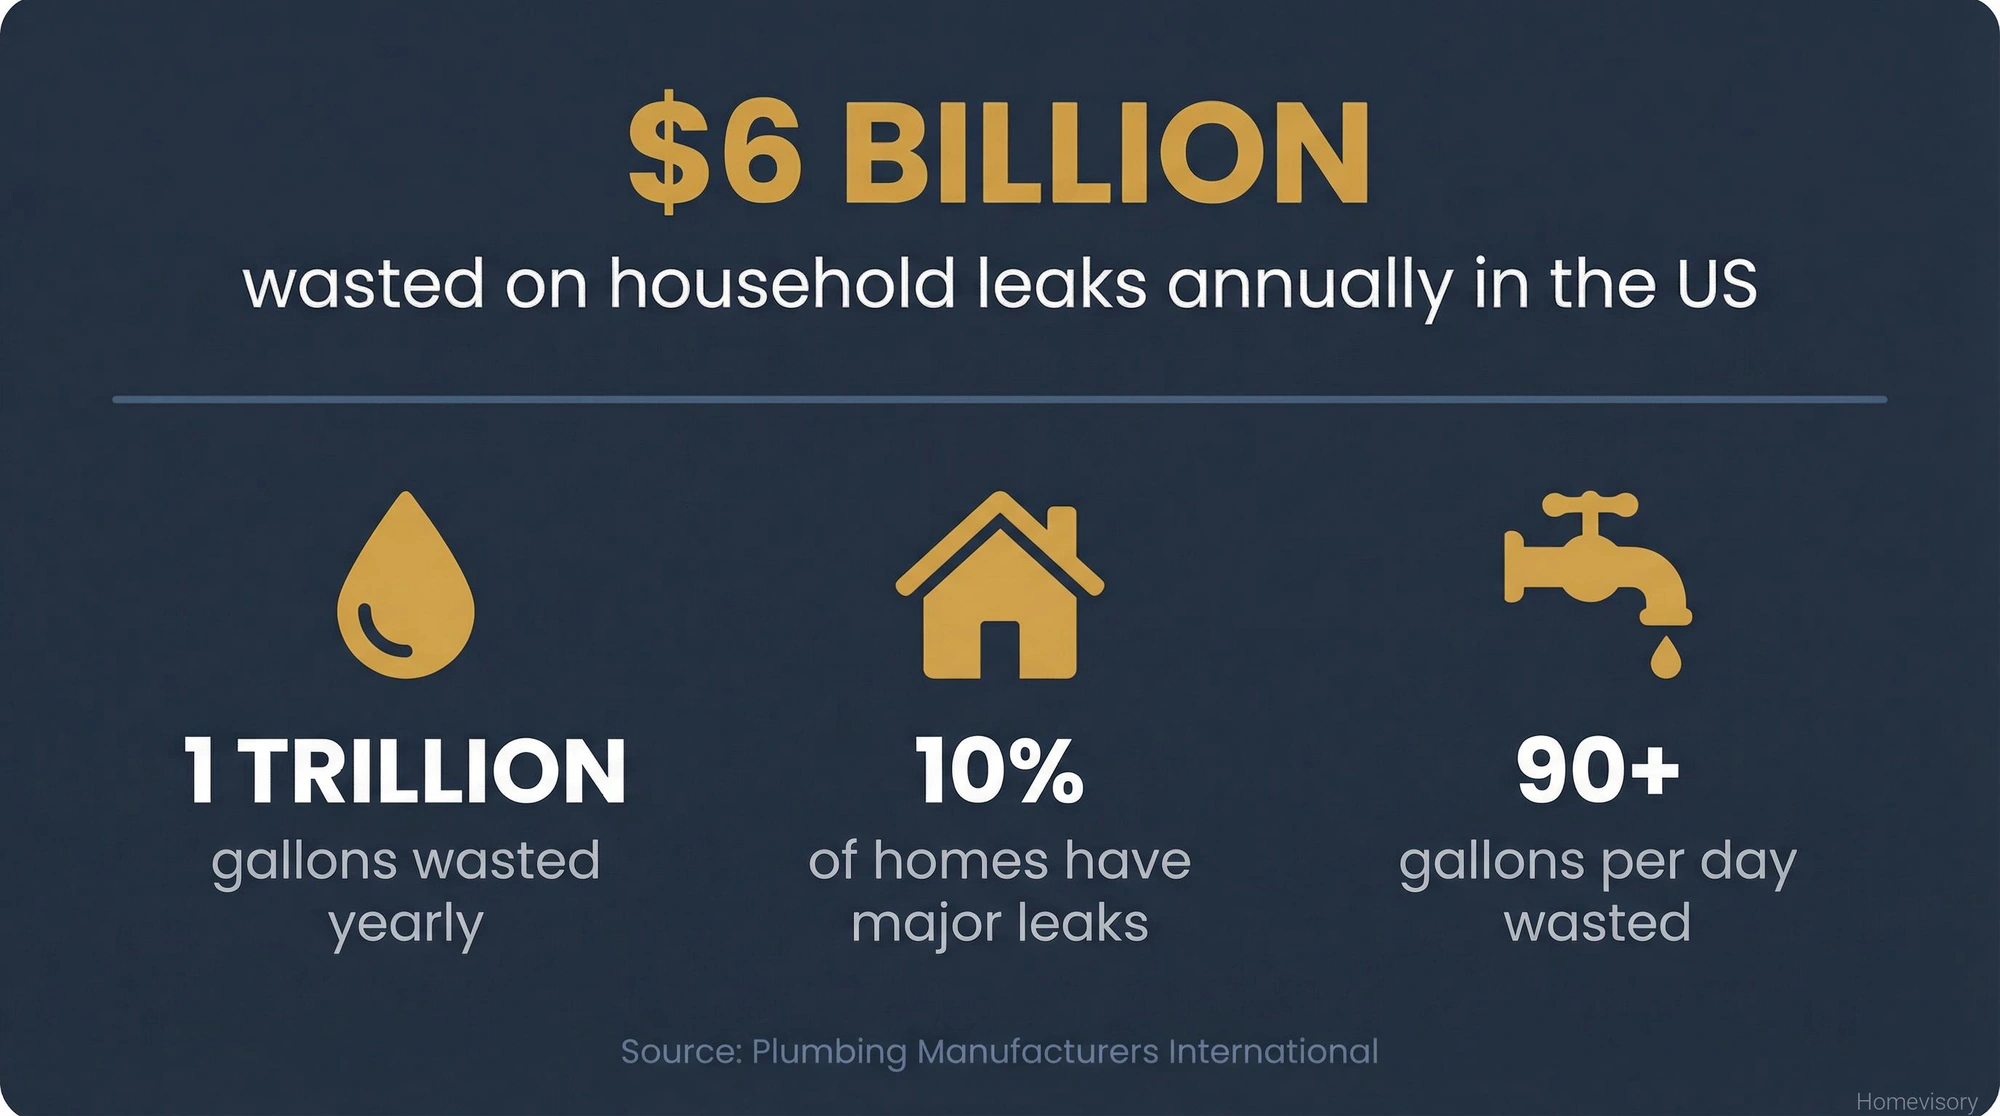
Running toilets waste water. A lot of water. Plumbing Manufacturers International reports that running toilets, dripping faucets, and other household leaks waste $6 billion per year and 1 trillion gallons annually in the US. Ten percent of homes have leaks wasting 90 gallons or more per day.
A toilet that runs because the flapper is degraded from never being cleaned, thats on you. A toilet that runs because mineral buildup is preventing the fill valve from shutting off, thats on you too.
This is the same lesson I learned the hard way with my shower tile shortcut in 2011. I tiled over old tile to save time. Eleven months later the grout cracked, tiles popped off, subfloor was rotting from water damage I couldn’t see. Water finds every mistake you make. It finds the buildup you didnt clean. It finds the flapper that doesnt seat right. It finds a way.
Raquel made me sleep on the couch because I smelled like mold. That was a bad week.
Cleaning your toilet tank is fifteen minutes of work twice a year. The vinegar costs three dollars. The alternative is replacing flappers every couple years, paying for extra water, and eventually dealing with a toilet that just doesn’t work right anymore.
Quick Reference
I know some people want the short version. Here it is.
- Turn off water, flush to drain
- Pour in vinegar, wait 12 hours
- Scrub tank walls and floor
- Clean all internal components with toothbrush
- Turn water on, test flush, check for leaks
- Repeat every six months
Whatever. Just do it.
This is exactly the kind of basic maintenance that people forget about. Not because its hard, just because nobody thinks about it. Thats what we do here at Homevisory. We help you remember the stuff you forget, track the maintenance schedule, and keep your home running without surprises. You can sign up free and start managing your home tasks the right way with our Homevisory home task manager.
While youre at it, if your toilet is giving you any other trouble, our complete toilet repair guide walks through every common issue from running toilets to leaks.