
Before You Start Thinking About Ductless Heat Pump Installation
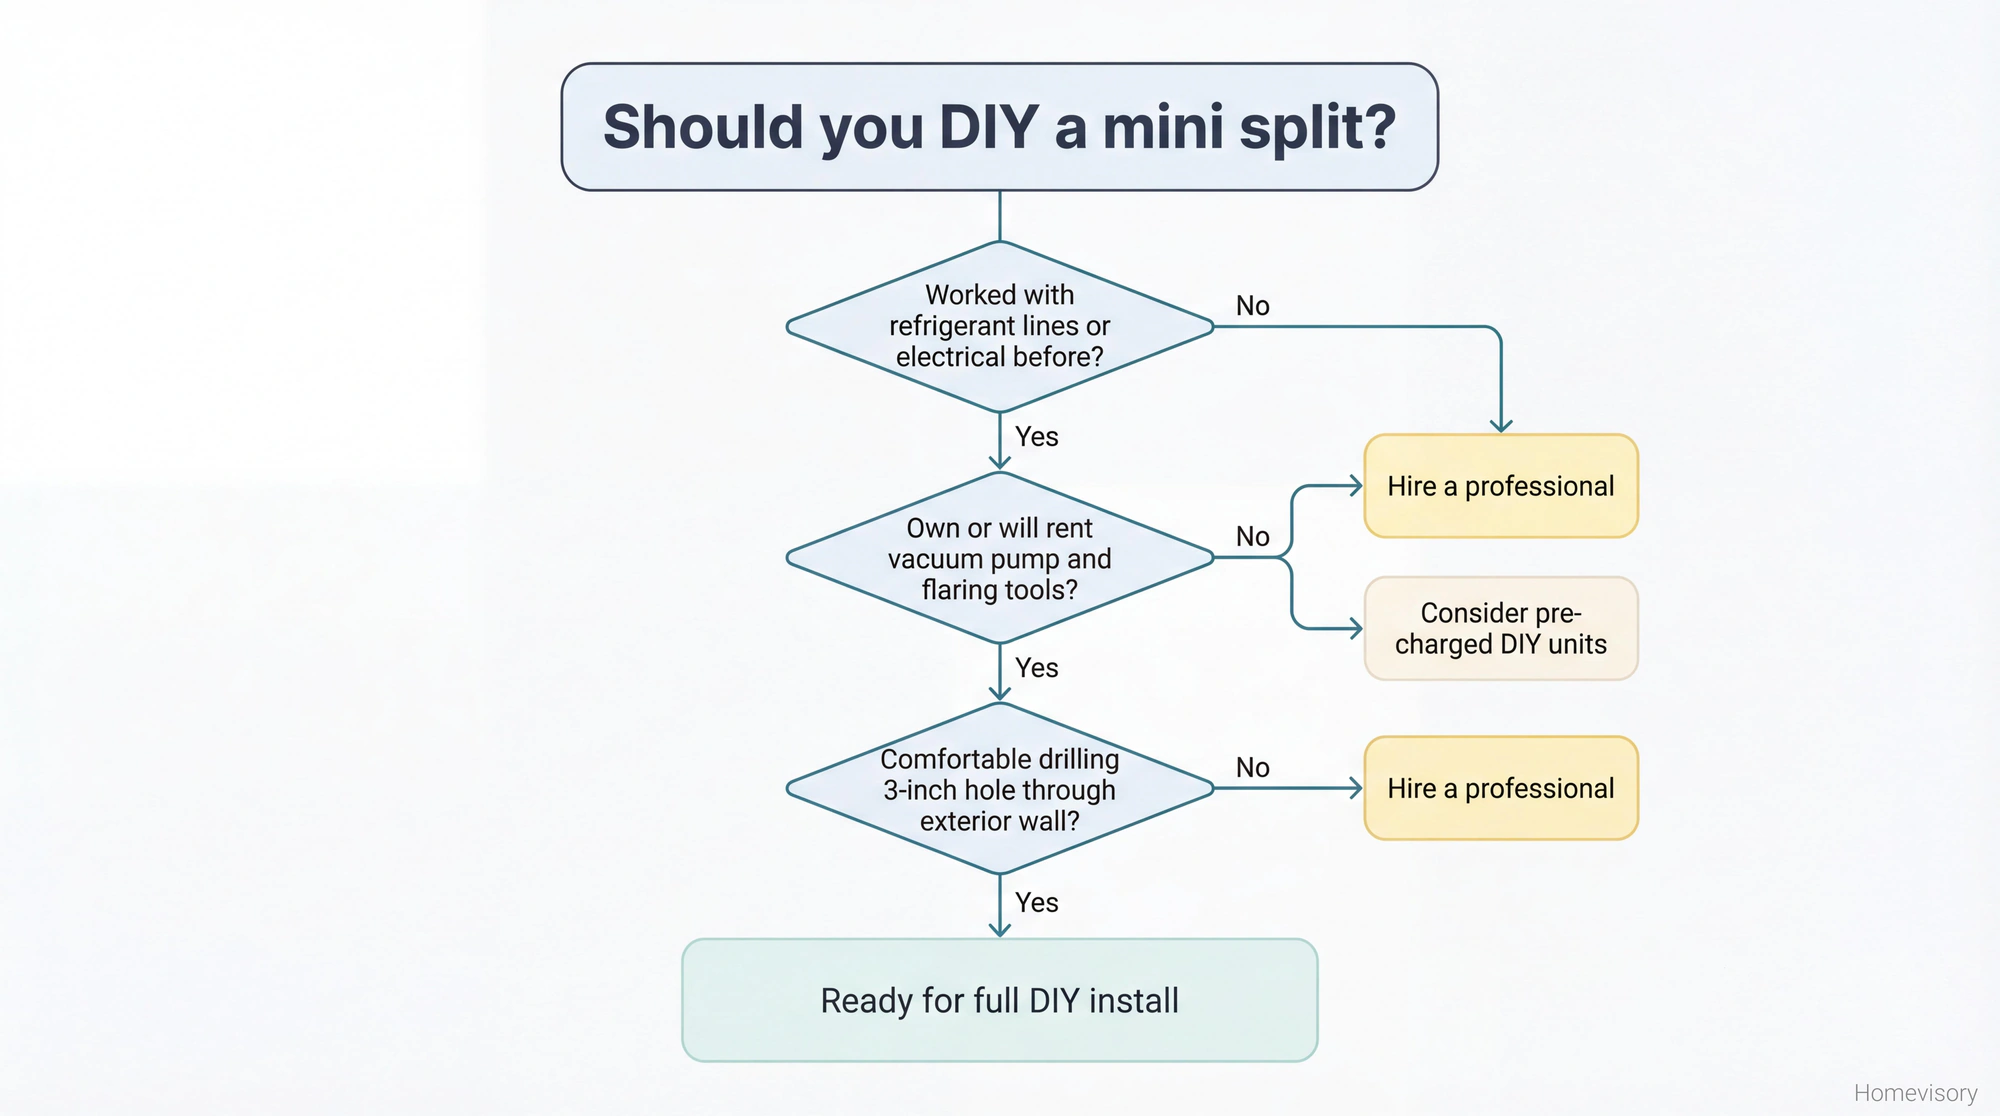
I want to be honest about something upfront. Ductless heat pump installation is not a beginner project. Its also not impossible for someone with solid DIY experience. The middle ground is where most people get confused, so let me help you figure out where you land.
If you’ve never run electrical, never worked with refrigerant lines, never drilled a three-inch hole through an exterior wall, this article might convince you to hire someone. Thats fine. Thats actually a good outcome if it saves you from flooding your living room with refrigerant or mounting a unit that falls off the wall six months later.
But if you’ve done HVAC-adjacent work, if you’re comfortable with the idea of flaring copper tubing and own a vacuum pump or are willing to rent one, then a mini split heat pump installation is absolutely within reach. I did my first one in 2019 and I’ve done three more since then.
The Real Cost Conversation
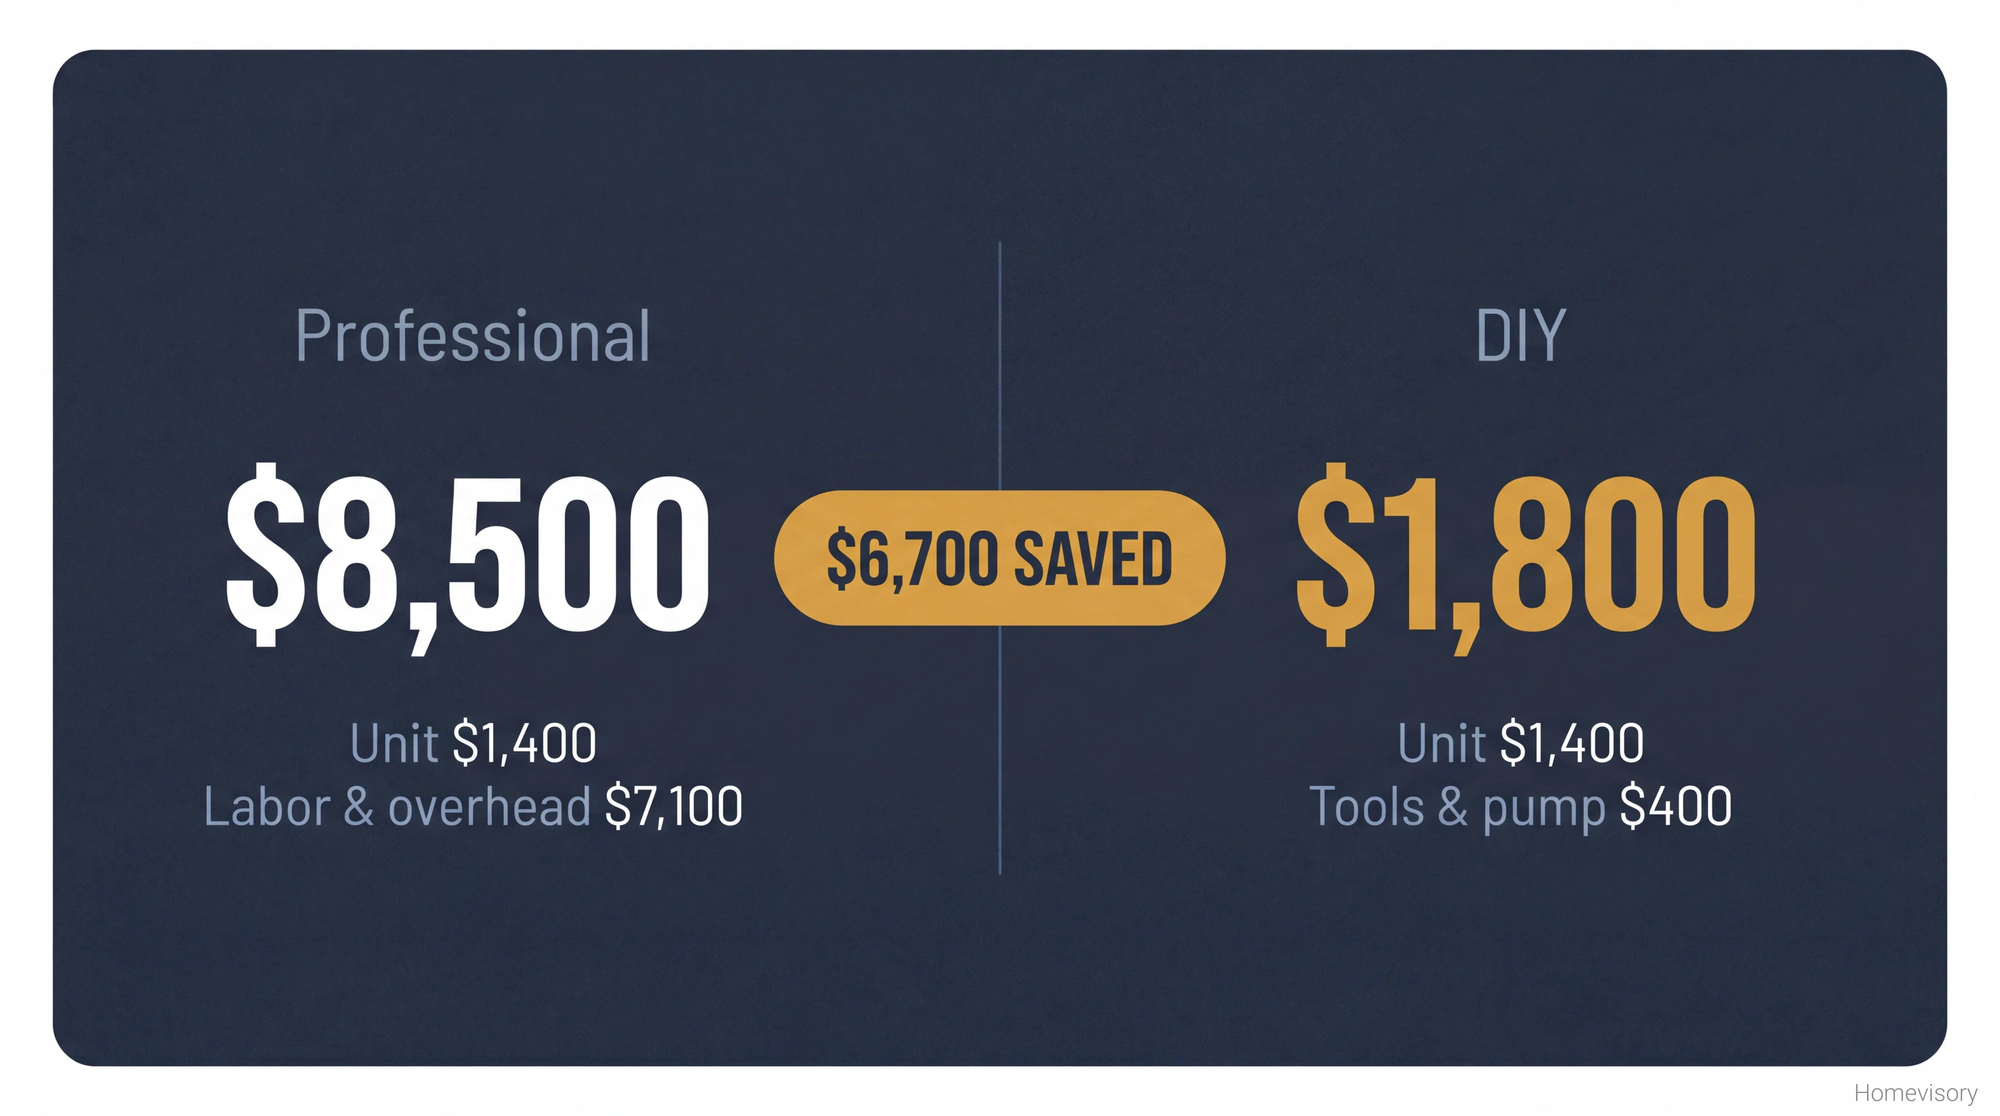
Here’s why people even consider doing this themselves. I got quoted $8,500 to install a single-zone mini split in my sunroom. The unit itself was $1,400. The rest was labor and, I assume, the privilege of having someone show up in a branded truck.
I called three companies. Lowest quote was $6,200. Highest was that $8,500 number which still makes me a little angry when I think about it.
I did it myself for about $1,800 total including the unit, a vacuum pump I bought because I knew Id use it again, flaring tools, and the electrical materials. If you already own tools or rent instead of buy, youre looking at $1,600 or less.
I’m not saying the professionals are ripping people off. They have overhead, insurance, licensing. But I am saying the gap between DIY and professional on this particular job is bigger than almost anything else in home improvement. Thats why people try it.
What You’re Actually Installing
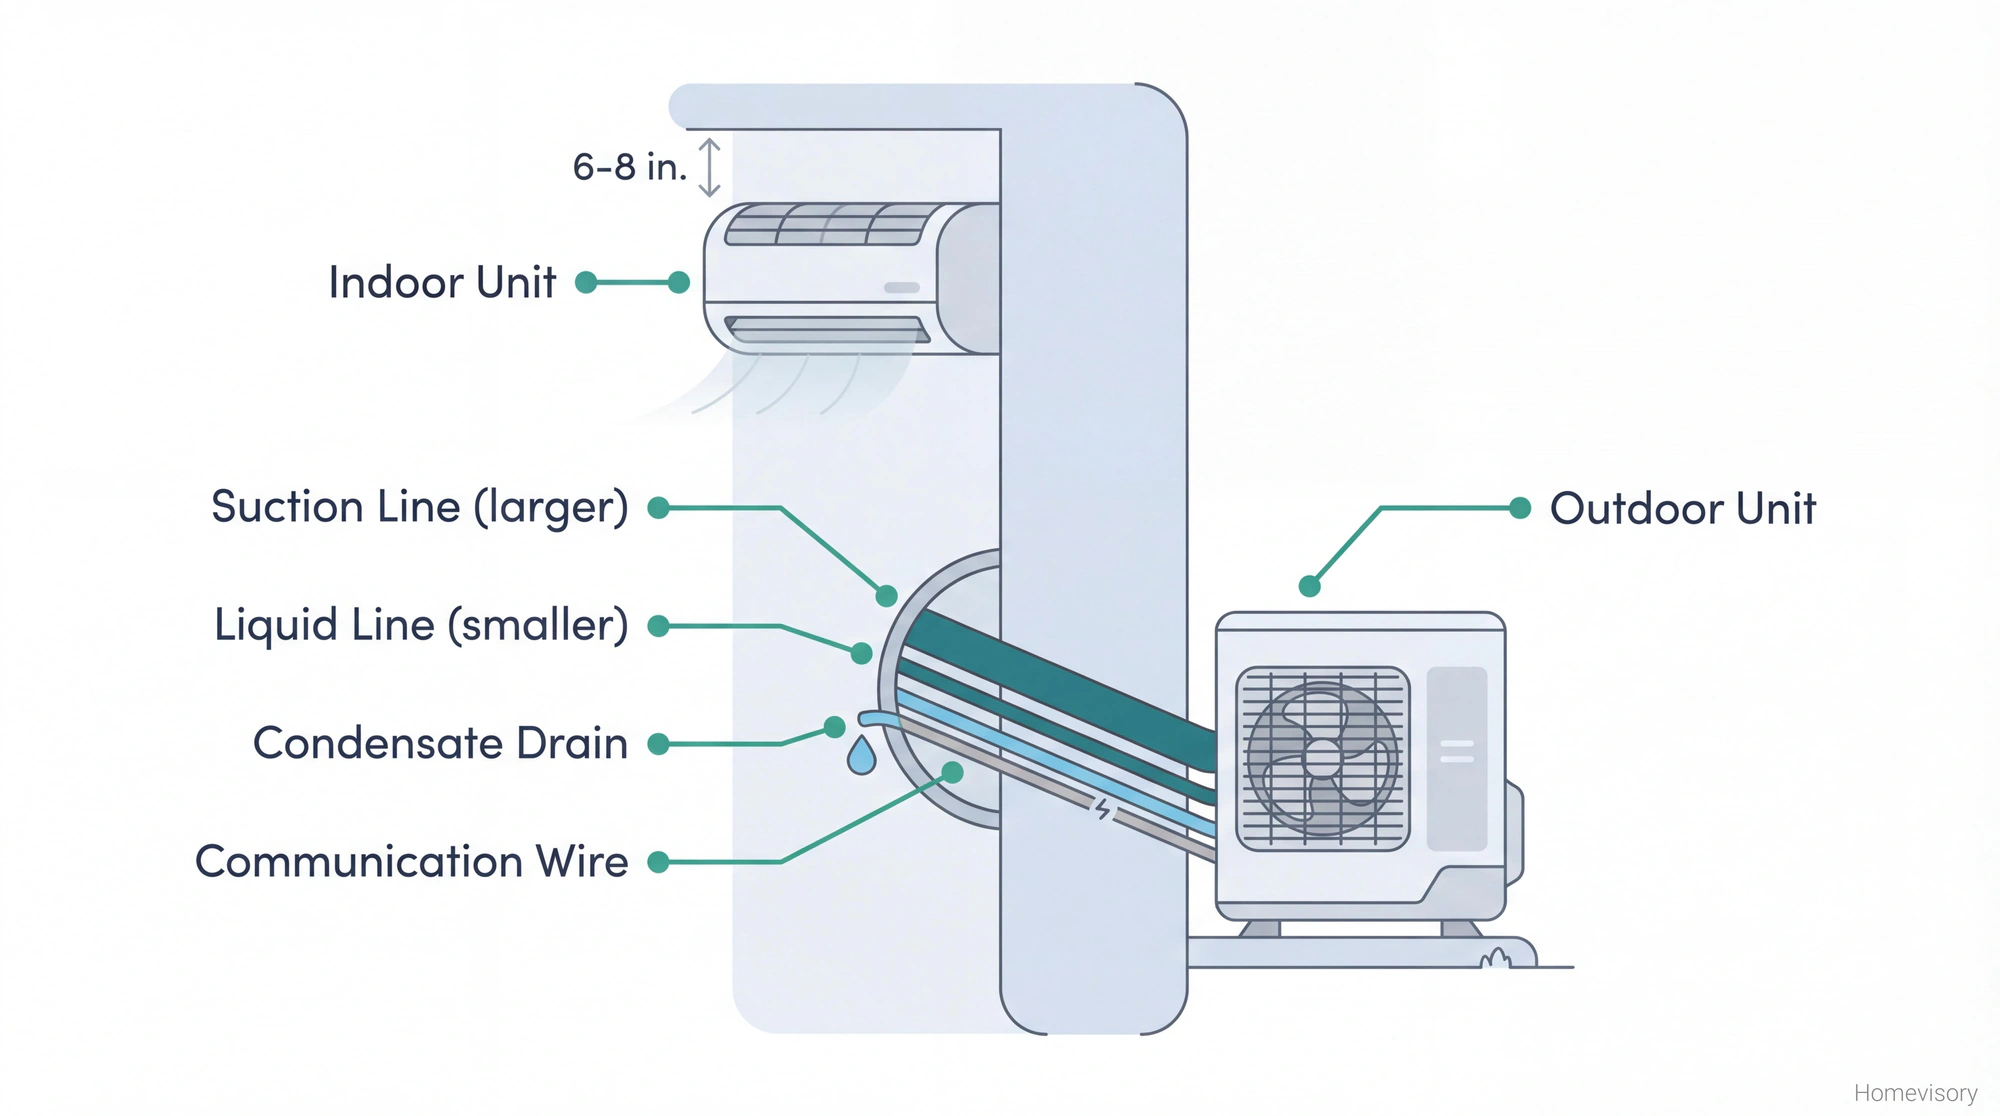
A ductless system has two main parts. The indoor unit, which most people call the head, mounts on your wall and blows conditioned air into the room. The outdoor unit, the condenser, sits outside and does the heavy lifting of actually moving heat.
These two units connect through a hole in your wall. Through that hole runs refrigerant lines (two of them, different sizes), a condensate drain line, and communication wiring. Thats it. The whole concept is simpler than a traditional HVAC system because there’s no ductwork.
Mini split heat pump installation appeals to people adding climate control to spaces that never had it. Garages. Sunrooms. Additions. Converted attics. Anywhere running ductwork would be expensive or impossible. If you already have ductwork, a traditional heat pump might be the better call.
Sizing
Get this wrong and nothing else matters. An undersized unit runs constantly and never reaches temperature. An oversized unit short-cycles, which means it turns on and off too frequently, which wears out the compressor and does a terrible job with humidity.
You need a Manual J load calculation. There are online calculators that get you close. You input square footage, ceiling height, insulation levels, window sizes, orientation, your climate zone. The output tells you BTU requirements.
Most rooms need 9,000 to 12,000 BTU. A 400 square foot sunroom in Florida with big windows might need 18,000. A well-insulated 200 square foot home office might only need 6,000.
When in doubt, go slightly smaller rather than bigger. I know that sounds wrong. But a unit thats a little undersized runs more efficiently and handles humidity better than one thats oversized. It might run longer on the hottest days but itll do a better job the other 350 days of the year.
Brands
People ask me about brands constantly. Mitsubishi and Fujitsu are the big names and they’re excellent and they’re expensive. Daikin, LG, and Carrier are all solid mid-range options. MrCool and Pioneer make units specifically designed for DIY installation with pre-charged lines that don’t require vacuum equipment.
The pre-charged DIY units are more expensive per BTU and you have less flexibility with line lengths. But they eliminate the hardest part of the job.
Whatever brand you pick. Moving on.
Where to Mount the Indoor Unit
This is where I see people mess up the most. They pick a wall that’s convenient for installation instead of optimal for performance.
The indoor unit needs to be mounted high, usually 6-8 inches below the ceiling. It needs adequate clearance on all sides for airflow, typically 6 inches minimum above and 4-6 inches on each side. It should not be directly above a TV or computer monitor because the airflow will annoy you. It should not be on a wall that gets direct sunlight for hours because the thermostat sensor is inside the unit and sun will confuse it.
Mr. Davis, my old woodshop teacher, used to say measure twice cut once and I thought that was just about lumber. Its about everything. I measured my sunroom wall six different times trying to figure out the right spot. I taped cardboard to the wall in three different positions and lived with each one for a day before deciding.
You want the air to flow across the longest dimension of the room. You want the unit accessible for filter cleaning. You want the wall to be structural enough to hold the weight, which usually means mounting into studs, not just drywall anchors.
The outside wall you drill through matters too. You want the shortest possible line run between indoor and outdoor units. You want to avoid drilling through anything structural. You want the hole to slope slightly downward toward the outside so condensate drains properly.
I spent more time planning than installing. Thats how it should be.
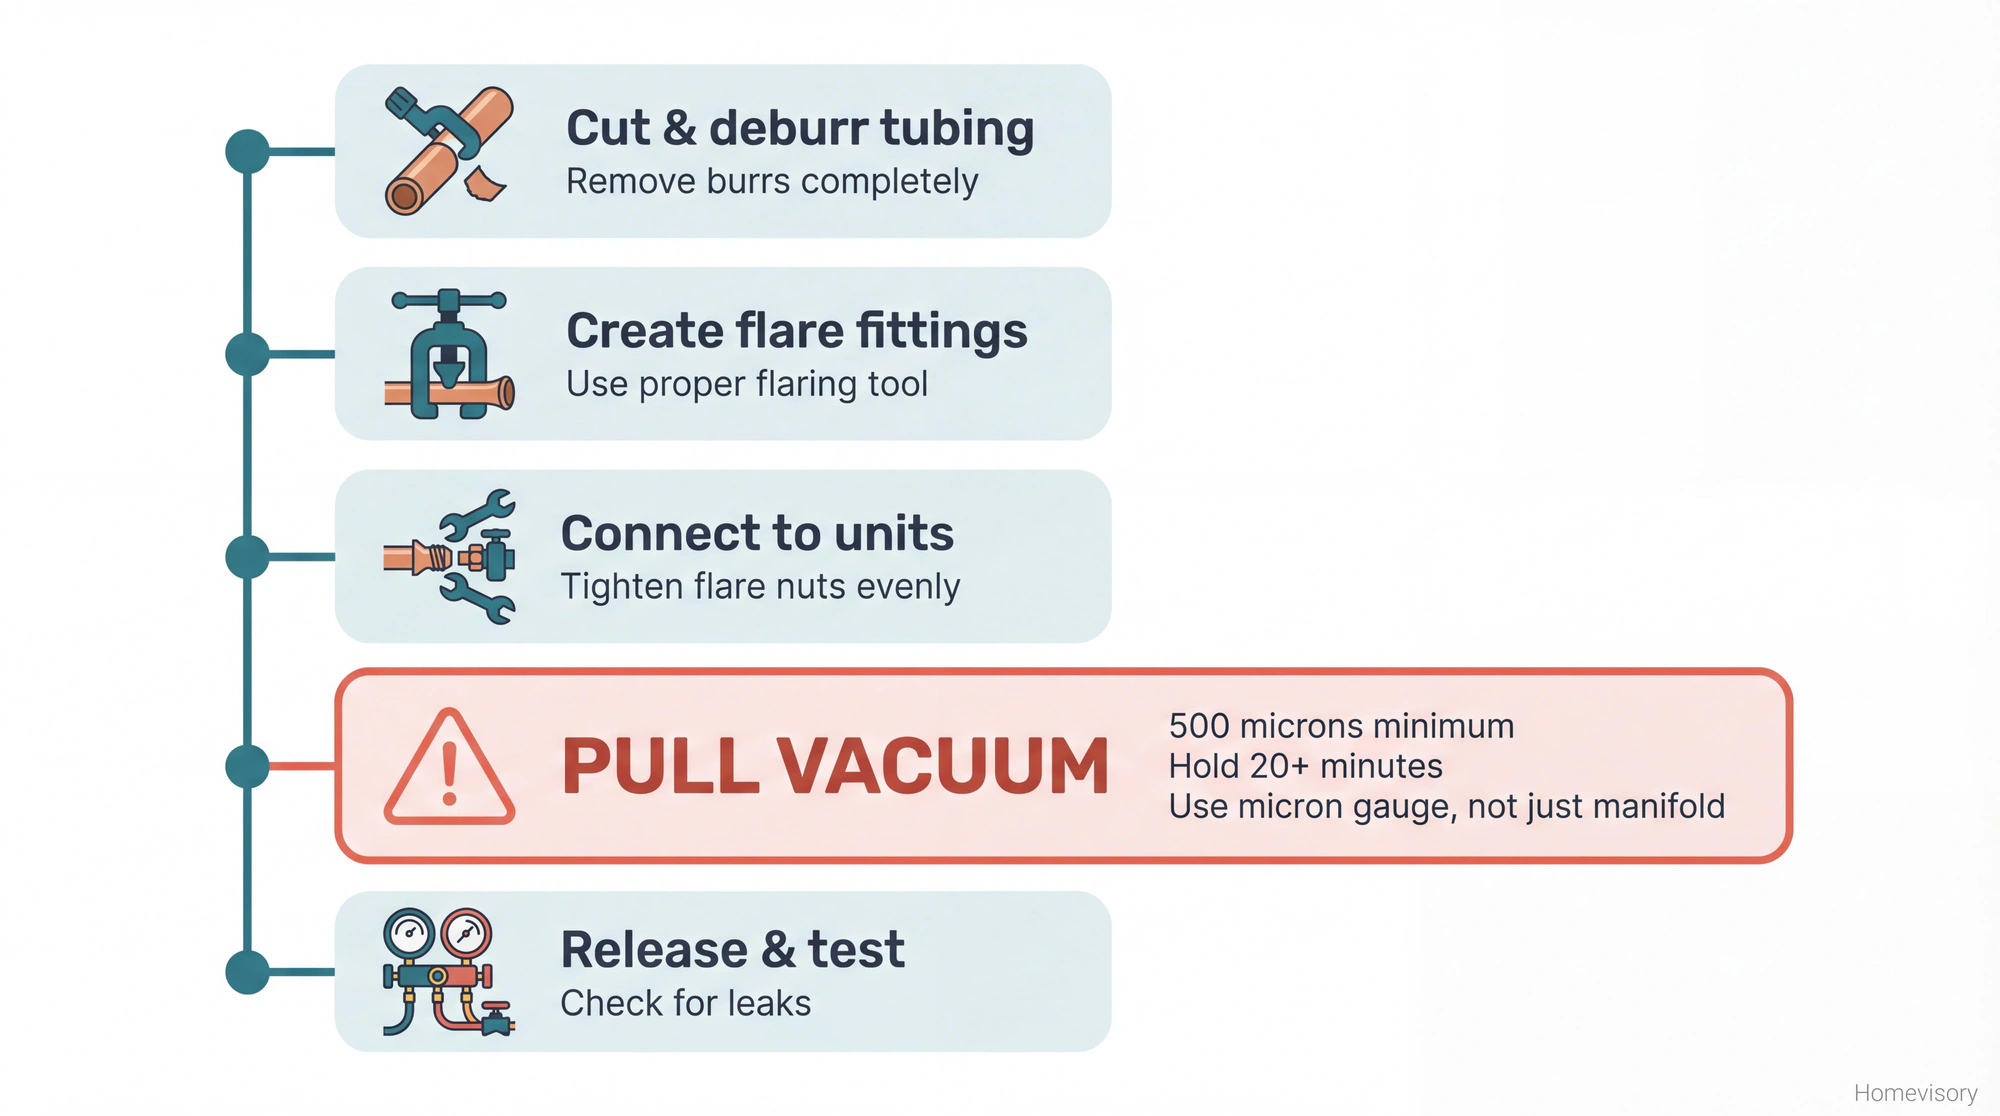
The Line Set: This Is Where I Get Obsessive
Okay. Refrigerant lines. This is the part that separates mini split heat pump installation from other DIY projects and its the part I probably care too much about but I’ve seen what happens when people rush through it so I’m going to spend some time here.
You have two copper lines. The larger one is the suction line and it carries cold gaseous refrigerant back to the condenser. The smaller one is the liquid line and it carries warm liquid refrigerant to the indoor unit. These lines are insulated, especially the suction line, and they connect to the units using flare fittings.
Flare fittings are how you create a leak-proof connection without brazing or welding. You use a flaring tool to spread the end of the copper tubing into a cone shape. That cone mates with a matching fitting on the unit. A flare nut tightens down and compresses the connection. Done right, it seals completely. Done wrong, you get a slow refrigerant leak that might take months to become obvious, by which point your warranty is void and your compressor is damaged.
Heres what kills most DIY installs and this is the part I really need you to understand: the vacuum. Before you release refrigerant into the system, you have to pull a vacuum on the lines. This removes air and moisture. Air contains nitrogen and oxygen that don’t belong in a refrigeration circuit. Moisture turns into ice crystals that damage the compressor and clog the expansion valve. You need a vacuum pump and a set of manifold gauges. You need to pull the system down to at least 500 microns, ideally 300 or below, and hold it there for at least 20 minutes to make sure there are no leaks. I’ve watched YouTube videos of people skipping this step entirely or using a bicycle pump or some nonsense and it makes me genuinely upset. Youre going to spend $1,500 on a system and skip the $40 vacuum pump rental? Youre going to install everything perfectly and then introduce moisture that destroys the compressor in three years? People do this. Dont be people.
Get a real vacuum pump. Get a micron gauge, not just the manifold gauges because they aren’t accurate enough at vacuum levels. Pull it down, watch the micron gauge, wait. If it rises fast you have a leak, probably at a flare connection. Fix it, pull again.
This part takes patience. My first install, I pulled vacuum three times because I kept getting small rises. Turned out one of my flare connections wasn’t quite right. I redid it, pulled again, held perfect. That system has been running for six years.
The Outdoor Unit
Compared to the line set work, the outdoor unit is straightforward. Level surface, adequate clearance, and away from anything that might block airflow or fall on it.
Most people use a ground-level pad, either a plastic condenser pad or a concrete pad. In areas with heavy snow you might want a wall bracket that mounts the unit 18-24 inches off the ground so snow doesn’t bury it.
Clearance requirements vary by manufacturer but you generally want 20-24 inches in front of the unit where the fan blows, 12 inches on the sides, and nothing directly above. Keep it away from dryer vents, gas meters, anything that produces heat or exhaust.
Route the line set neatly along the wall. Use line hide covers if you care about appearance. Make sure the drain line terminates somewhere that won’t create problems, not over a sidewalk where people walk, not into a flower bed right against the foundation.
Electrical
I’m going to be honest with you. I didn’t do my own electrical work on my first mini split. I ran the line set, mounted both units, did all the refrigerant work, and then had an electrician come add the dedicated circuit.
Ductless units typically need a 240V circuit, 15 or 20 amp depending on the unit size. This means running wire from your panel to a disconnect box near the outdoor unit, then from the disconnect to the unit itself.
If your panel is already full, you need a new breaker or a panel upgrade. If your panel is outdated, you might need an upgrade anyway. If you’re not sure what you’re doing inside an electrical panel, you can die.
Call an electrician. I’m not getting into that here.
Some smaller units run on 120V which means you might be able to use an existing circuit if it’s dedicated and properly rated. Check your specific units requirements.
The Install Day
I did my sunroom unit on a Saturday in October. Started at 7 AM, finished around 4 PM, and that included lunch and a trip to Home Depot because I broke a flaring tool. Second and third installs took about five hours each.
Rough sequence:
Mount the bracket plate for the indoor unit. Drill the wall penetration hole using a 3-inch hole saw. Run the line set from inside to outside. Mount the indoor unit on the bracket. Set up the outdoor unit and connect lines. Pull vacuum. Test for leaks. Release refrigerant. Power on and test operation.
The worst part is drilling through whatever’s inside your wall. I hit a horizontal fire block on one install and had to extend my hole saw with a long bit and it was miserable. Check for electrical and plumbing before drilling.
The best part is powering it on and feeling cold air come out. After years of that sunroom being unusable from April through October, watching Raquel sit in there comfortable for the first time, actually using that space, that was worth every minute.
When to Call a Professional
If you need multiple indoor heads connected to one outdoor unit. Multi-zone systems are significantly more complex and the refrigerant distribution gets tricky.
If you’re not comfortable working with refrigerant. Its not the most dangerous thing in the world but it can cause frostbite if it contacts skin and its bad for the environment if released.
If your electrical panel situation is complicated.
If you want a warranty that’s actually honored. Many manufacturers void the warranty if a licensed technician didn’t install it. Some DIY-focused brands like MrCool explicitly allow owner installation. Know what you’re buying.
Chicago Winters
I lived in Chicago for a while during my travel years, commercial renovation work all over the place. Had a job that went through January and February. I remember my eyelashes froze walking from the parking lot to the building. Actual ice on my face. The wind coming off the lake went through every layer I owned like it wasnt even there.
I think about that sometimes when I’m dealing with heat pumps in Florida. When I’m worried about whether the sunroom will hit 72 degrees on a 95 degree day. Different problems. But yeah.
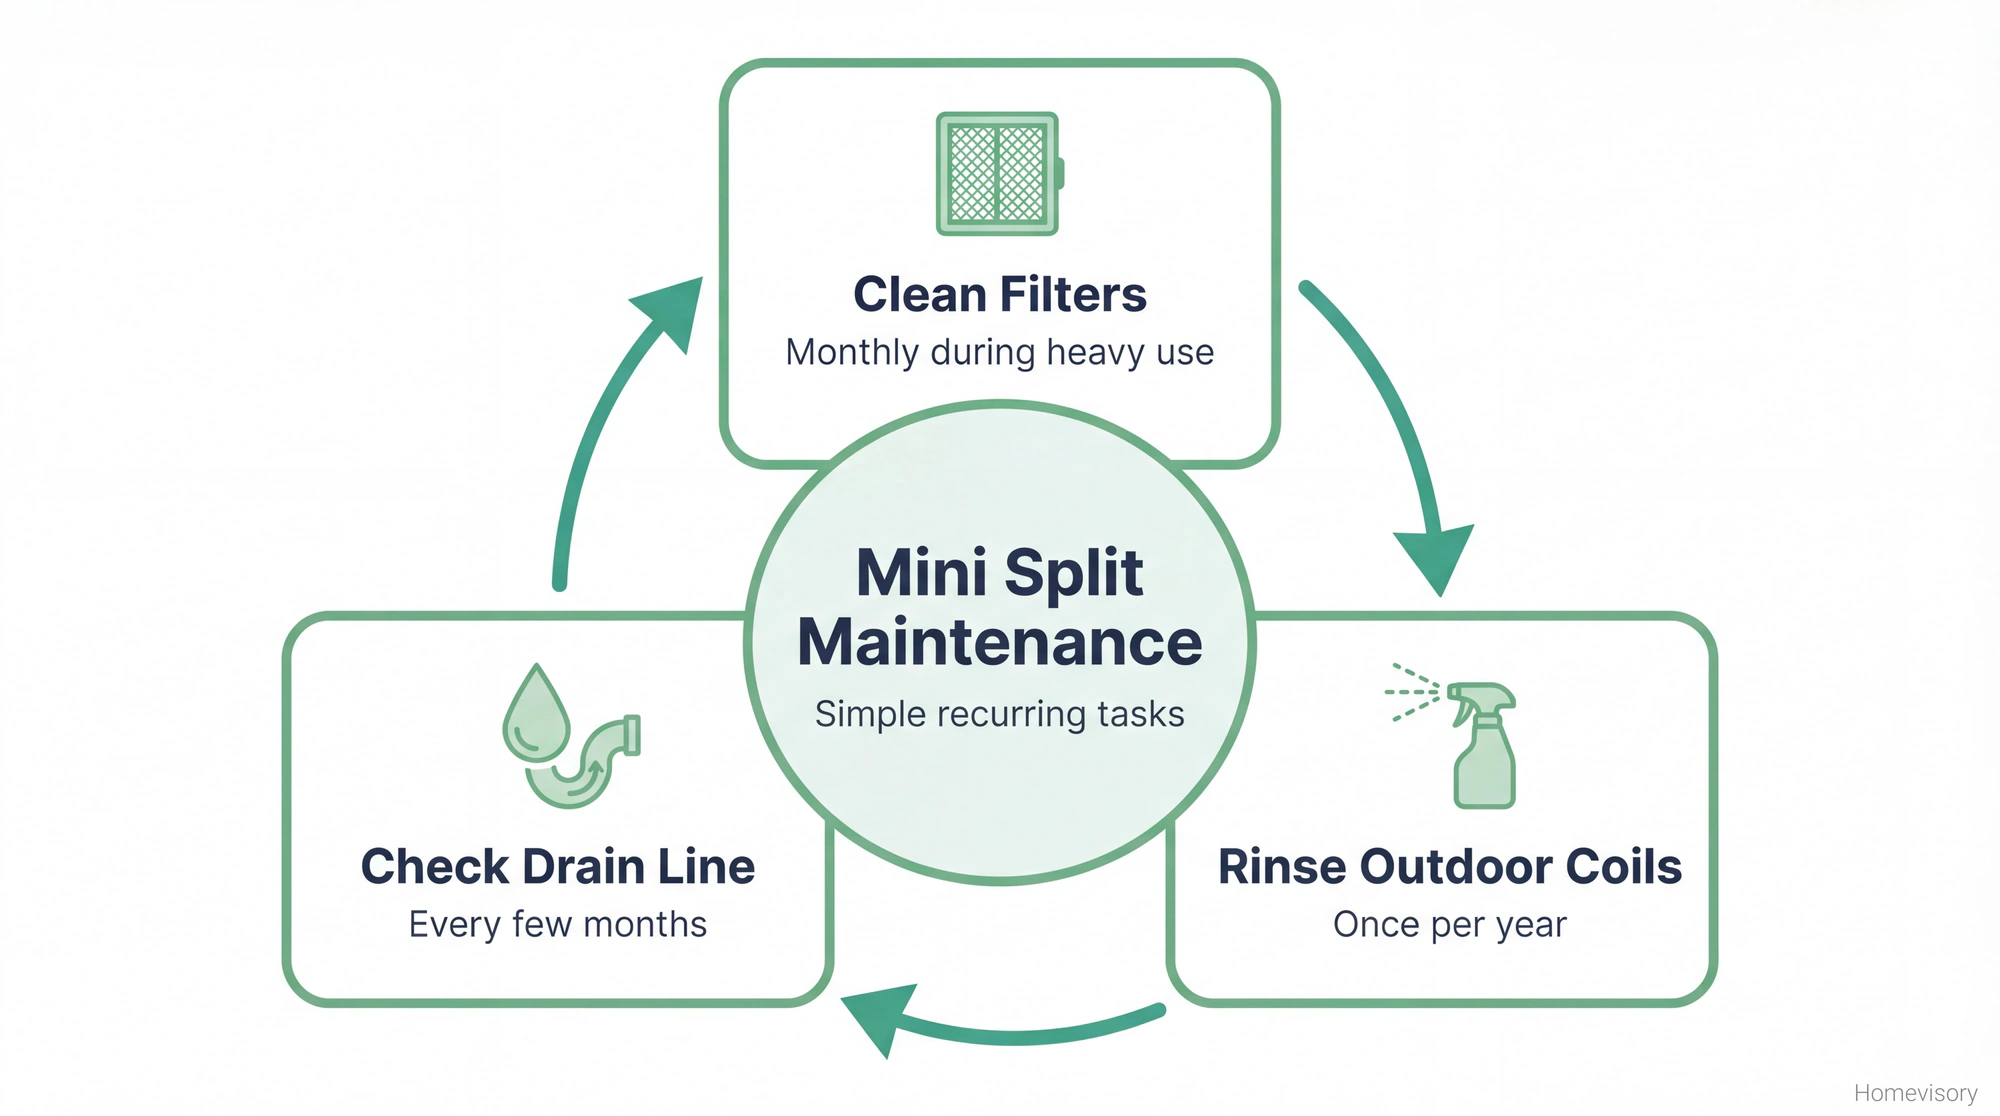
Maintaining Your System
Once it’s in, maintenance is minimal. Clean or replace the filters in the indoor unit every month during heavy use. Not sure how often yours needs it? Here’s how often to change your air filter. Most units have washable filters, just rinse them and let them dry completely. For a full rundown on keeping your system running efficiently, check out our HVAC maintenance guide.
Once a year, clean the outdoor unit coils. Spray them with a hose, nothing high pressure, just enough to rinse off dust and debris. Trim any plants that have grown too close.
Check the condensate drain occasionally. If water is backing up or not draining, you might have a clog. A little bleach solution poured through prevents algae growth.
Thats it.
The Homevisory Part
This is exactly the kind of project where having a system helps. You need to remember when you last cleaned the filters. You need seasonal reminders to check the outdoor unit. You need to track warranty information and any quirks you noticed during installation.
Homevisory’s home task manager does this. You set it up once and it tells you when to do things. Free to sign up. That’s what we do here at Homevisory, we help you stay ahead of maintenance instead of scrambling when something breaks.
Mini split heat pump installation is a bigger project than changing an air filter. But the maintenance afterward is just as important and just as easy to forget. Build the system now, thank yourself later.
Ready to stay on top of your home maintenance? Sign up for the Homevisory home task manager - it’s free.