
The Machine Looks Easy Until It Isn’t
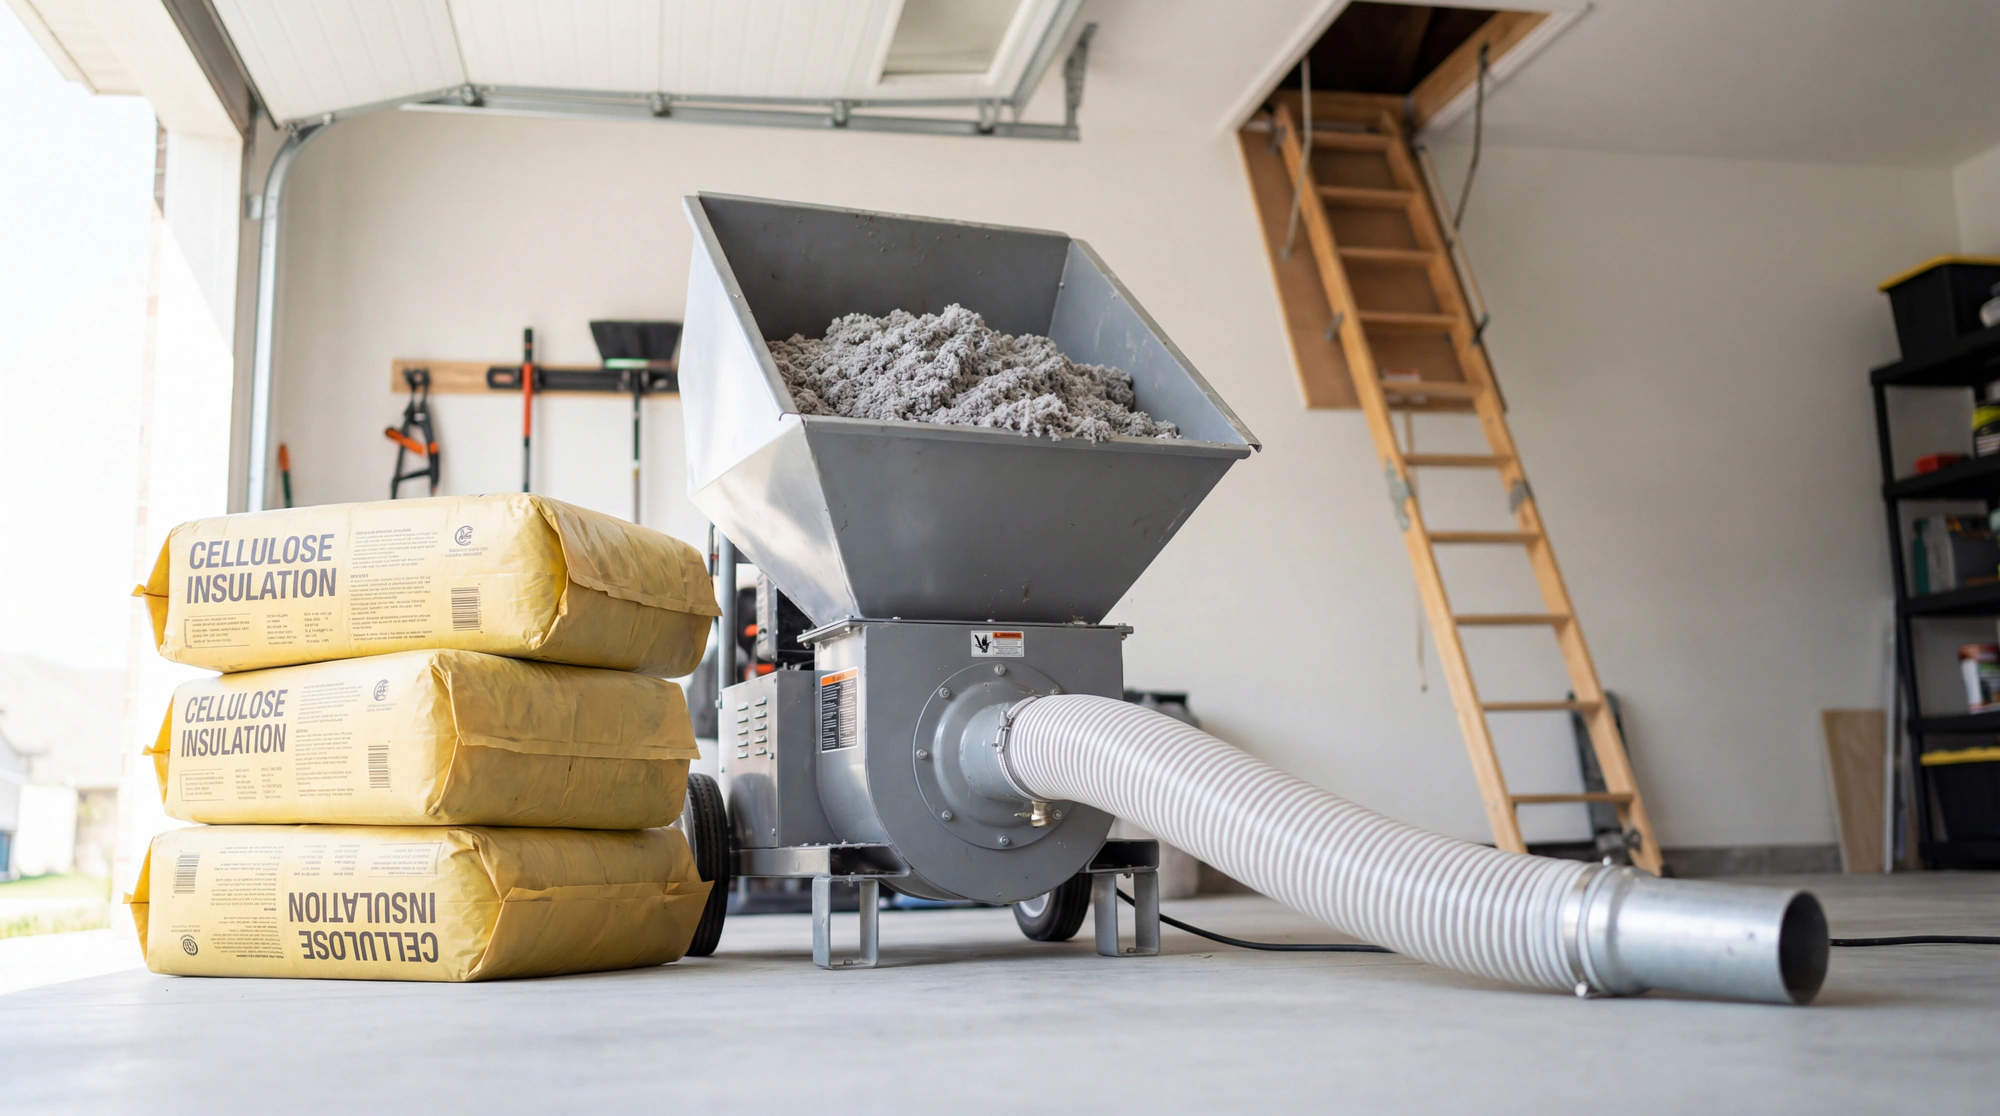
People see the blown in insulation machine at Home Depot and think this is going to be simple. You rent it for four hours, buy some bags of loose fill, climb up in the attic, and spray it around. Done. Save yourself a couple thousand dollars.
I’ve watched this go wrong more times than I can count.
The actual blowing part is not complicated. Thats true. You feed bags into the hopper, someone holds the hose, insulation comes out. But everything around that process, the prep work, the safety stuff, knowing where to blow and where not to blow, knowing when to stop, thats where people get into trouble. And once cellulose insulation is everywhere including your HVAC ducts and soffit vents and all over your face and in your lungs, you cant exactly put it back in the bag.
So heres the real question. Should you do this yourself or pay someone.
The answer depends on your attic.
What You’re Actually Trying to Do
Before we get into DIY versus professional, you need to understand what blown in insulation is supposed to accomplish. Its not just about “making the attic warmer.” Thats not even accurate. Insulation doesnt make anything warmer. It slows down heat transfer.
In winter, heat from your living space wants to rise into the attic and escape through the roof. In summer, heat from the sun beating on your roof wants to drop down into your living space. Insulation creates resistance to both of those. Thats all it does. Resistance.
The amount of resistance is measured in R-value. Higher R-value means more resistance. And this is where I’m going to spend some time because most people have no idea what R-value they actually need and they just guess.
R-Value and Climate Zones
The Department of Energy divides the country into climate zones. Zone 1 is hot, like Miami and the Keys. Zone 7 is cold, like northern Minnesota. Where you live determines how much insulation you need. You can find the specific R-value recommendations for your zone on the ENERGY STAR insulation guide.
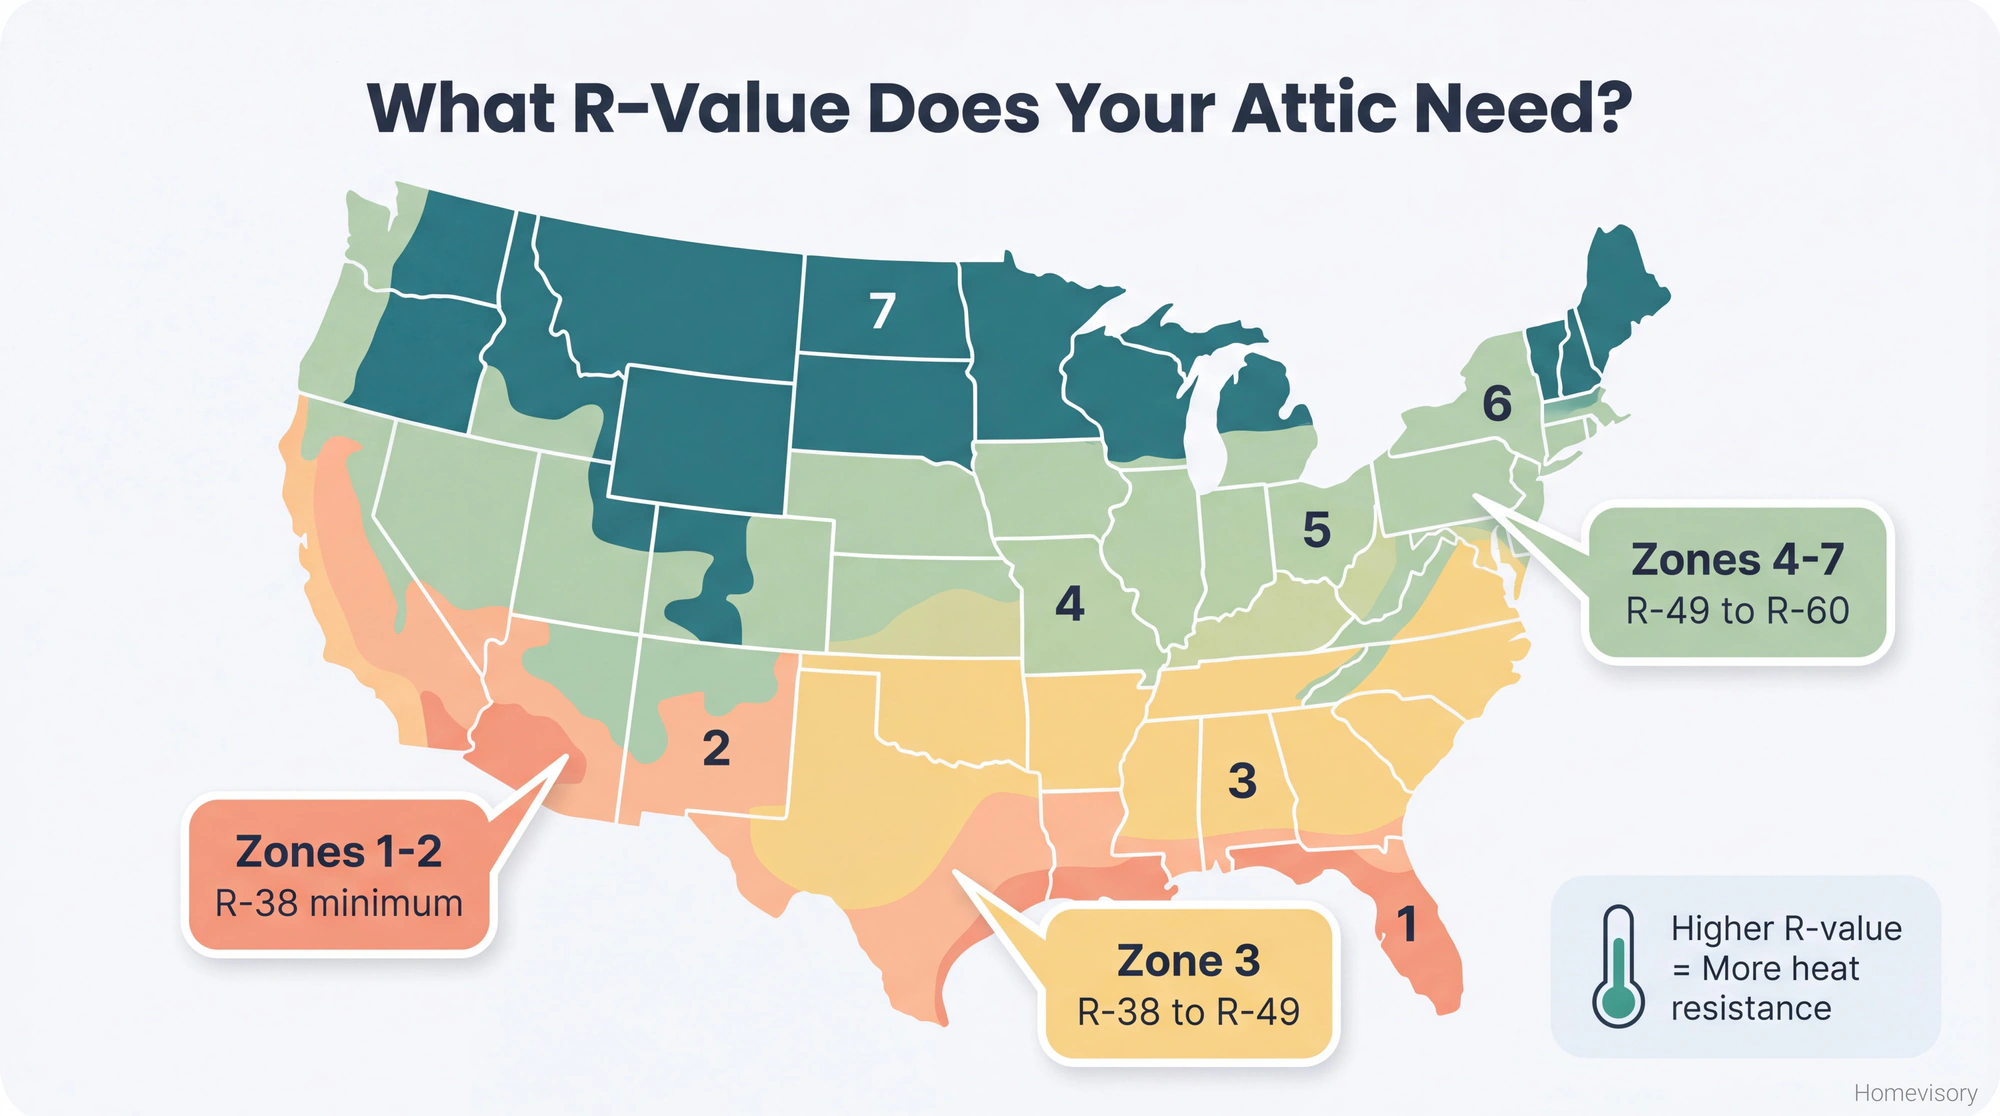
For most of the country, the recommendation for attic insulation is somewhere between R-38 and R-60. If youre in Zone 3, which is most of the South, you need R-38 minimum but R-49 is better. If youre in Zones 4 through 7, you need R-49 to R-60. I’m in Palm Beach now, Zone 2, and even here the recommendation is R-38 because people forget that insulation also keeps the heat out in summer and you want your air conditioning to work less, not more. Good insulation paired with a well-maintained HVAC system can extend your furnace lifespan significantly by reducing how hard it works. I talk to people down here who think they dont need much attic insulation because “its Florida, we dont have real winters” and I have to explain that their electric bill in August is twice what it should be because their AC is fighting against 150-degree attic air dropping down through their ceiling. The insulation works both directions. Thats the whole point of thermal efficiency. Its not just about cold.
My dad Curtis would say measure twice, cut once. He was talking about something else, factory stuff, but it applies. Figure out your climate zone. Look up the R-value you need. Then figure out how much insulation that actually means.
Translating R-Value to Inches
This is where it gets practical.
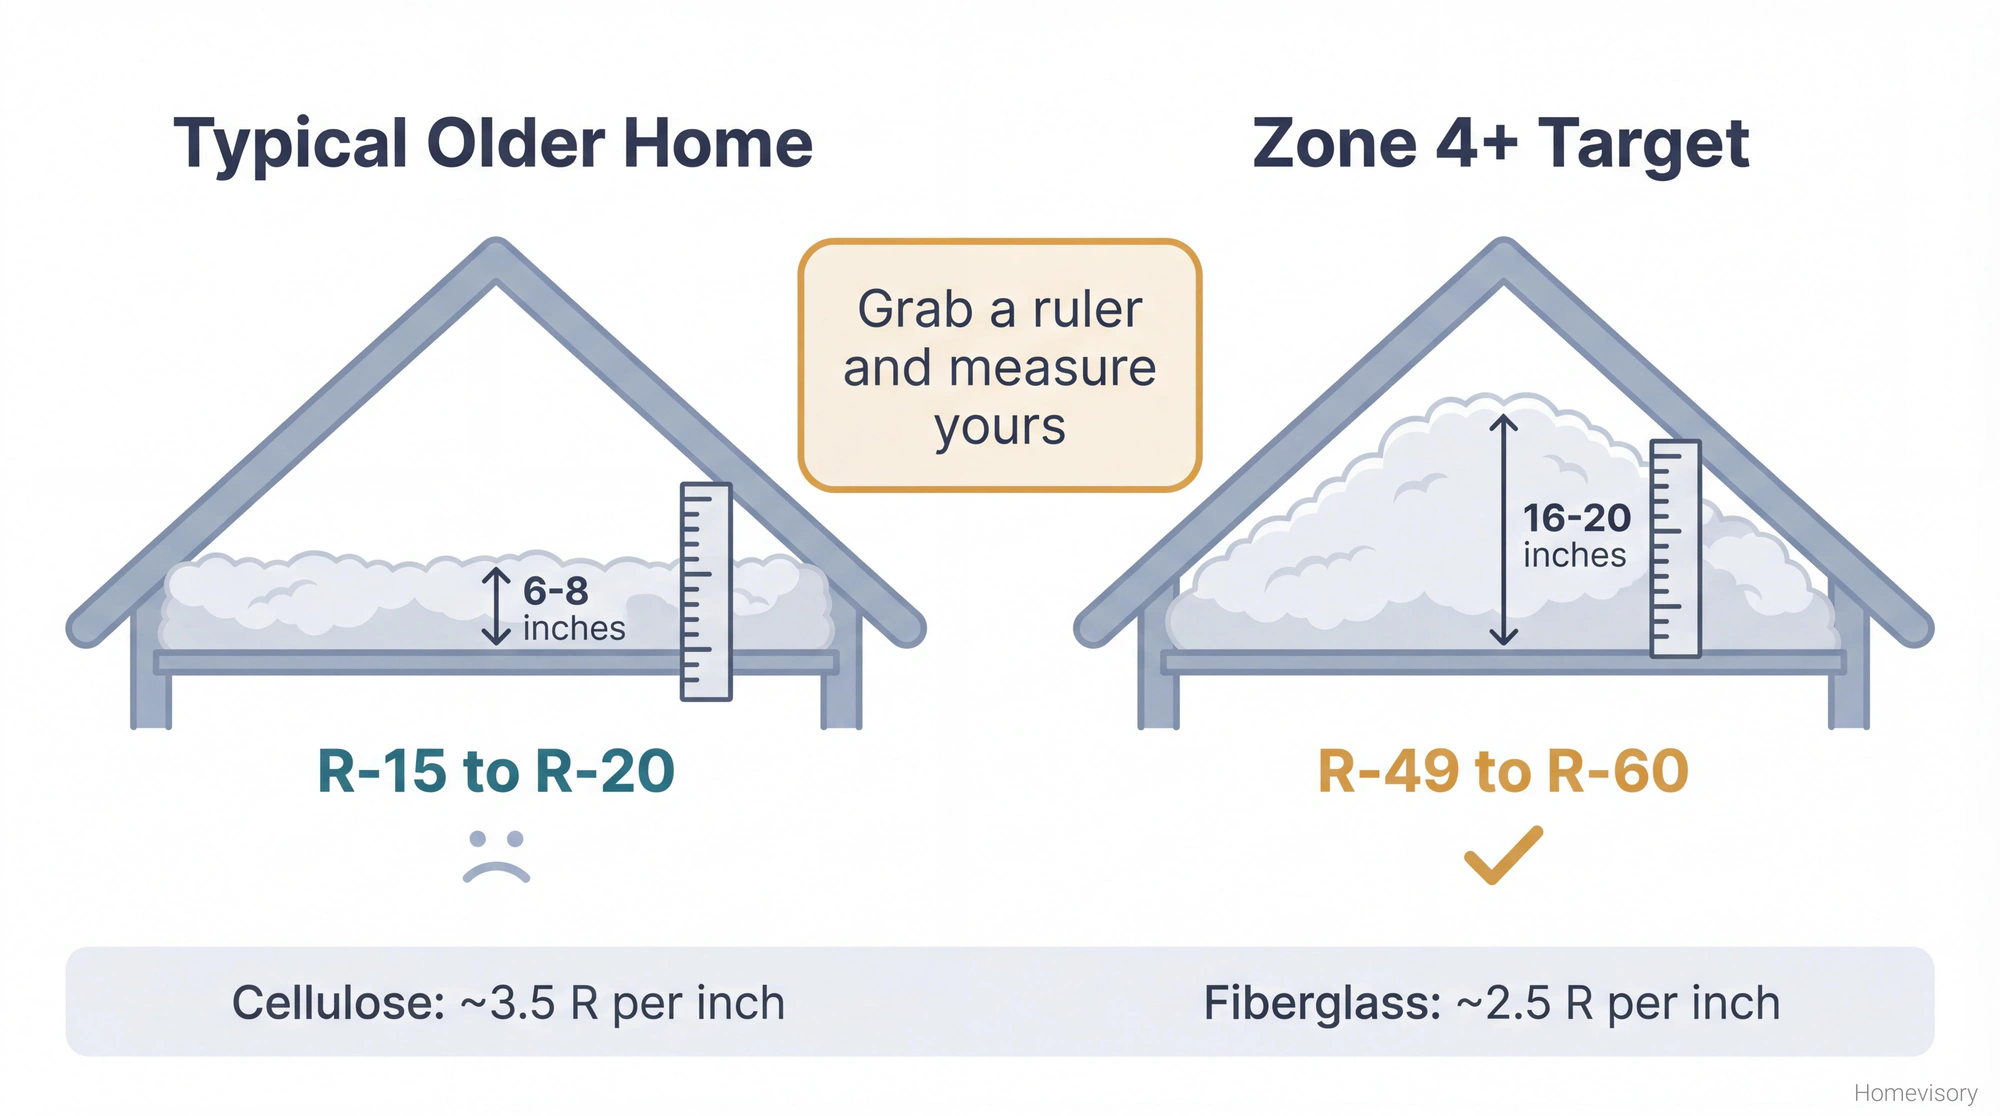
Different materials have different R-values per inch. Fiberglass blown in insulation gives you about R-2.5 per inch. Cellulose gives you about R-3.5 per inch. So if you need R-49, youre looking at roughly 20 inches of fiberglass or 14 inches of cellulose to get there.
Go up in your attic right now. Take a ruler. Measure what you have.
Most houses built before 2000 have maybe 6-8 inches up there if youre lucky. That’s R-15 to R-20. Not enough. Not even close. I was in a house in Texas, this was back in 2007, and the attic had maybe 4 inches of settled insulation that had probably been R-11 when it was installed in 1985 and was now R-8 at best. The owner was spending $400 a month on electricity in summer and had no idea why.
Insulation settles over time. Cellulose settles more than fiberglass. If your blown in insulation was installed twenty years ago, its not doing what it used to do. You need more.
The DIY Reality
Okay. So you know your R-value target. You know how many inches you need. You’ve measured what you have. Now the decision.
DIY makes sense if:
- Your attic is easy to access with a full-size pull-down ladder or walk-up stairs
- You can actually move around up there without doing gymnastics
- You dont have a complicated roof with a million angles and soffits
- The existing insulation is in decent shape, just not enough of it
- You have someone to help because this is a two-person job
- You dont mind being covered in insulation for several hours
Professional makes sense if:
- Your attic access is a tiny ceiling hatch
- Youve got knob and tube wiring up there (this is a safety issue, not a convenience issue)
- There’s old insulation that needs to come out first
- You see signs of moisture damage, mold, animal damage, anything weird
- Your soffits are blocked and need airflow correction
- You just dont want to do it
I’m not going to tell you that DIY is always a bad idea. Its not. I’ve done it myself. I’ve helped friends do it. But I’ve also seen people make expensive mistakes, and most of those mistakes happened because they underestimated the prep work.
Prep Work Nobody Talks About
The blowing part takes two or three hours. The prep work can take all day. And you’ll want a stud finder to locate your ceiling joists before you start walking around up there — stepping between joists instead of on them is how you avoid putting your foot through the ceiling.
Before any loose fill goes into your attic, you need to seal air leaks. Every penetration through your ceiling, every electrical box, every recessed light, every HVAC duct, every plumbing stack. If you just blow insulation over these without sealing them, youre insulating air leaks. Warm air is still escaping. Cold air is still coming in. The insulation is just watching it happen.
Air infiltration is what kills your energy bill. Not lack of insulation. Both matter but sealing matters more.
You also need to make sure your soffit vents arent blocked. An attic fan can help move hot air out, but it only works if the soffits are clear. The attic needs airflow from the soffits up to the ridge or gable vents. If you blow insulation into the soffits, you block that airflow, moisture builds up, and eventually you have a mold problem. You need baffles at every rafter bay near the eaves to keep the insulation back from the soffits.

I spent a morning in Chicago once, this was during my travel years, early 2000s, and the apartment I was staying in had ice dams on the roof three inches thick. I asked the super what was going on. He said the landlord had “added insulation” a few years back. What actually happened was somebody blew insulation into the attic without baffles, blocked all the ventilation, now heat was escaping through the roof unevenly, melting snow, which refroze at the eaves, and ice built up. The guy ruined the roof trying to save money on heating. I remember walking outside that morning and my eyelashes froze together. I’m not exaggerating. Thats how cold Chicago gets. And this building had ice dam problems because someone “saved money” on insulation. The landlord never did fix it properly. We moved. But yeah.
Cellulose vs Fiberglass
People ask me all the time which material is better for blown in insulation. Cellulose is made from recycled materials, mostly newspaper treated with fire retardant. Fiberglass is, well, fiberglass. Cellulose has a higher R-value per inch. Fiberglass is more moisture resistant and doesnt settle as much.
Both work. Moving on.
Seriously. I’m not getting into this debate here. I’ve used both. I’ve seen both perform well and both perform badly. The installation quality matters more than the material. If someone does a sloppy job with cellulose, it wont work. If someone does a sloppy job with fiberglass, it wont work. Pick one and do it right.
The Machine Rental Experience
If you go the DIY route, heres what happens. You go to Home Depot or Lowes. You buy a certain number of bags of insulation, usually theres a minimum purchase to get the machine free. Then they give you the machine, which looks like an industrial leaf blower attached to a hopper.
One person feeds bags into the hopper and makes sure it doesnt jam. The other person is in the attic with the hose, walking around, blowing insulation where it needs to go. You need to wear a real respirator, not a dust mask, a respirator. You need safety glasses that seal around your eyes. You need long sleeves and gloves. This stuff gets everywhere and fiberglass especially will make you itch for days if it gets on your skin.
The machine is loud. The attic is hot. The work is physically harder than it looks because youre hunched over walking on joists trying not to step through the ceiling while aiming a hose thats fighting you.
It takes about 30-40 bags of insulation to add 10 inches of depth to a 1000 square foot attic. Use an insulation calculator online to figure out exactly what you need for your space and your target insulation depth. Buy 10% more than the calculator says because you always need more than you think.
When to Call a Professional
Some situations are just not DIY.
If your attic has old vermiculite insulation, stop. That might contain asbestos. Do not touch it. Do not blow over it. Get it tested first.
If you have knob and tube wiring, which is old ceramic insulators instead of modern romex, you need an electrician before you insulate. Covering that wiring with insulation is a fire hazard.
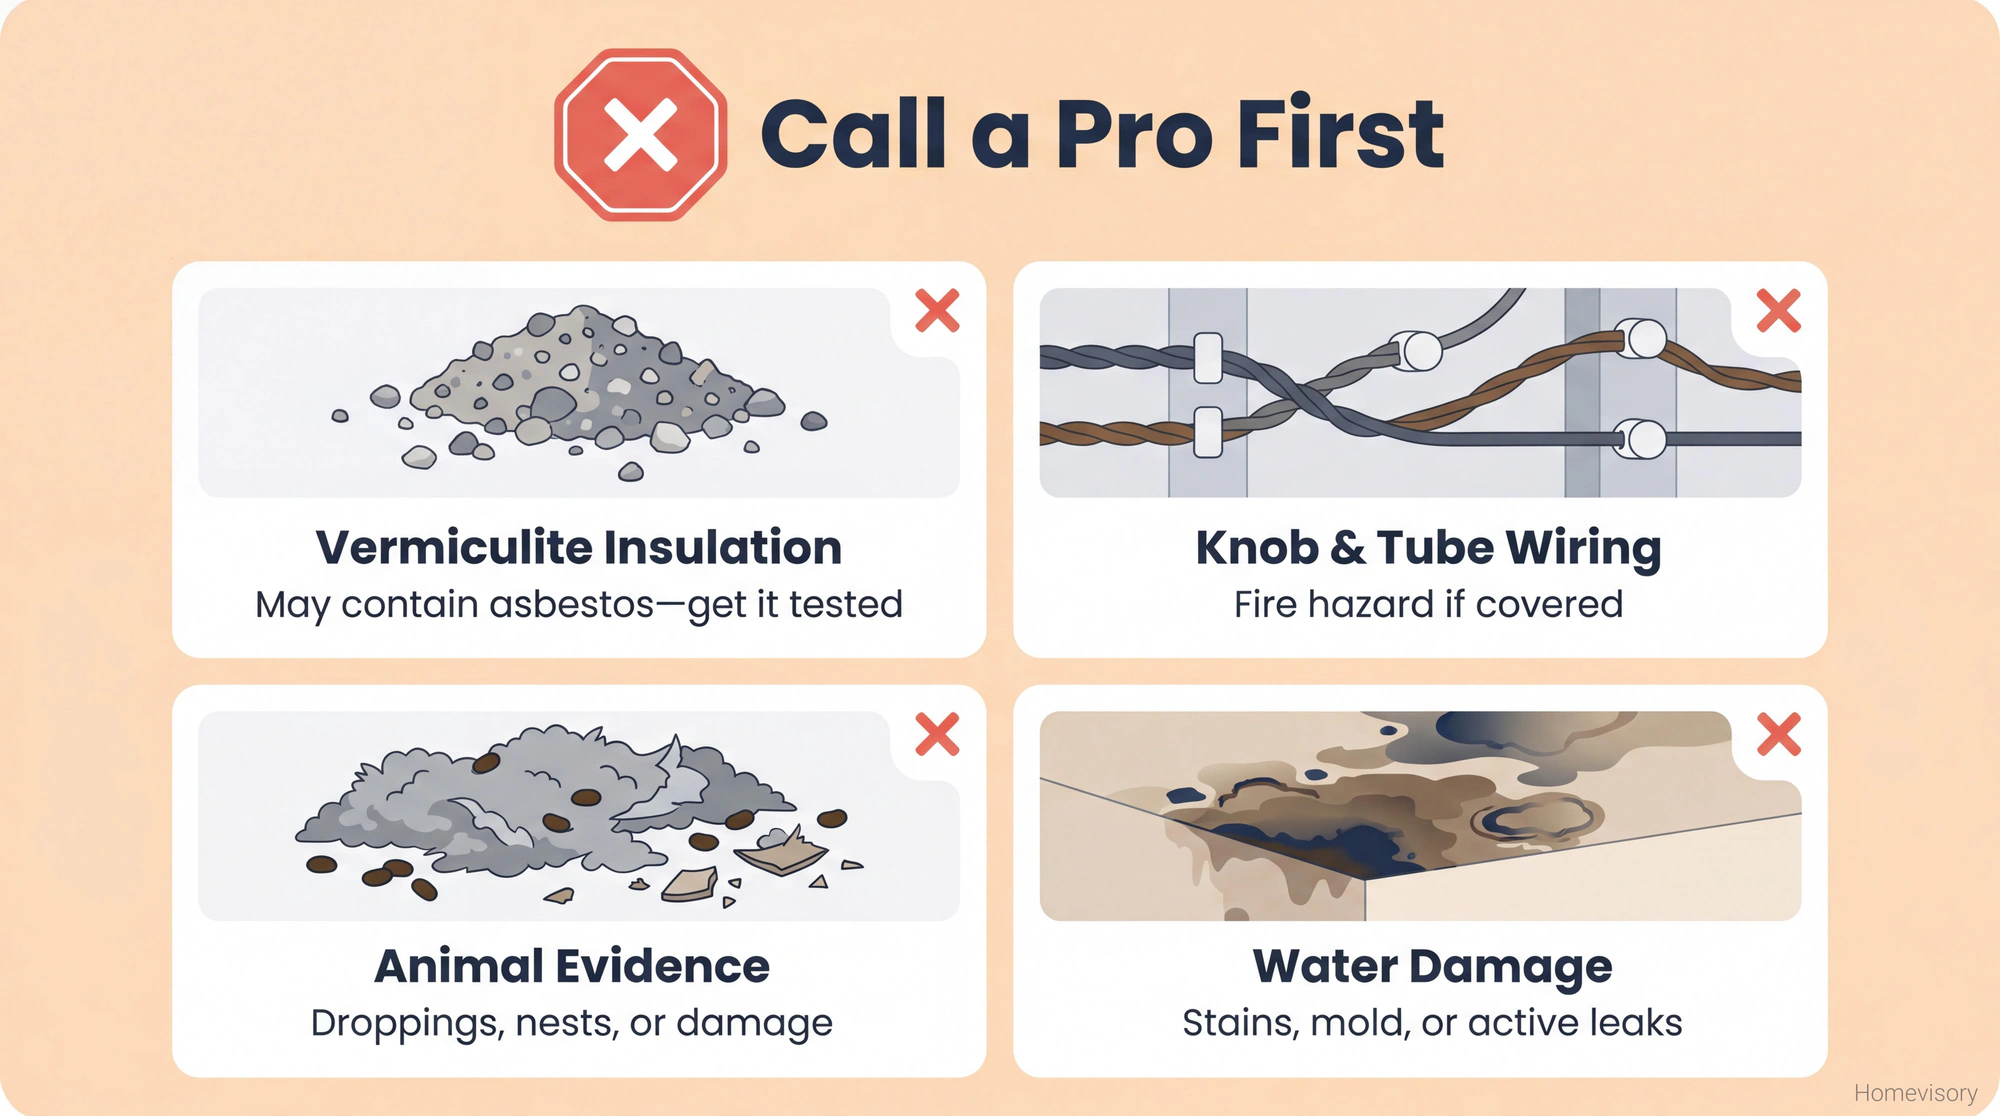
If theres evidence of rodents, bats, or other animals, you need that addressed first. Dont just blow insulation over animal droppings.
If there’s water damage, mold, or any sign of roof leaks, insulation is not your first problem.
And honestly, if your attic access is one of those tiny hatches in a hallway closet ceiling, youre going to be miserable. Professionals have equipment for that. You dont.
What Professionals Actually Do
A good insulation contractor will:
Start with an inspection to see whats up there already. Theyll check for air leaks, moisture issues, ventilation problems, damaged existing insulation. Then they give you a quote that includes prep work, not just the blowing.
The prep is the part that matters. Air sealing. Installing baffles. Maybe removing old insulation if its damaged. Then the blowing, which they do with commercial equipment thats faster and more powerful than the rental stuff.
Cost depends on your area and attic size but expect $1500-3000 for a standard attic if theres no remediation needed. If they need to remove old insulation or do significant air sealing, it goes up from there.
Get multiple quotes. Ask specifically what prep work is included. If someone quotes you half the price of everyone else, ask what theyre skipping.
A Note About Home Inspectors
This is a pet peeve. Home inspectors will go up in an attic, shine a flashlight around, and write in their report that the insulation “appears adequate.”
What does that mean. Adequate for what. Did they measure it. Do they know the R-value. Do they know what R-value the house needs based on climate zone.
Usually no. They looked at it and it looked like insulation so they said it was fine.
If youre buying a house and you want to actually know the condition of the attic insulation, measure it yourself. Bring a ruler. Do the math. Dont trust “appears adequate.”
The Homevisory Approach
I keep a note in my calendar to check attic insulation every year before winter. Not to add more, just to look. Make sure nothing weird is happening up there. Make sure the depth hasnt settled too much. Make sure no animals have moved in and made a mess of things. Its part of my seasonal home maintenance checklist along with everything else that needs doing before the cold hits. And if your energy bills are higher than they should be, poor attic insulation is usually one of several culprits — our guide on why your electric bill is so high covers the full list, and window insulation is another quick fix that pays for itself in one season.
If you use Homevisory, you can set this reminder and forget about it until the app tells you its time. Thats what we built it for. You dont have to remember everything, the system remembers for you. Sign up free and add attic insulation check to your seasonal tasks. Your future self will appreciate it when your heating bill doesnt double because you forgot to look.