
When Grout Goes Bad
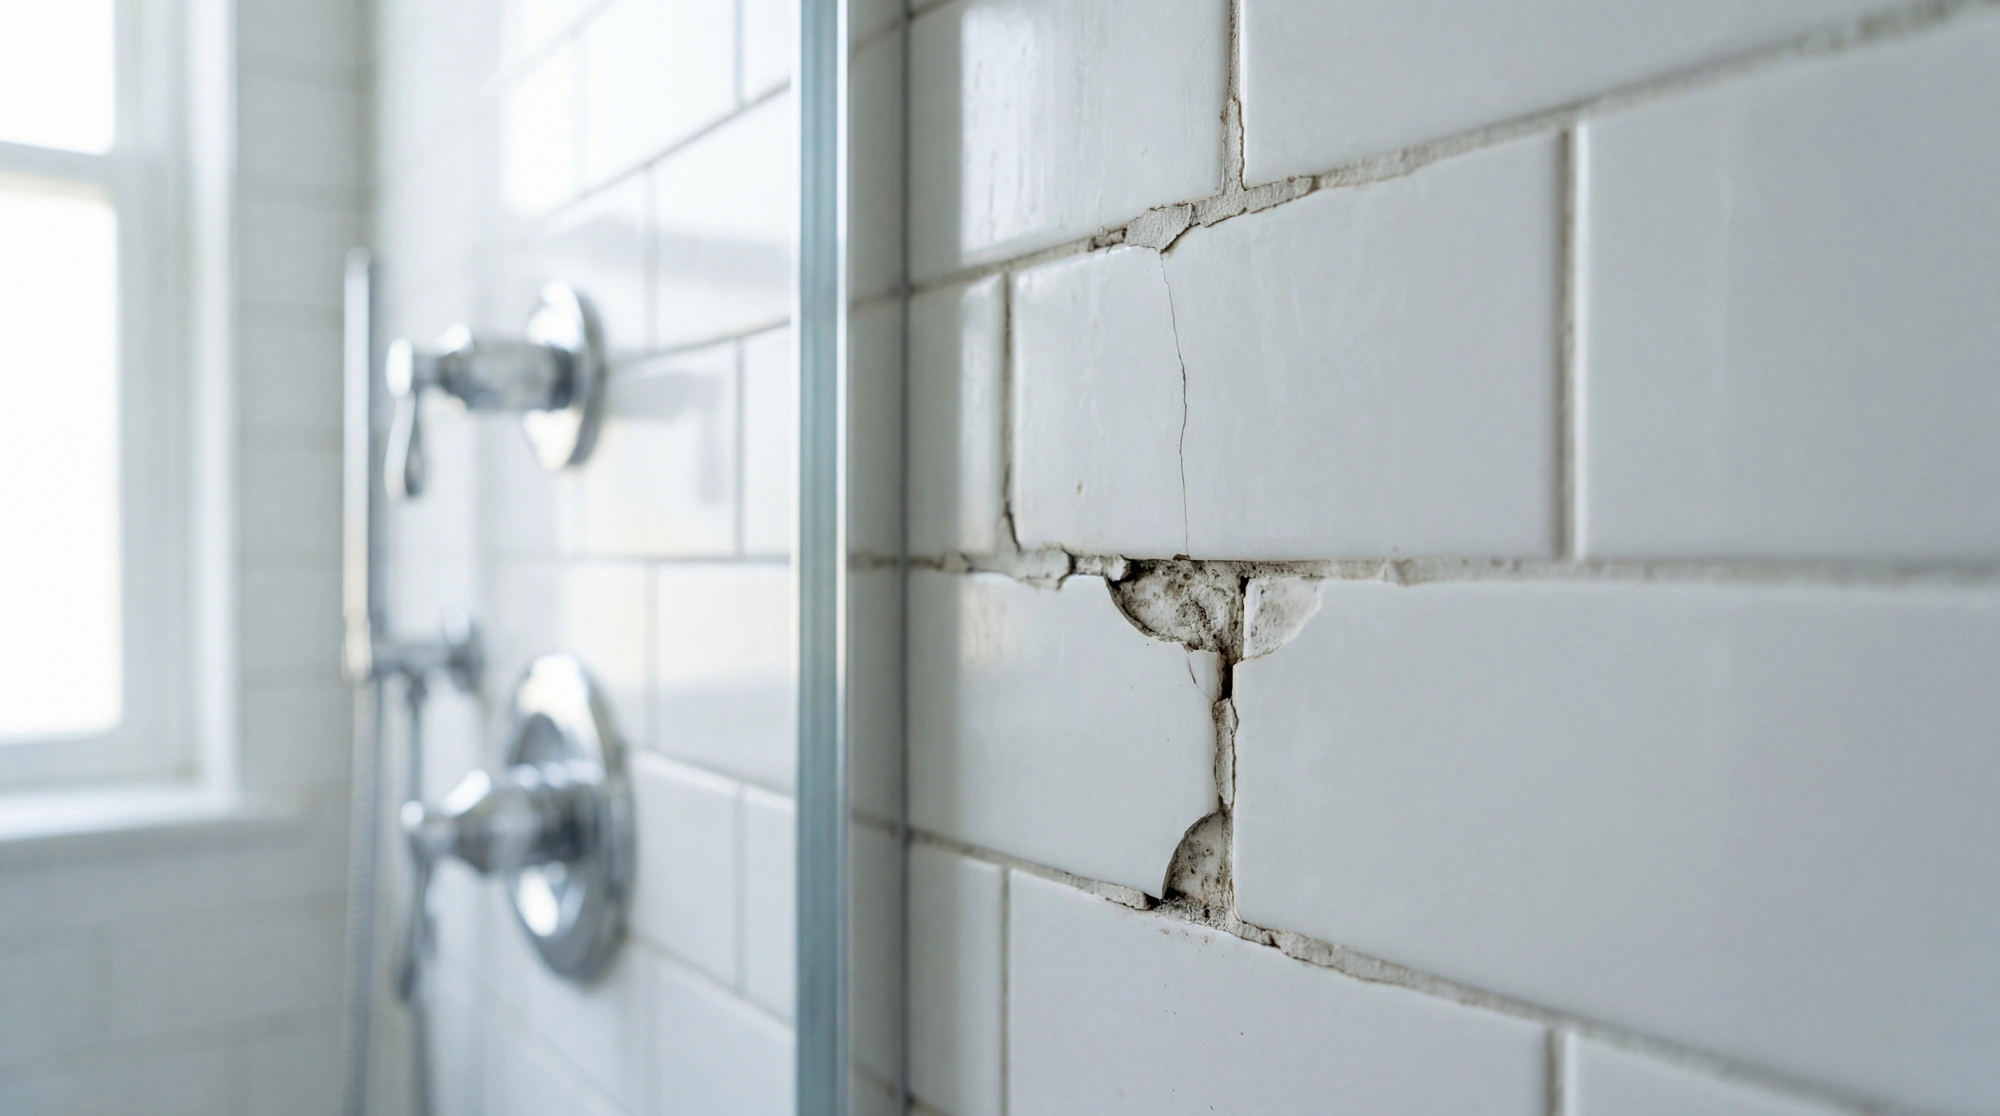
Grout fails. Thats just what happens. It cracks, it crumbles, it turns colors you didnt know were possible. And when it does, water gets behind it, and water behind tile is how you end up replacing an entire shower instead of just regrouting it.
I learned this the expensive way.
Most people ignore grout until its already a problem. They see cracks forming and think eh, its cosmetic. Its not cosmetic. Grout is a sealant. When it fails, moisture gets into places moisture shouldnt be. And moisture in the wrong place is how you get mold, rot, and subfloor damage that costs five times what the grout repair would have cost.
If youre noticing cracked, crumbling, or discolored grout in your shower or tile floor, you can fix it yourself. Its not complicated. But it takes longer than you think and theres no way to rush it.
Why Grout Fails in the First Place
Grout isnt permanent. People think it is because it looks like cement, but regular sanded grout is porous and it breaks down over time. Shower grout especially. The constant wet-dry cycle, the humidity, soap residue, hard water, all of it wears on grout.
The main reasons grout fails:
- Water exposure without proper sealing
- Building movement and settling
- Cheap grout or bad mixing
- Not enough grout pressed into the joints
- Cleaning products that are too harsh
I messed up my own bathroom in 2011 and it haunts me. I was rushing to finish a tile project, my own shower, and I tiled directly over old tile to save time. I knew better. I did it anyway. The grout started cracking within months because the substrate wasnt stable enough, and within a year there was water damage behind the wall. Soft subfloor. Mold smell. Raquel made me sleep on the couch because I “smelled like mold” after demo. She wasnt wrong. Anyway.
The point is grout problems are usually symptoms of something else. Before you start any tile grout repair, you need to figure out why it failed. If its just age and wear, fine, regrout it. If theres movement in the substrate or water damage behind the tile, regrouting is just putting lipstick on a pig.
Press on the tile around the bad grout. Does it flex? Does it feel hollow when you tap it? If yes, you might have bigger problems than grout. Call someone.
What You Need for Tile Grout Repair
Heres the list. Nothing fancy.
- Grout removal tool (oscillating multi-tool with grout blade OR manual grout saw)
- Shop vac or vacuum with hose attachment
- New grout (sanded or unsanded, depends on joint width)
- Grout float
- Bucket and sponge
- Spray bottle with water
- Grout sealer
- Painters tape if youre messy
- Safety glasses
- Dust mask
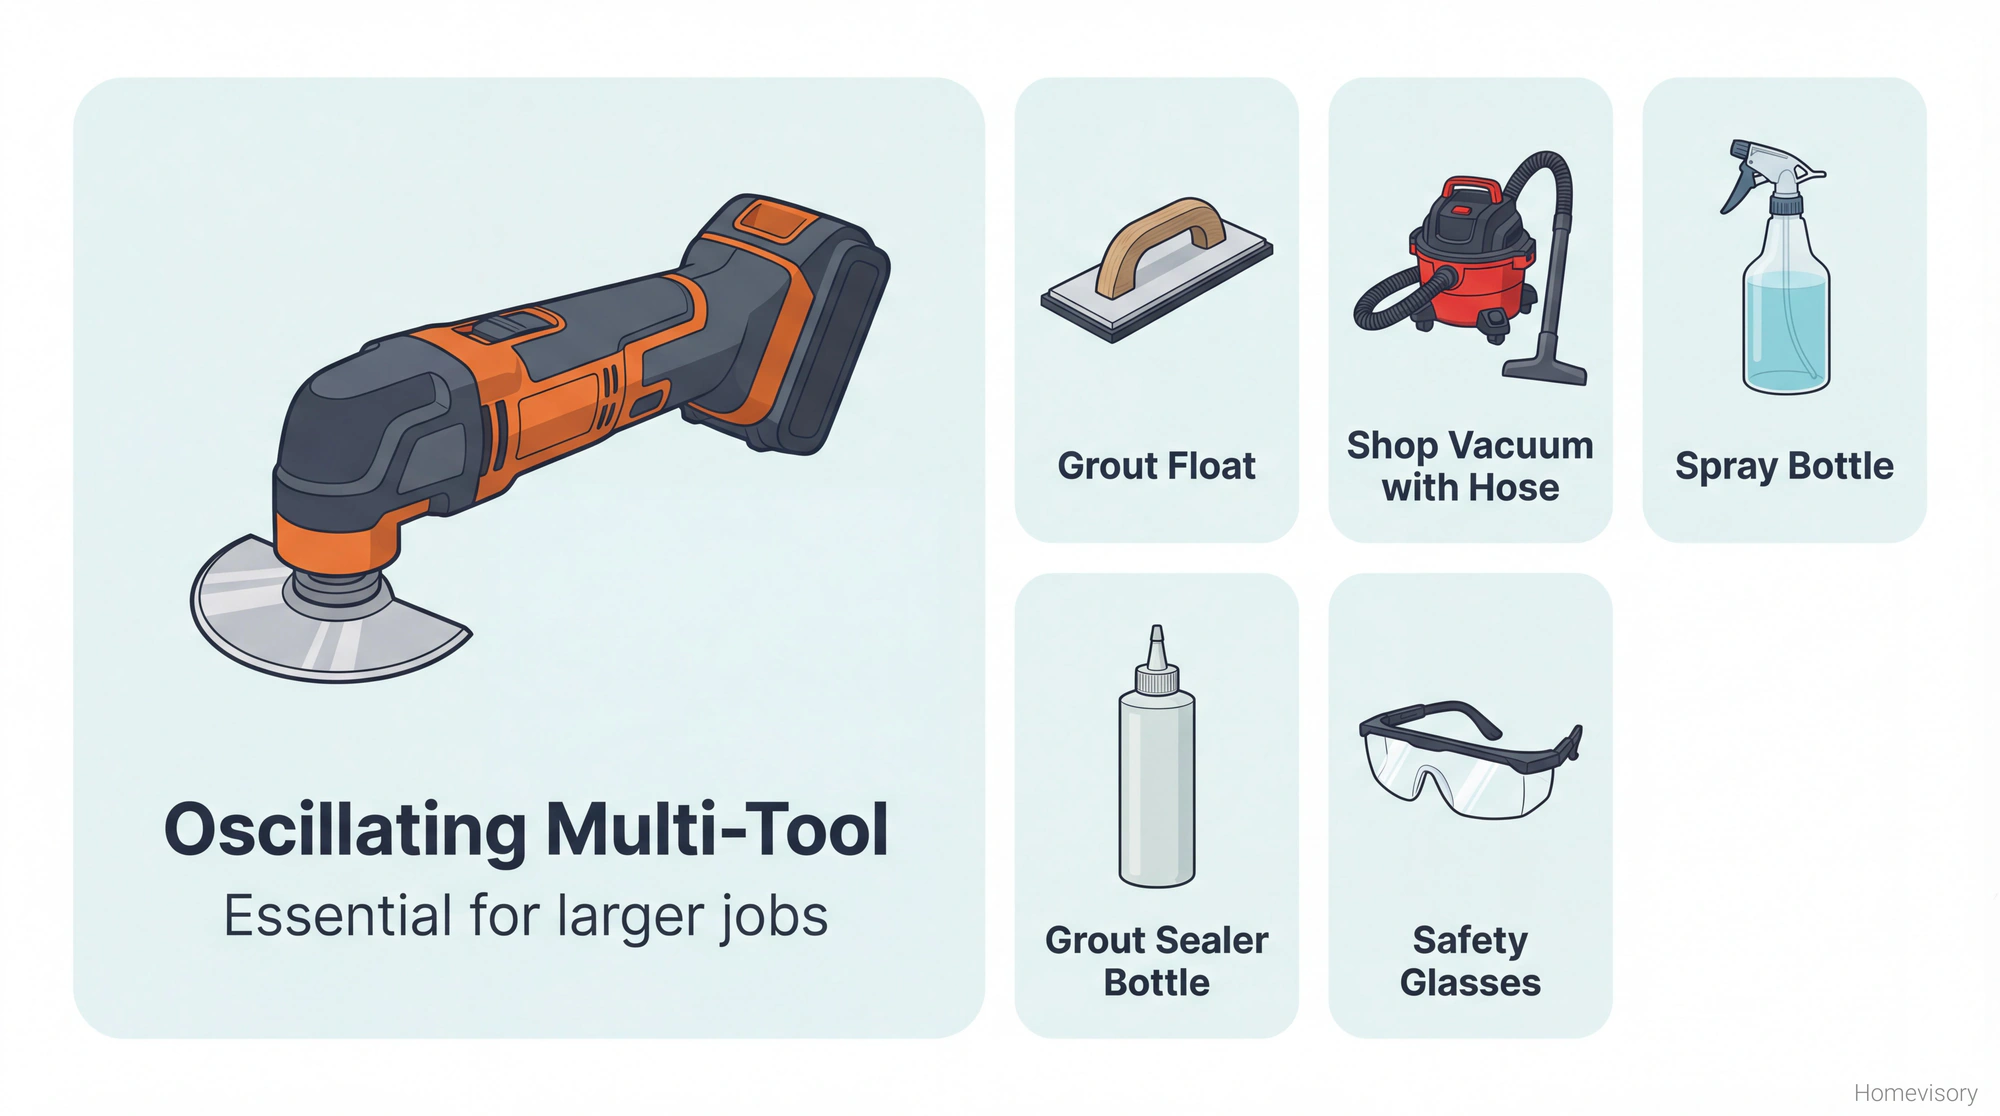
The grout removal tool matters. You can use a manual grout saw, and I have, but if youre regrouting more than a few square feet your wrist is going to hate you. An oscillating multi-tool with a carbide grout blade makes this job much faster. Theyre like $50-100 for a decent one and you’ll use it for other stuff.
Whatever grout you buy, just make sure its sanded if your grout lines are wider than 1/8 inch. Unsanded if theyre thinner. Thats it. Moving on.
Grout Color
Go to the store with a tile sample or a photo. Match it the best you can. The color will look different wet vs dry so read the packaging.
Im not getting into color theory here.
Removing the Old Grout
This is the part people underestimate and its the part that matters most.
My dad Curtis used to say, about factory work, he used to say the setup takes longer than the job. Same thing here. You might spend three hours removing grout and thirty minutes applying new grout. That ratio is normal. People watch YouTube videos where someone regrouts a shower in what looks like twenty minutes and they think thats reality. Its not. Those videos are edited. Nobody films themselves scraping grout for three hours because nobody would watch it.
The goal is to remove at least two-thirds of the old grout depth. If your grout joints are 1/8 inch deep, you want to get down at least 1/16 to 1/8 inch. Some people say half depth is fine. I say more is better. The new grout needs something to grab onto and the more surface area you give it the stronger the bond.
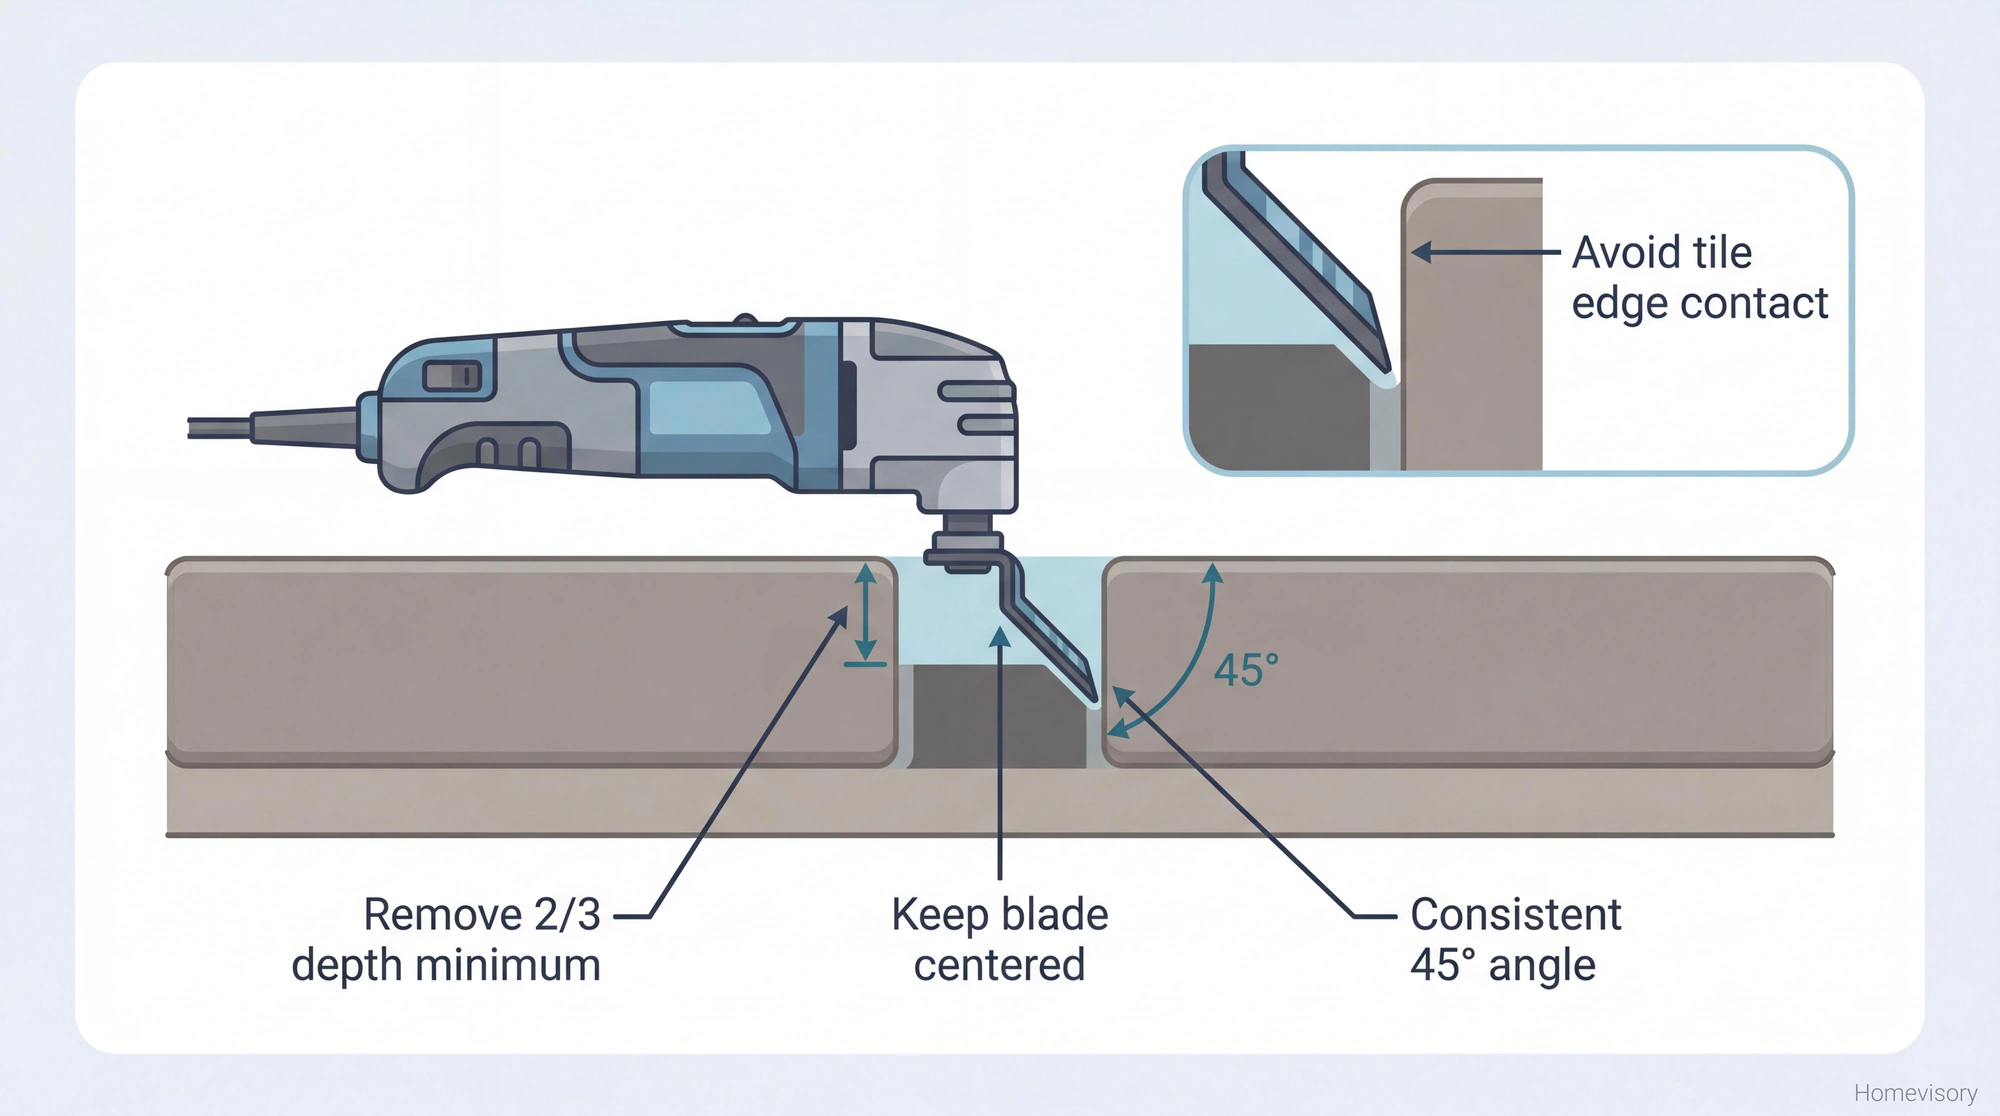
Here’s where I probably care too much but I’ve seen so many regrouting jobs fail because people got lazy with removal so I’m going to keep going. When you’re using an oscillating tool you have to keep it at a consistent angle and you have to go slow enough that you’re actually cutting grout and not just vibrating against it, and you absolutely cannot let the blade wander into the tile edge because even a small chip is permanent and if you chip enough tiles you’ve just made a cosmetic problem worse. The blade should ride in the grout channel like a train on tracks, steady pressure, consistent depth, and you stop and check every few inches to make sure you’re not drifting. I’ve seen people rush this and destroy perfectly good tile. Breaks my heart.
Work in sections. Dont try to do a whole shower in one session. Your hand cramps. You lose focus. Mistakes happen.
After each section, vacuum out all the dust. Every bit of it. If theres dust in the joints when you apply new grout, it wont bond properly. Use a shop vac with the hose attachment and really get in there.
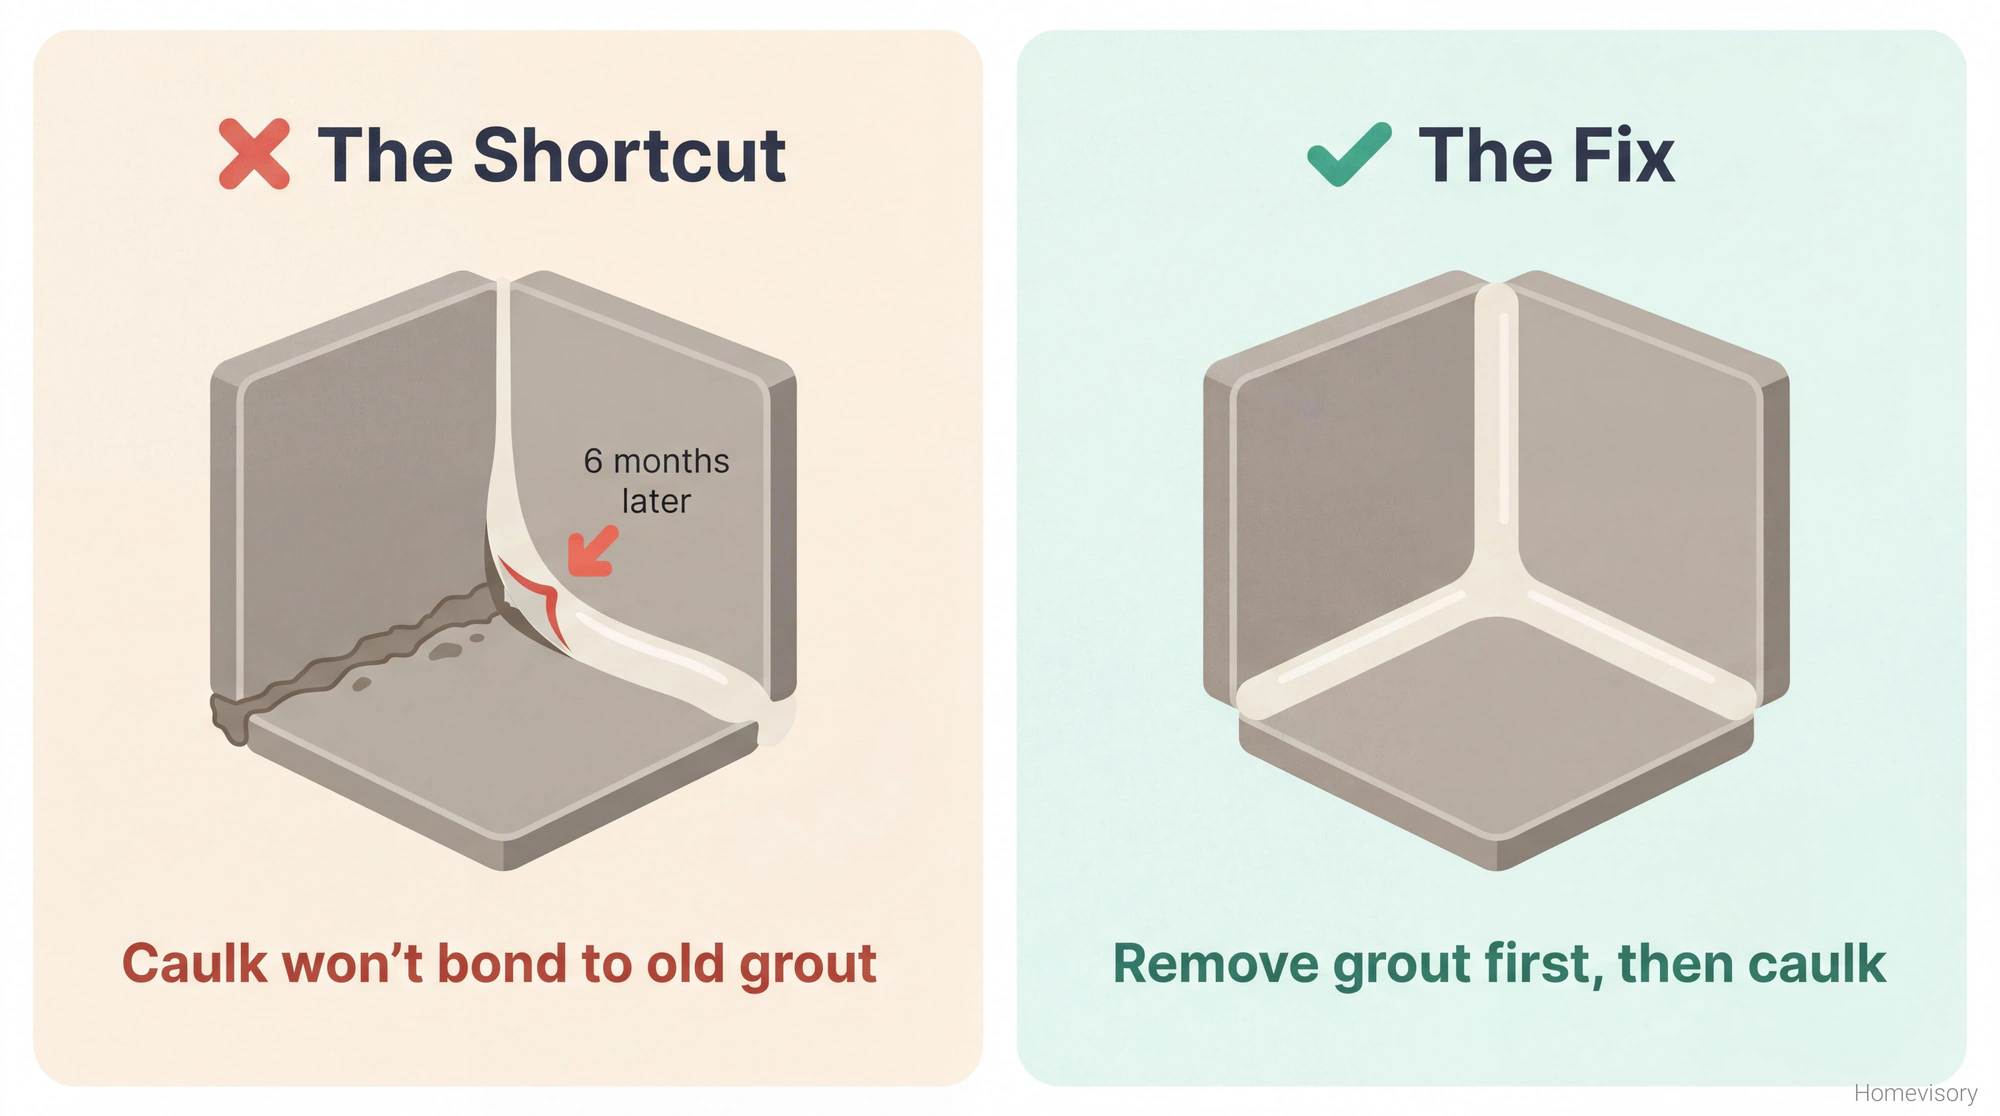
Corners and Edges
The corners where walls meet walls and walls meet floor, those should be caulk, not grout. Grout is rigid. It cracks at transition points where surfaces move differently. Silicone caulk is flexible.
If you have cracked grout in corners, remove it, clean the joint, let it dry completely, and caulk it. Get color-matched caulk if you care about that sort of thing. Custom Building Products makes sanded caulk that matches their grout colors.
Grout is just one piece of bathroom maintenance. Our complete bathroom cleaning guide covers tubs, soap scum, caulk, mold prevention, and shower heads — everything that keeps your bathroom from falling apart.
Some people caulk over failing grout instead of removing it. This drives me insane. The caulk wont bond to the old grout. Itll peel off in six months. You havent fixed anything. Youve just postponed it.
How to Regrout Tile
Once the old grout is removed and vacuumed, the actual regrouting is the easy part.
Mix the grout according to the package. Its usually about the consistency of peanut butter. You dont want it runny and you dont want it stiff. Let it sit for five or ten minutes after mixing, this is called slaking, then mix again briefly.
Wet the joints with a spray bottle. Not soaking, just damp. This keeps the tile from sucking moisture out of the grout before it can cure.
Load grout onto your float and spread it diagonally across the joints. You want to push grout into the joints, not across them. Angle the float at about 45 degrees and drag it at an angle to the grout lines. If you drag parallel to the lines, you’ll pull grout out instead of pushing it in.
Work in small sections, maybe three or four square feet at a time. Fill the joints, then hold the float almost perpendicular to the surface and scrape off excess. Most of the grout should end up in the joints, not on the tile surface.
Wait. This is where patience matters. Mr. Davis, my old woodshop teacher, he used to talk about patience with detail work. How rushing always shows. You can see it in the finished product even if you cant point to exactly what’s wrong.
The grout needs to set up before you clean. Usually 15-30 minutes but it depends on humidity and temperature. It should look hazy and feel firm but not rock hard. If you try to clean too soon, youll pull grout out of the joints. Too late and the haze is a nightmare to remove.
Wet your sponge, wring it out until its just damp, and wipe diagonally across the tile. Rinse and wring the sponge constantly. Youre not trying to scrub. Youre trying to smooth the joints and remove the haze in one gentle motion.
Three passes usually. Let it dry between passes. If theres a slight haze left after it cures, you can buff it with a dry cloth.
How to Regrout a Shower Specifically
Showers are the same process but with extra considerations.
You need the shower completely dry before you start. Run a fan in there for 24 hours if you have to. Any moisture in the walls, even humidity, affects how the grout cures.
After grouting, you have to keep the shower dry for at least 24 hours. Some grouts say 72 hours before water exposure. Read your packaging. This is where most shower regrouting jobs fail. People finish at 8 PM and take a shower the next morning because they “cant wait.” Then they wonder why the grout crumbled in two months.
Seal the grout. Shower grout especially. Unsealed grout absorbs water and all the soap scum and body oils and whatever else is in your shower. Wait at least 72 hours after grouting, then apply a penetrating grout sealer. Follow the directions. Do two coats.

Re-seal yearly. Or at minimum, do the water test every six months. Put a few drops of water on the grout. If it beads up, youre fine. If it soaks in, time to reseal.
When to Call Someone
If more than 30-40% of your grout is failing, you might want to bring in a professional. Not because you cant do it, but because its a lot of work and theres probably an underlying issue causing widespread failure.
If tiles are loose or hollow-sounding, thats beyond grout repair. Thats tile replacement and probably substrate repair.
If you see black mold, not just surface mildew but actual black mold growing behind the grout lines, thats a different situation. That needs remediation before it needs tile work.
Keep Your Grout Maintained
Once youve done the tile grout repair, maintain it so you dont have to do it again in two years.
- Clean with pH-neutral cleaners. The bleach-based stuff and vinegar are hard on grout.
- Run the bathroom fan during and after showers
- Squeegee shower walls after you shower (I know nobody does this but it helps)
- Reseal grout once a year
- Address cracks immediately, small repairs prevent big ones
Grout repair isnt glamorous. Its tedious and dusty and your knees hurt afterward. But its one of those jobs where doing it right means you dont think about it for years. And doing it wrong means youre ripping out your shower in two years.
Homevisory tracks maintenance tasks like grout sealing so you dont have to remember them yourself. You can sign up free and add your home, and it’ll remind you when its time to check on things before they become problems. Thats what we do here at Homevisory.