
Why Most Concrete Crack Repair Fails
I’ve filled more concrete cracks than I can count and I’ve also watched people fill cracks wrong more times than I can count. The crack comes back. The filler pops out. Water gets in. They blame the product.
Its almost never the product.
Concrete crack repair is one of those jobs that seems simple, and honestly it is simple, but simple doesnt mean you can skip steps. The reason most repairs fail has nothing to do with which concrete crack filler you bought. It has everything to do with what you did before you opened the tube.
Understanding What Youre Dealing With
Before you buy anything, you need to figure out what kind of crack you have. The GSA identifies two main types: active cracks and dormant cracks. Active cracks are still moving, changing width or depth over time. Dormant cracks have stabilized and arent going anywhere.
Why does this matter. Because if you fill an active crack with rigid epoxy, the crack is going to move and your repair is going to fail. You need flexible filler for active cracks. Rigid filler for dormant ones. Most people grab whatever is on the shelf at Home Depot without thinking about this.
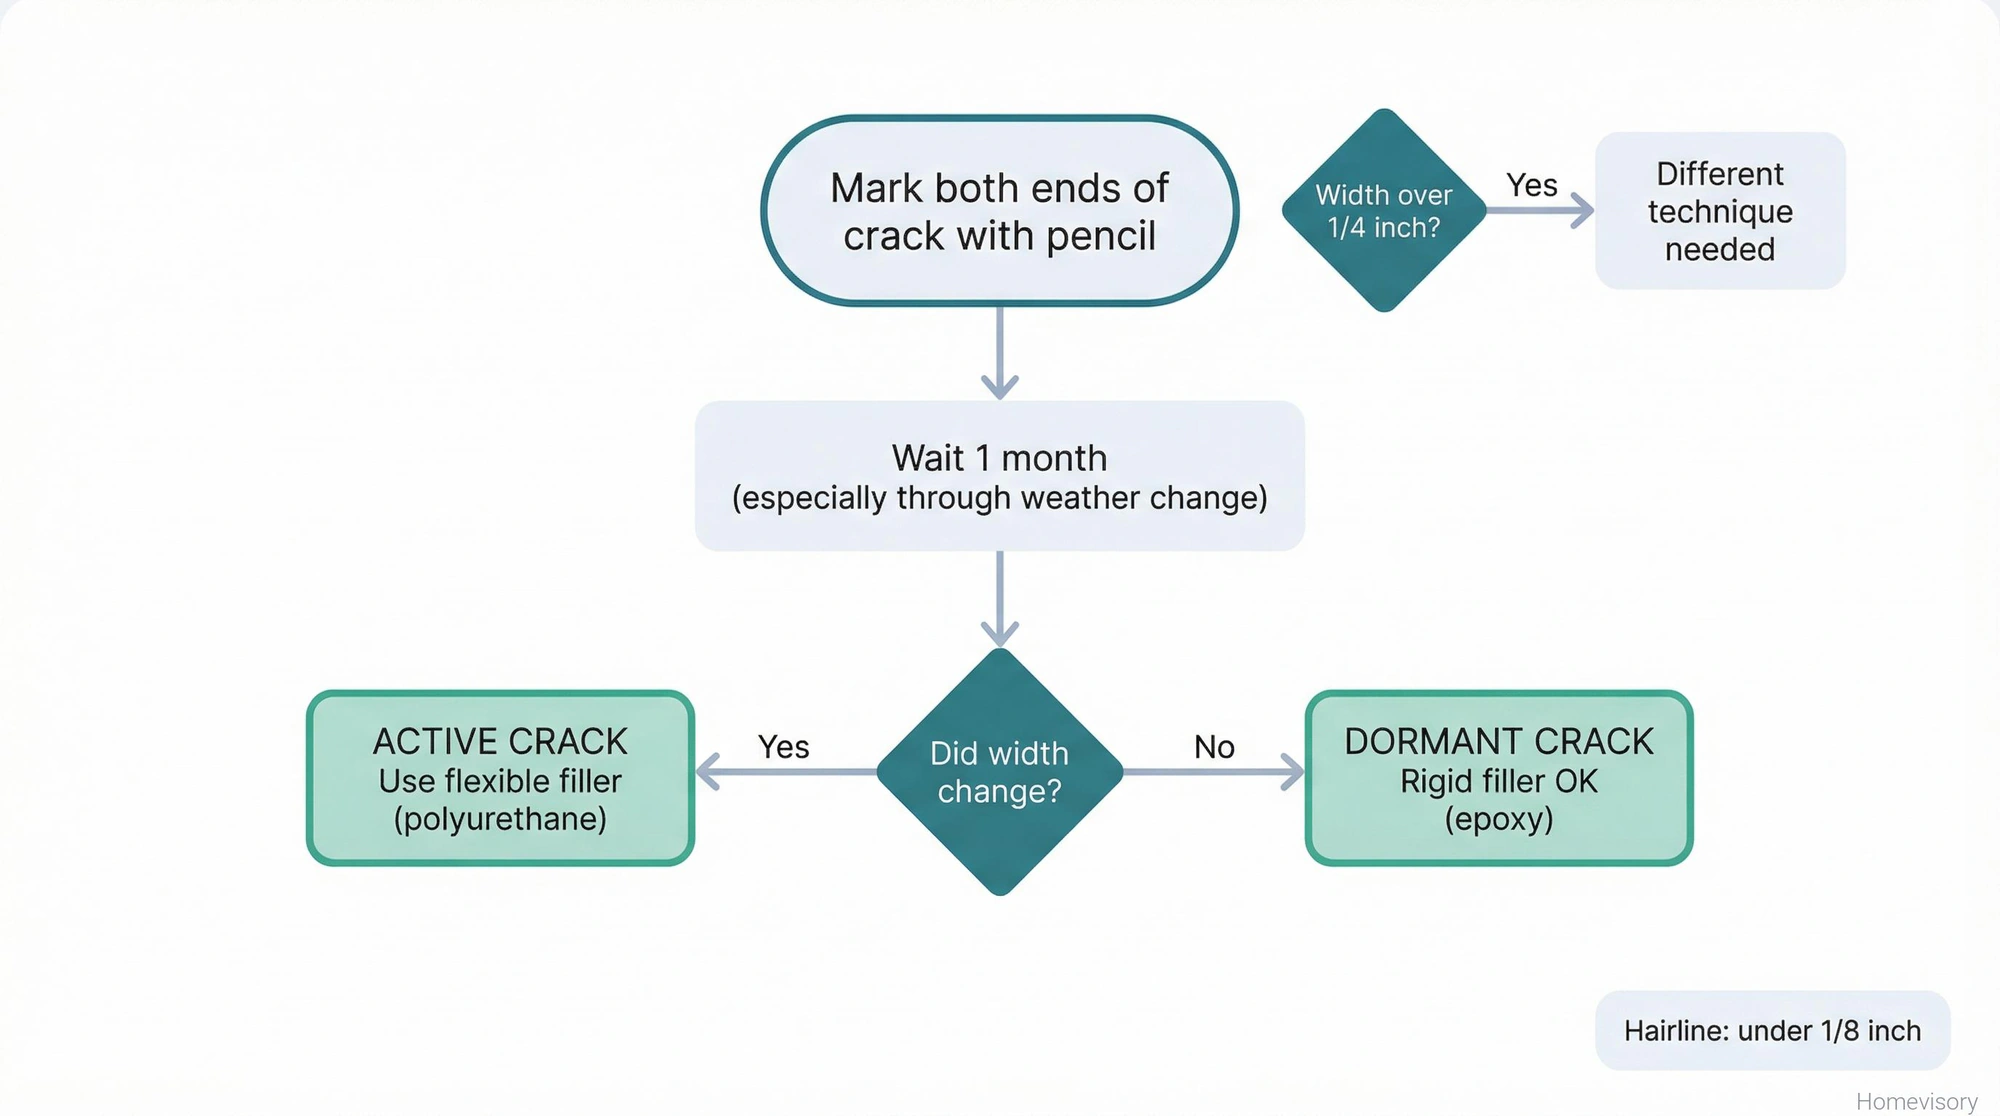
Here’s how to tell the difference: mark both ends of the crack with a pencil and measure the width. Check it again in a month, especially if the weather has changed. If it moved, its active. If it didnt, its dormant.
The other thing to look at is width. Hairline cracks under about 1/8 inch are different animals than the wider stuff. Engineering guidelines consider cracks under 0.3mm (roughly 1/100th of an inch) acceptable in normal structures. Once you get past 1/4 inch wide, you’re in different territory and might need different products or techniques.
Structural cracks are another category entirely. If the crack runs through a foundation wall, if one side is higher than the other, if its growing fast, call a professional. I’m not getting into that here. This is about driveways, garage floors, sidewalks, patios. If you’re dealing with larger structural damage to your driveway, patio, or sidewalk, that’s a different scope but some of the same principles apply. The stuff you can fix yourself on a Saturday.
Preparation Is the Job
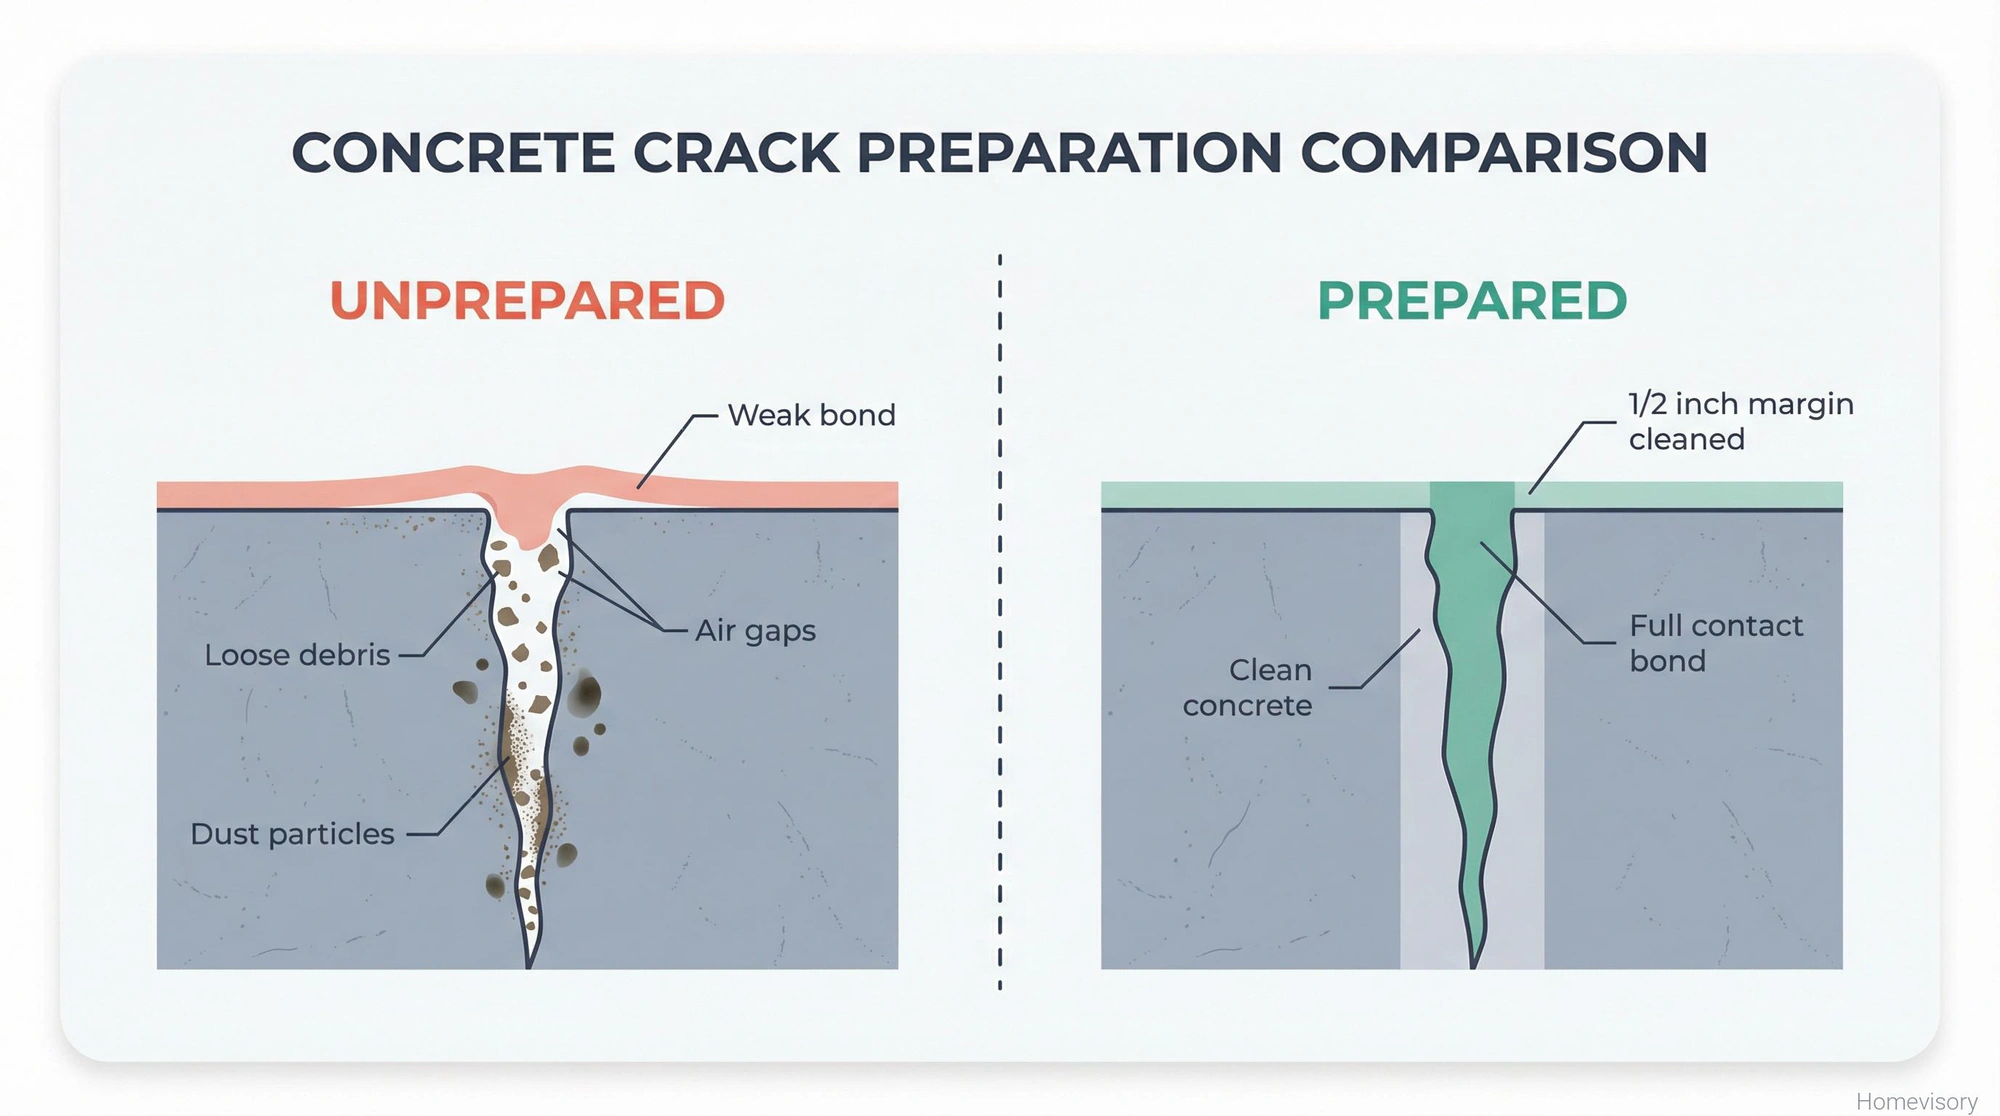
This is the part I care too much about. I know I care too much about it. But I’ve seen so many people skip this and then wonder why their repair lasted six months instead of six years that I cant help myself. Mr. Davis, my woodshop teacher back in Atlanta, used to say “the joint is only as strong as the surfaces it touches.” He was talking about wood glue. Same principle applies to concrete crack filler. If the filler cant bond to clean concrete because theres dirt or loose material or old sealer in the way, it wont bond. Period. The product instructions always say to clean the crack and people always think they did clean it and they almost never actually clean it enough. I’m talking about getting a wire brush in there, a shop vac, maybe compressed air, and actually removing everything thats not solid concrete. The American Concrete Institute recommends wire brushing over mechanical grinders specifically because grinders can fill cracks with dust. They also say to clean about half an inch wide on each side of the crack, not just the crack itself.
My dad made me redo a crack prep job when I was maybe seventeen. Garage floor in Texas, this long crack running from the door to near the back wall. I thought I’d cleaned it fine. He looked at it and just shook his head. Handed me the wire brush again. Said something about doing things right but I dont remember exactly what he said, I just remember being annoyed and hot because it was July in Texas and the garage had no AC. I spent another hour on my knees going over that crack. Anyway.
For wider cracks, you might need to undercut them slightly, make them wider at the bottom than the top. This is called a keying cut and it helps the filler lock in mechanically. Not always necessary but on bigger cracks its worth doing.
If the crack has been there a while, there might be oil stains or other contamination. The ACI says you can use high-pressure water, oil-free compressed air, or power vacuums. If you use water, blow the crack out with compressed air afterward so its dry before you fill it. Moisture kills adhesion on most products.
Best Concrete Crack Filler Options
Here’s whats actually available and when to use each one:
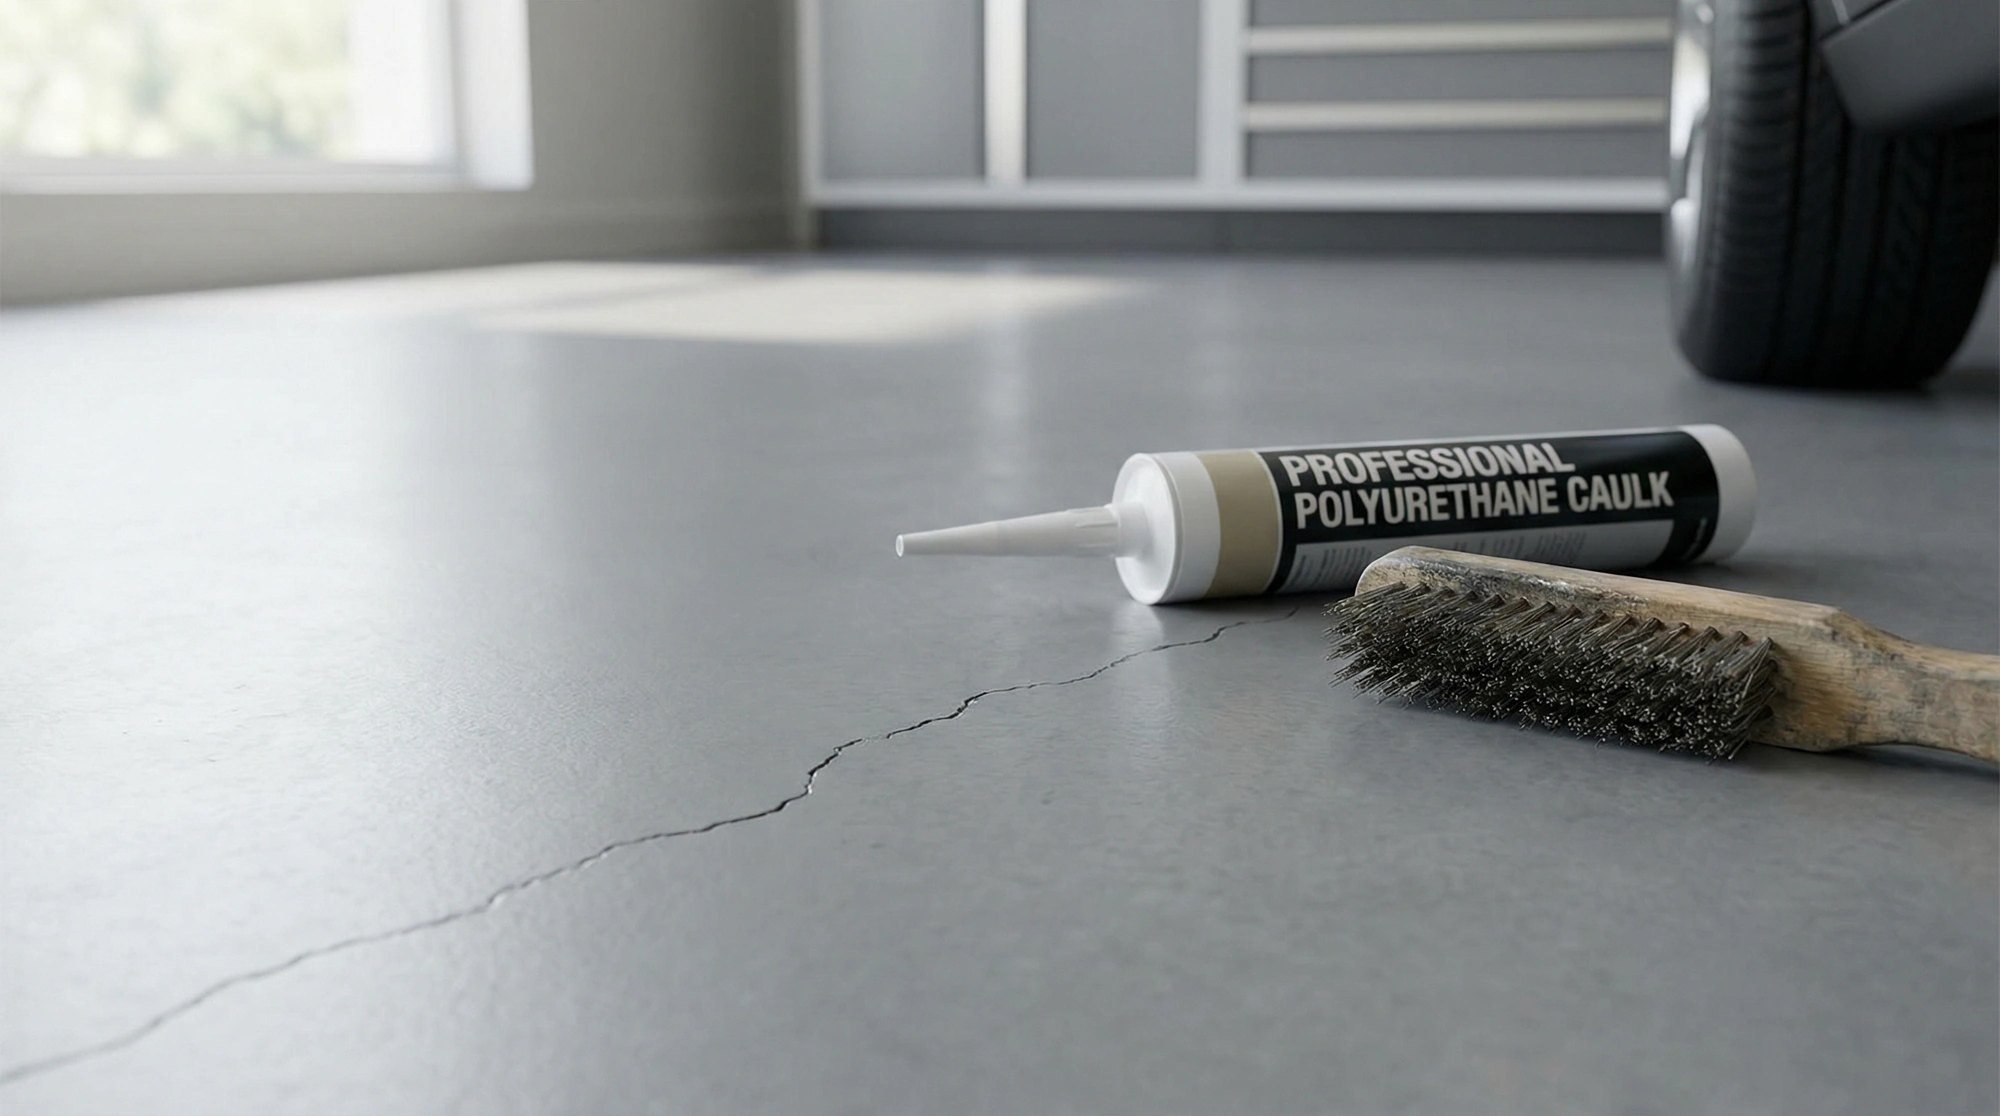
Polyurethane Caulk
This is what I use for most residential crack repair. Professional concrete companies prefer polyurethane or hybrid polyurethane because of the adhesion. Its flexible enough to handle some movement, bonds well to concrete, and lasts. Sikaflex and Loctite PL make good ones. Not the cheapest option but trying to save five dollars on caulk when you’re already spending your Saturday on this seems pointless.
For active cracks that move seasonally, polyurethane is really your only choice. The flexibility matters.
Epoxy Fillers
Rigid. Strong. Good for dormant cracks where you need structural bonding. Overkill for a hairline crack in your patio but appropriate for a garage floor crack that needs to support weight. PC Concrete is a decent brand. These set up hard so make sure the crack is actually dormant before using.
Vinyl Concrete Patchers
Fine for surface repairs and wider cracks where you need to build up material. Quikrete makes one that works. Not as strong as epoxy, not as flexible as polyurethane. Middle of the road. Whatever works. Moving on.
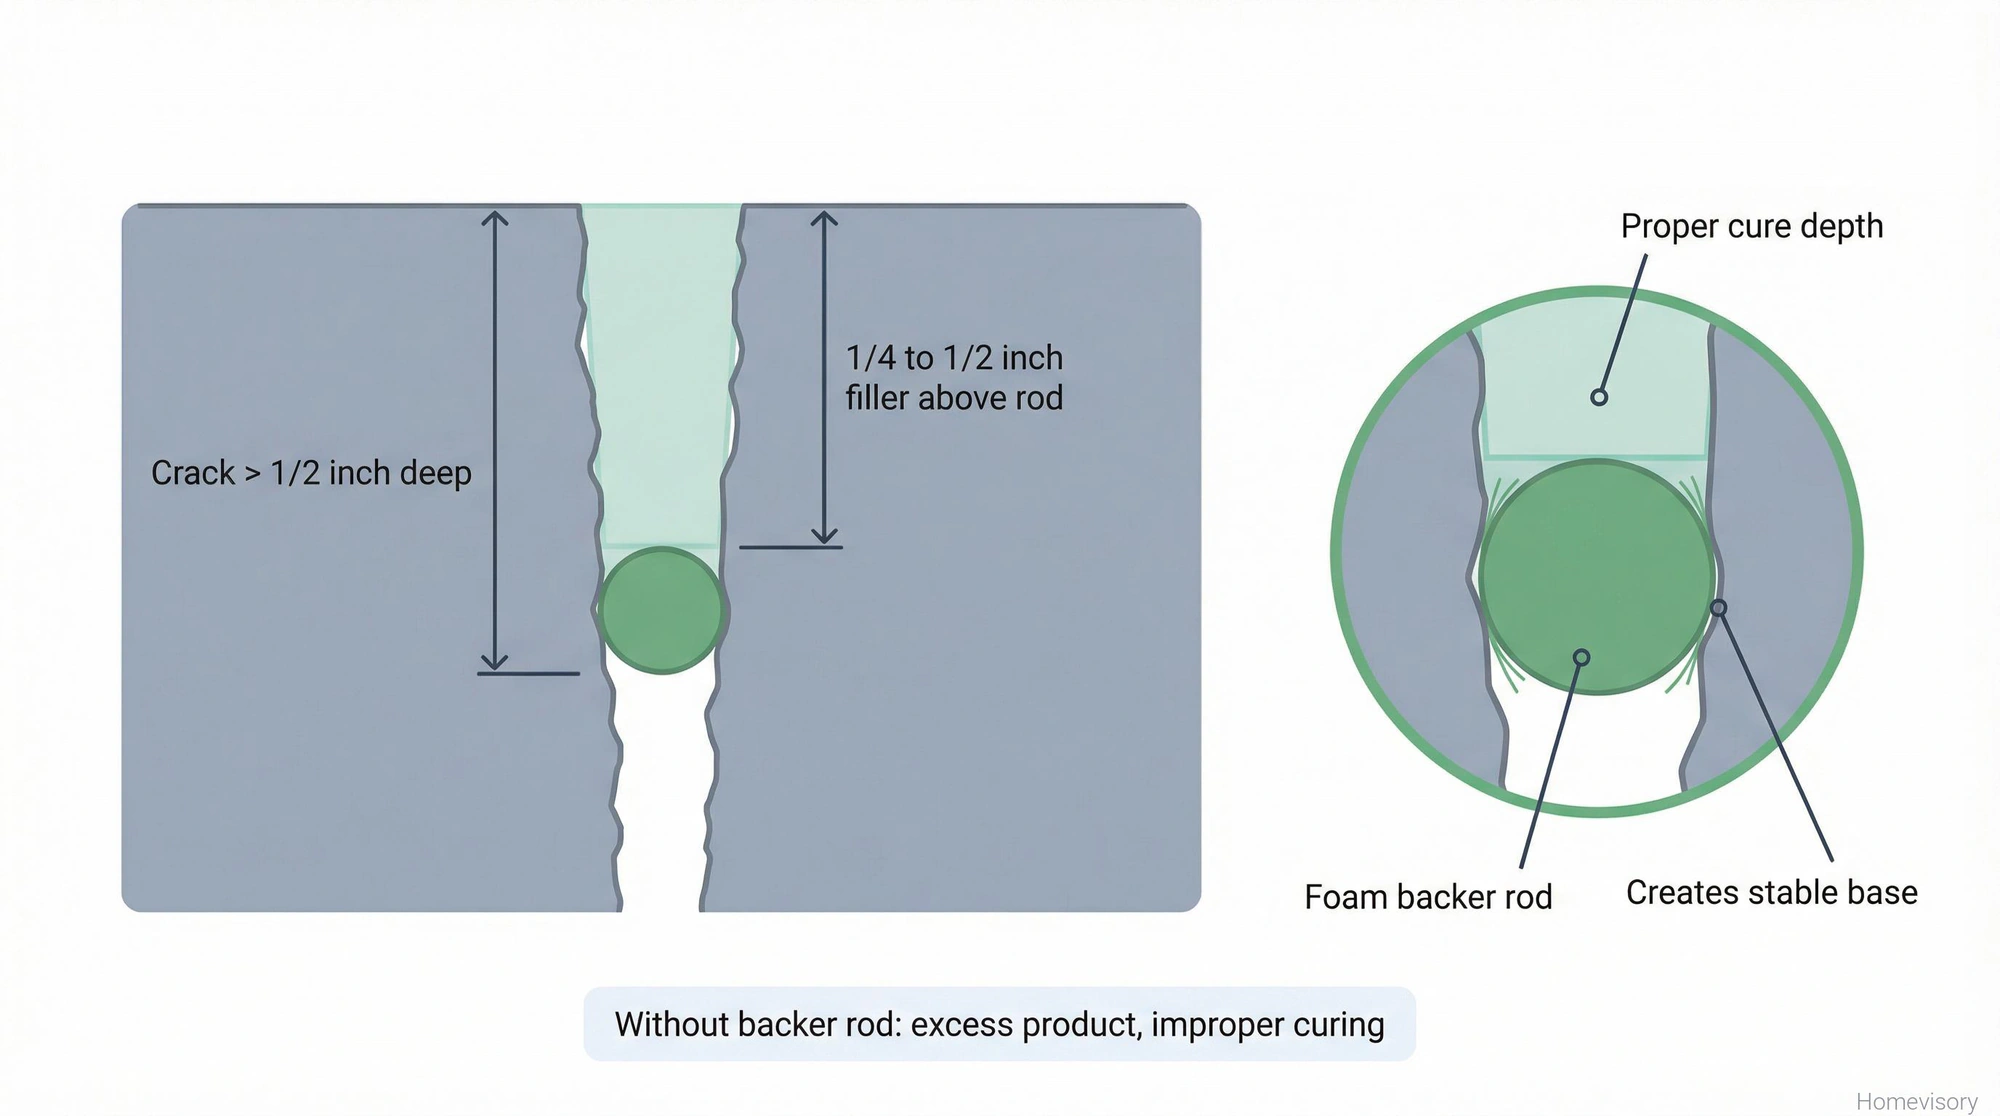
Foam Backer Rod
This isnt filler, its what goes under the filler for cracks deeper than about half an inch. Its closed-cell foam rope that you push into the crack to create a bottom for your caulk to sit on. Without it, you’re using way too much product and the repair wont cure right. Costs almost nothing. Use it.
The Actual Repair Process
Once your crack is clean and dry:
-
For deep cracks (over 1/2 inch), push backer rod into the crack. Leave about 1/4 to 1/2 inch of space above it for filler.
-
Cut your caulk tube tip at an angle. The opening should be slightly smaller than the crack width.
-
Apply filler from bottom to top if its a vertical crack. Push the caulk gun firmly so the filler gets into the crack, not just on top of it.
-
Tool the surface smooth before it skins over. A plastic spoon works fine. Some people use their finger. I use a finger. Just wipe the excess.
-
Dont touch it. Let it cure. Check the product label for cure time but expect at least 24 hours before any traffic.
For larger areas or badly cracked slabs, you might be looking at patching compound instead of caulk. Same prep rules apply, maybe more so because youre covering a bigger area.
What This Costs
DIY concrete crack repair is cheap. Tube of good polyurethane caulk runs $8-15. Backer rod is maybe $5 for way more than you need. Wire brush, shop vac, you probably already have.
Professional caulking runs roughly $5 to $10 per linear foot. So a driveway with 100 linear feet of cracks could cost $500-1000 to have done. Other estimates put basic crack repair at $14-18 per linear foot when you factor in more intensive repairs.
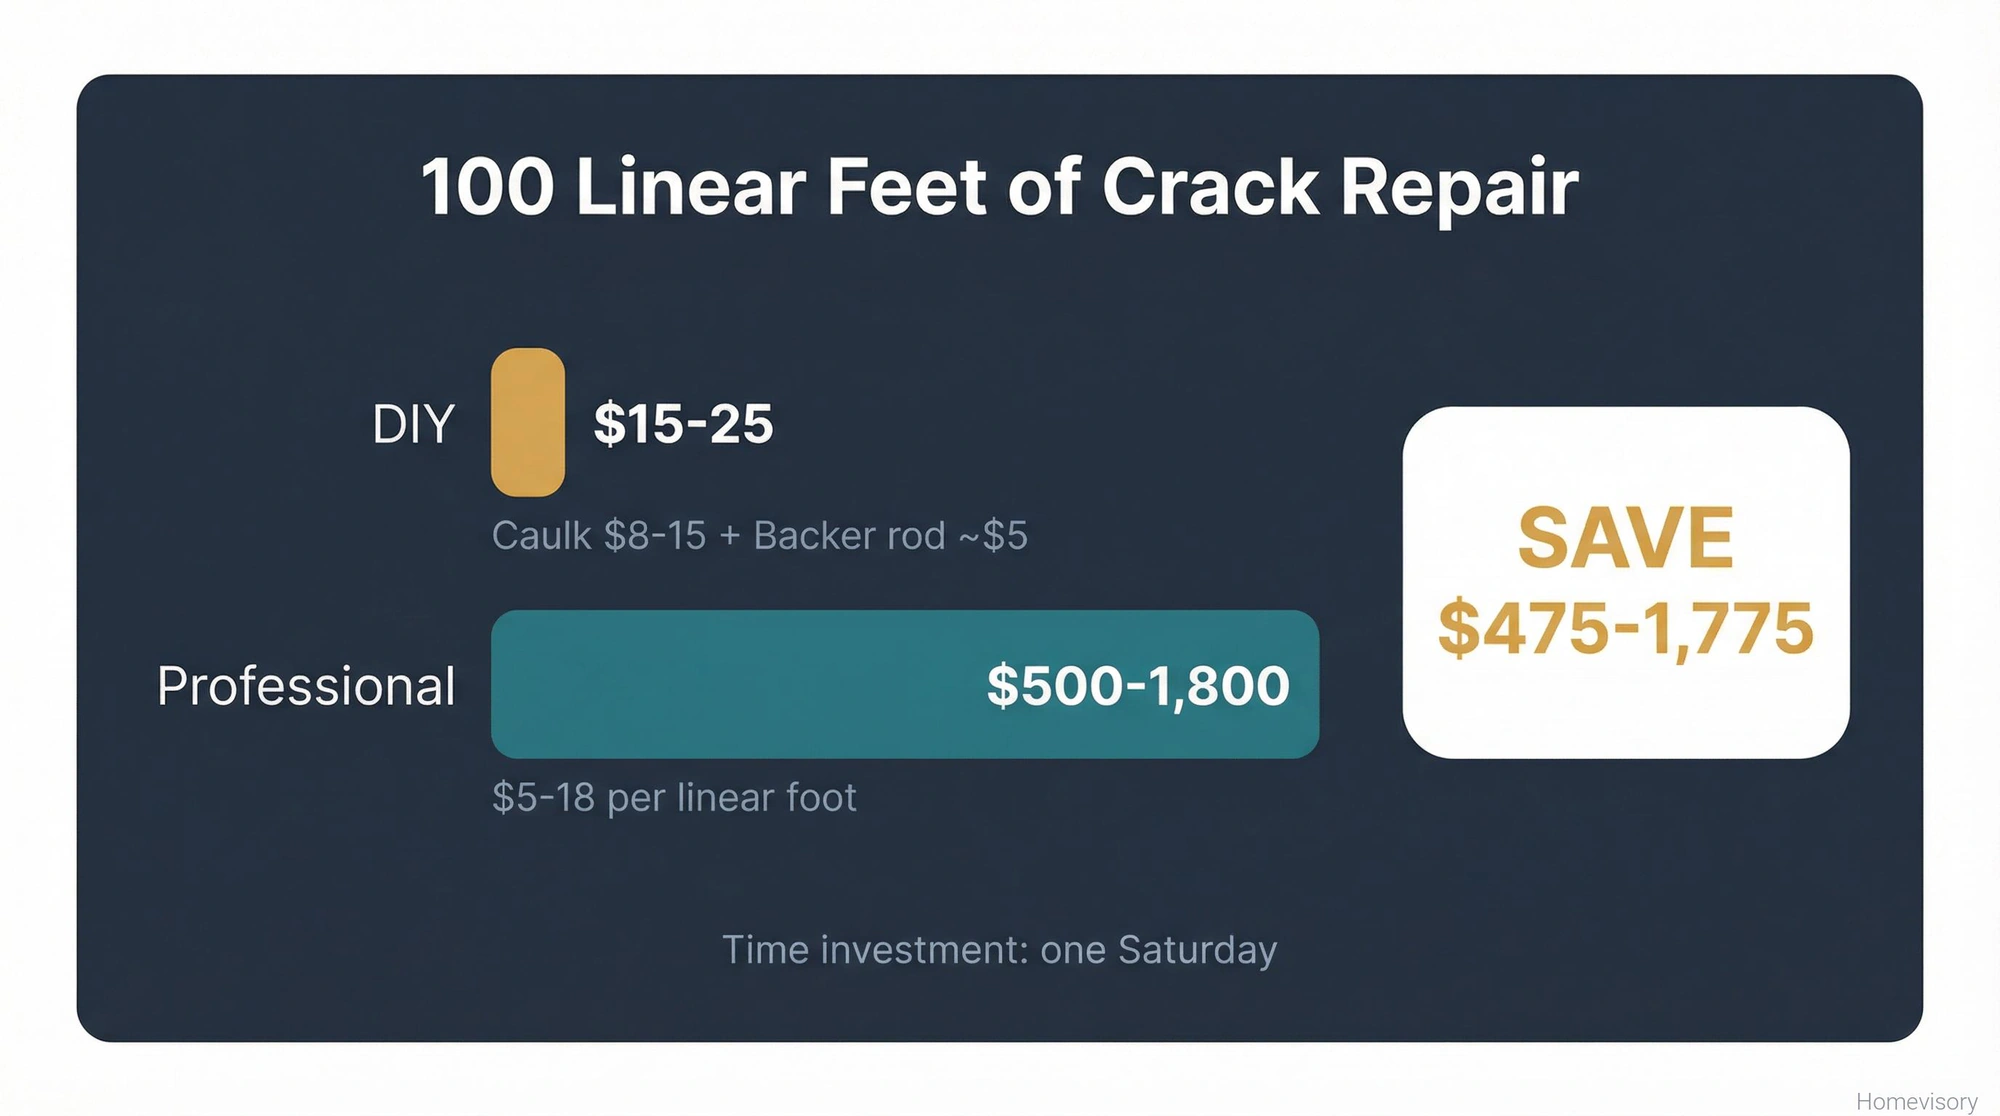
Is it worth doing yourself. For most cracks, yes. The materials cost almost nothing compared to labor. The work isnt hard if you dont skip the prep.
Safety Note
One thing. Concrete and cement products are caustic. Cement burns are real and they’re bad. If you’re mixing any patching compound or handling wet cement products, wear gloves. Not optional. The stuff will burn your skin and you wont feel it happening until after the damage is done.
Most caulk-type fillers are less dangerous but still, gloves. Your hands will thank you.
When to Call Someone
Cracks in foundation walls. Cracks where one side has shifted vertically. Cracks accompanied by bowing or bulging. Cracks that keep coming back in the same spot despite proper repair. Any crack that makes you nervous.
Thats not DIY territory. Get someone qualified to look at it.
Keep Them From Coming Back
The GSA notes that both active and dormant cracks provide channels for moisture penetration if left unrepaired, leading to future damage. Water gets in, freezes, expands, makes the crack worse. So even dormant cracks should get filled.
Once repaired, consider sealing the whole slab every few years. Prevents water penetration. Slows future cracking. Its preventive maintenance and its way easier than fixing cracks. Our concrete care guide covers the full maintenance cycle — cleaning, repairs, and sealing — so nothing gets missed.
Concrete crack repair is straightforward work if you respect the prep. Clean the crack properly, choose the right filler type for your situation, apply it correctly, let it cure. Thats it.
The crack in my garage floor in Texas, the one my dad made me re-prep in July heat, held for years. Probably still holding. I drove by that house a few years back when I was visiting family and I thought about checking but I didnt. Seemed weird to knock on a stranger’s door and ask to see their garage floor.
If you want to stay on top of this kind of stuff without having to remember it all yourself, thats what we built Homevisory for. The Homevisory home task manager keeps track of seasonal maintenance, sends you reminders when its time to check your concrete, seal your driveway, all of it. Sign up free and let the system remember so you dont have to.