
The Real Question Nobody Wants to Answer
I refinished my own hardwood floors once. In 2003, right after we bought our first house in Texas, back when I thought I could do everything myself because I worked in renovations and knew what I was doing. I was wrong. I knew what professionals were doing. That’s different from knowing how to do it yourself with rental equipment and a weekend.
The floors came out fine. Eventually. After I made mistakes that added two extra days to the project and cost me almost as much in materials as hiring someone would have cost in the first place.
So when people ask me about hardwood floor refinishing, whether they should DIY or hire a professional, I dont give them the answer they want. I give them the real one.
What Refinishing Actually Involves
Lets get the basic process out of the way because I think most people underestimate what theyre signing up for.
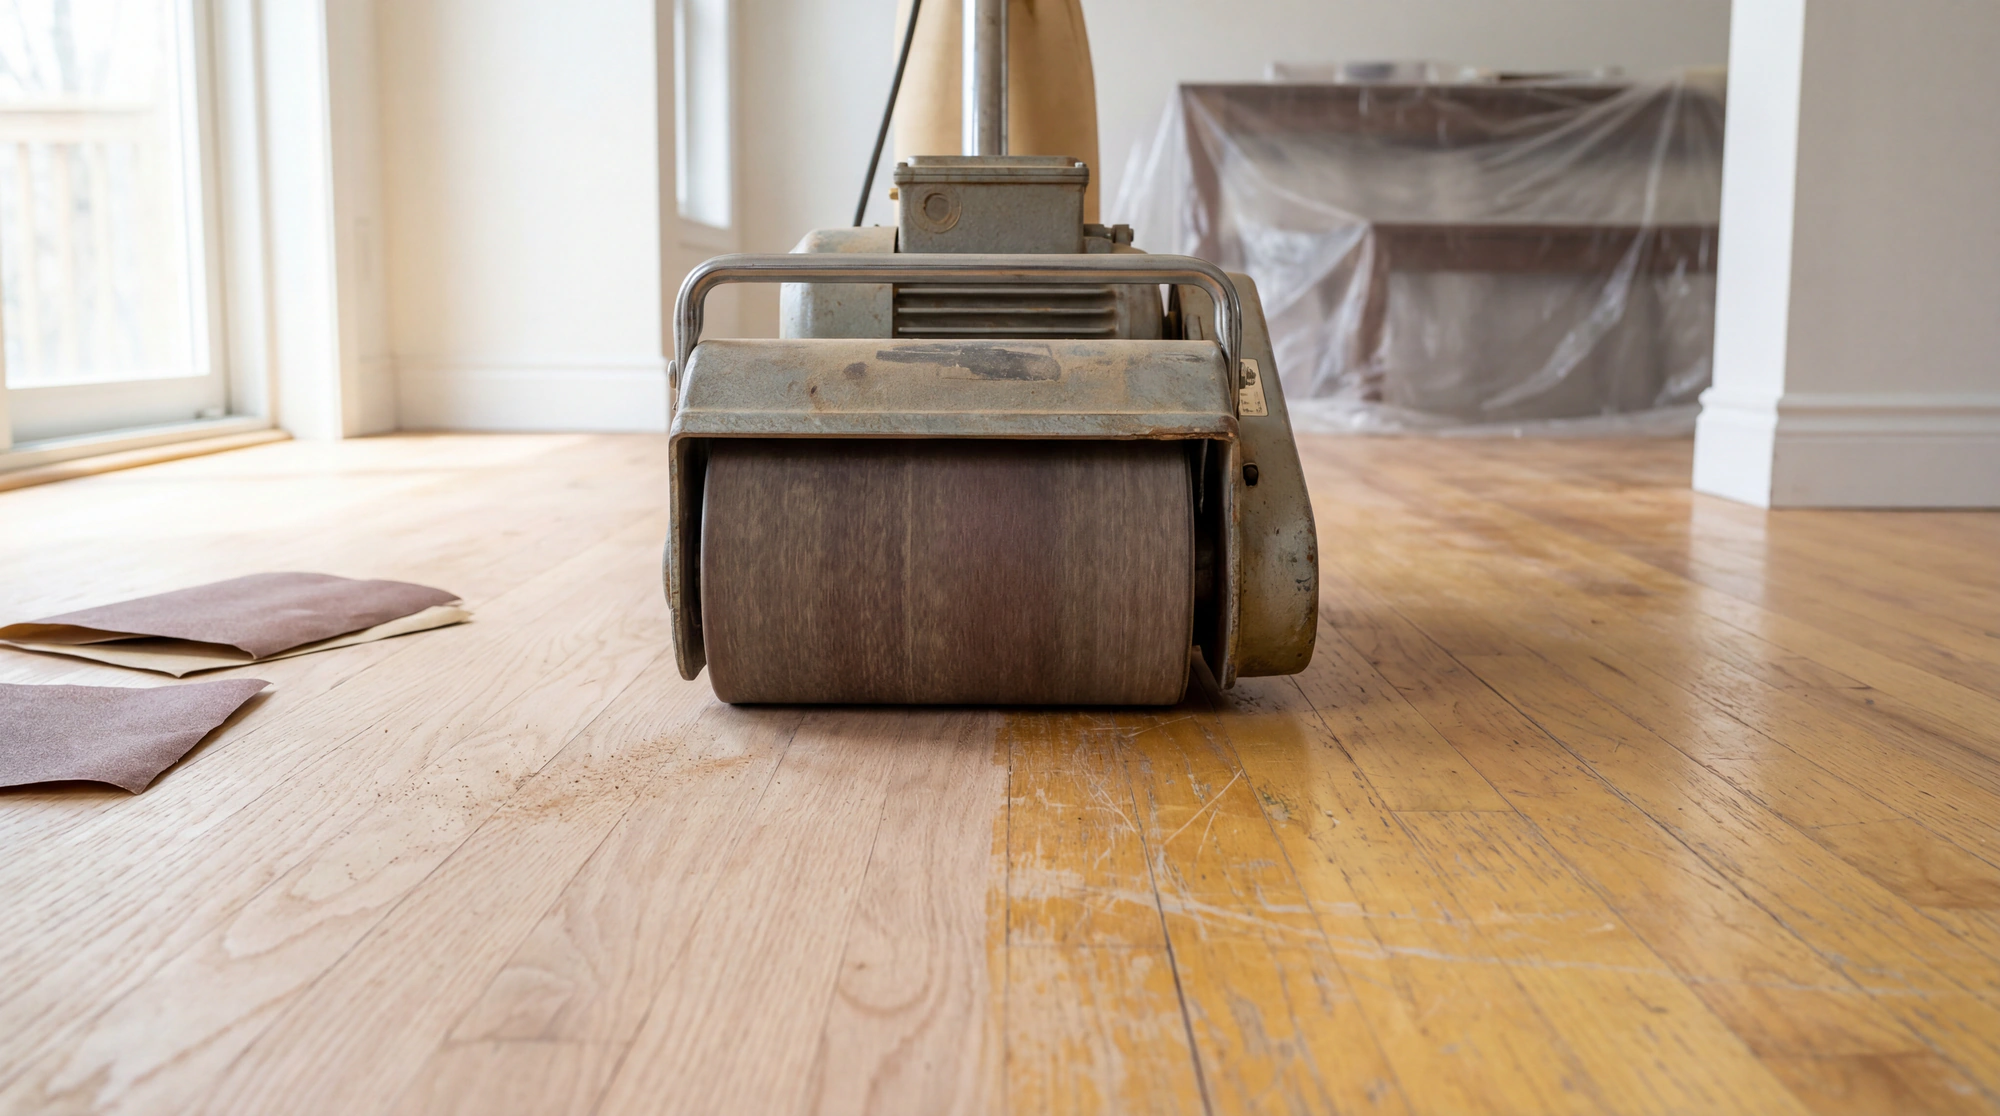
Hardwood floor refinishing means you’re sanding off the existing finish, all of it, down to raw hardwood. Then you’re applying new finish. That’s it. Simple concept.
The execution is where everything falls apart.
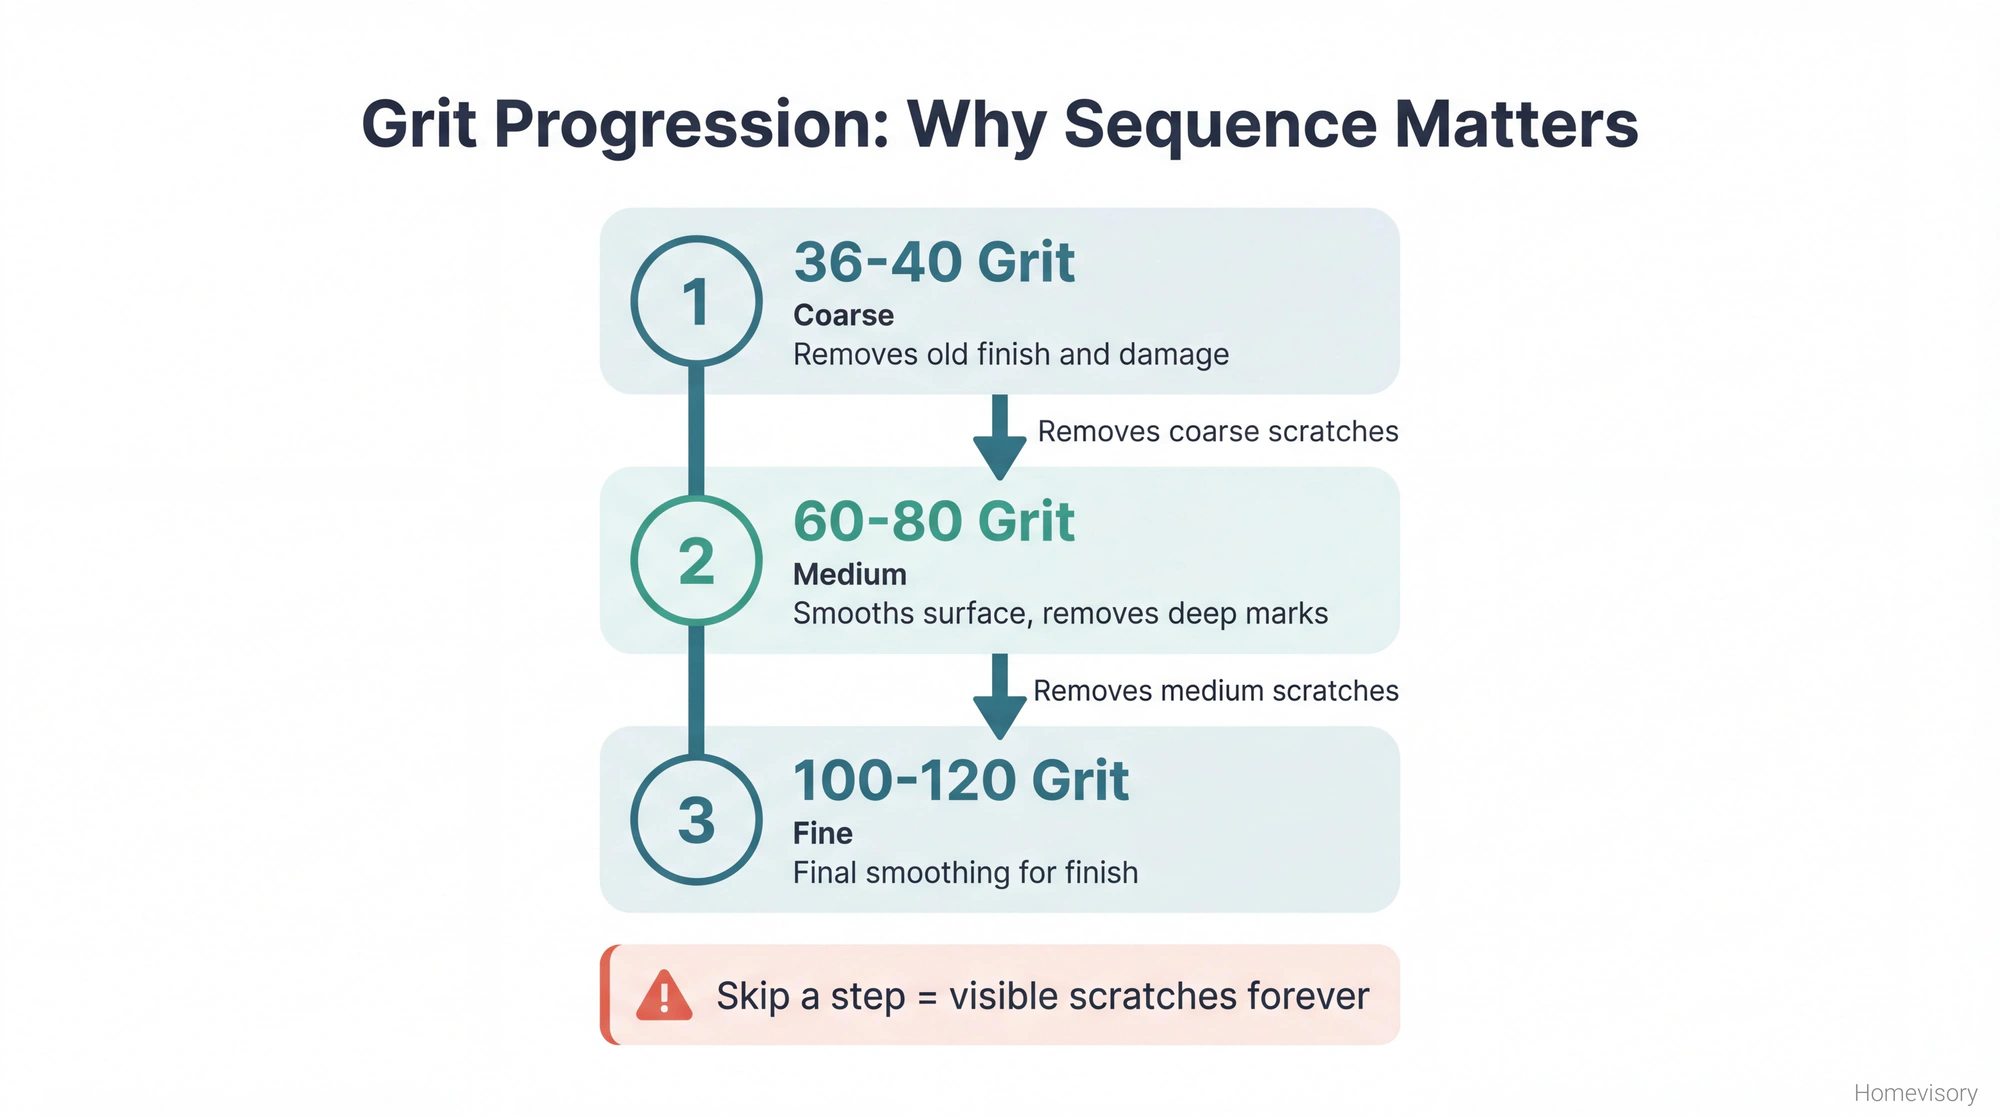
You need to sand the entire floor three times minimum. First pass with coarse grit, usually 36 or 40 depending on the condition of your floors. Second pass with medium grit, 60 or 80. Third pass with fine grit, 100 or 120. Some people do a fourth. This is called grit progression and if you skip steps or use the wrong sequence you will see scratches in your finish forever. Not sometimes. Forever.
After sanding you vacuum everything. Then you vacuum again. Then you tack cloth the entire floor. Then you apply your sealer coat, let it dry, do a light screen sand, vacuum again, tack cloth again, and apply your first coat of polyurethane. Repeat for coats two and three.
If youre staining, add another step between sealer and topcoat.
The whole process takes three to five days if you know what youre doing. Double that if you dont.
The Cost Breakdown
Professional hardwood floor refinishing runs between $3 and $8 per square foot depending on where you live, the condition of your floors, and whether you want stain. That’s labor and materials.
For a 500 square foot room, you’re looking at $1,500 to $4,000.
For 1,000 square feet, $3,000 to $8,000.
Palm Beach where I live now is on the higher end. When I lived in Texas it was cheaper. Regional differences matter.
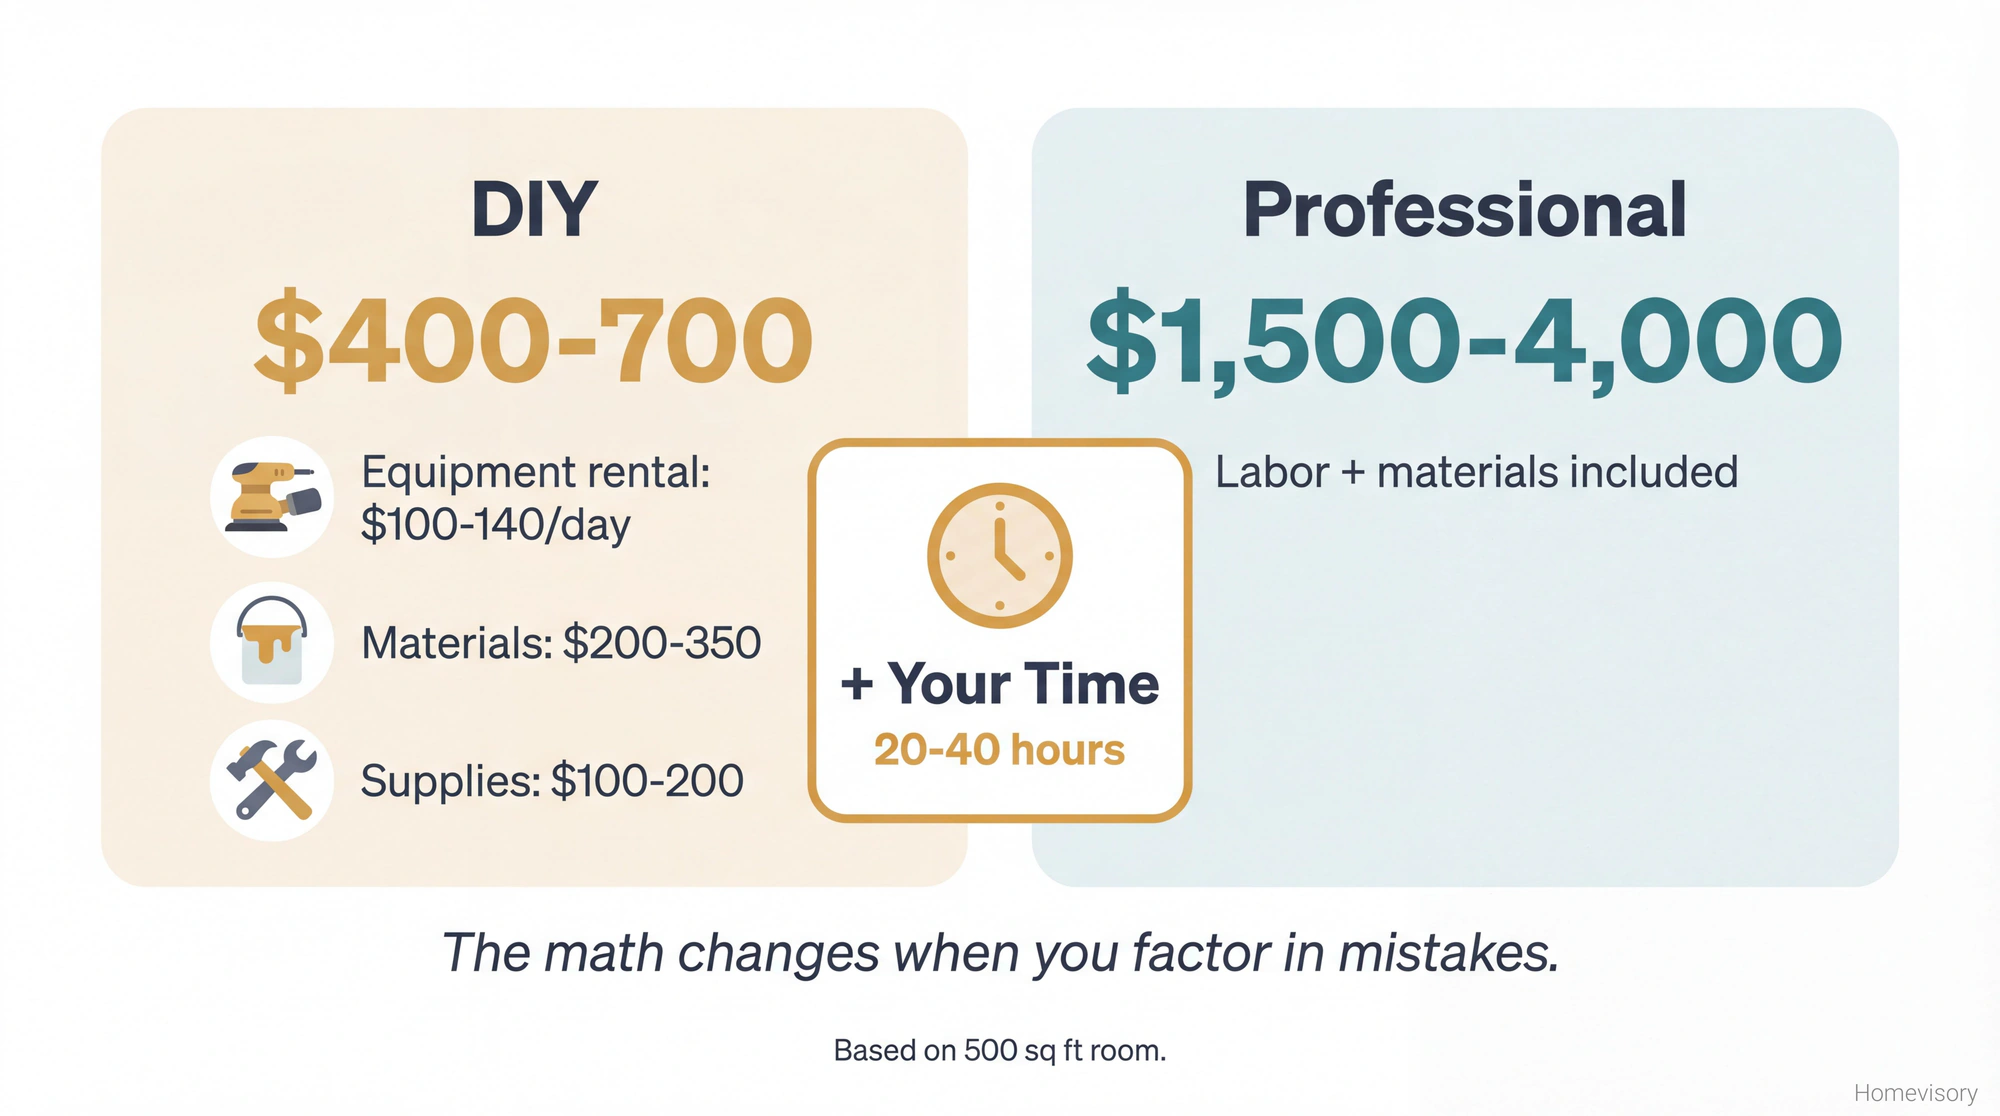
DIY costs break down like this:
- Drum sander rental: $60-80 per day
- Edger rental: $40-60 per day
- Sandpaper and screens: $50-150 depending on square footage
- Polyurethane (oil or water-based): $50-100 per gallon, you need about one gallon per 400 square feet per coat, times three coats
- Stain if you want it: $30-50 per gallon
- Brushes, foam applicators, rollers: $30-50
- Respirator and respiratory protection: $25-40
- Tack cloths, painters tape, plastic sheeting: $20-30
Total for 500 square feet DIY: roughly $400-700 in materials and rentals.
Looks like a no-brainer right. Save a thousand dollars or more. Do it yourself.
Here’s where the math gets complicated.
The Sanding Part That Destroys People
This is the part I care about. This is the part that matters. Most of what I’m about to say applies whether you’re doing it yourself or evaluating whether a professional is worth the money.
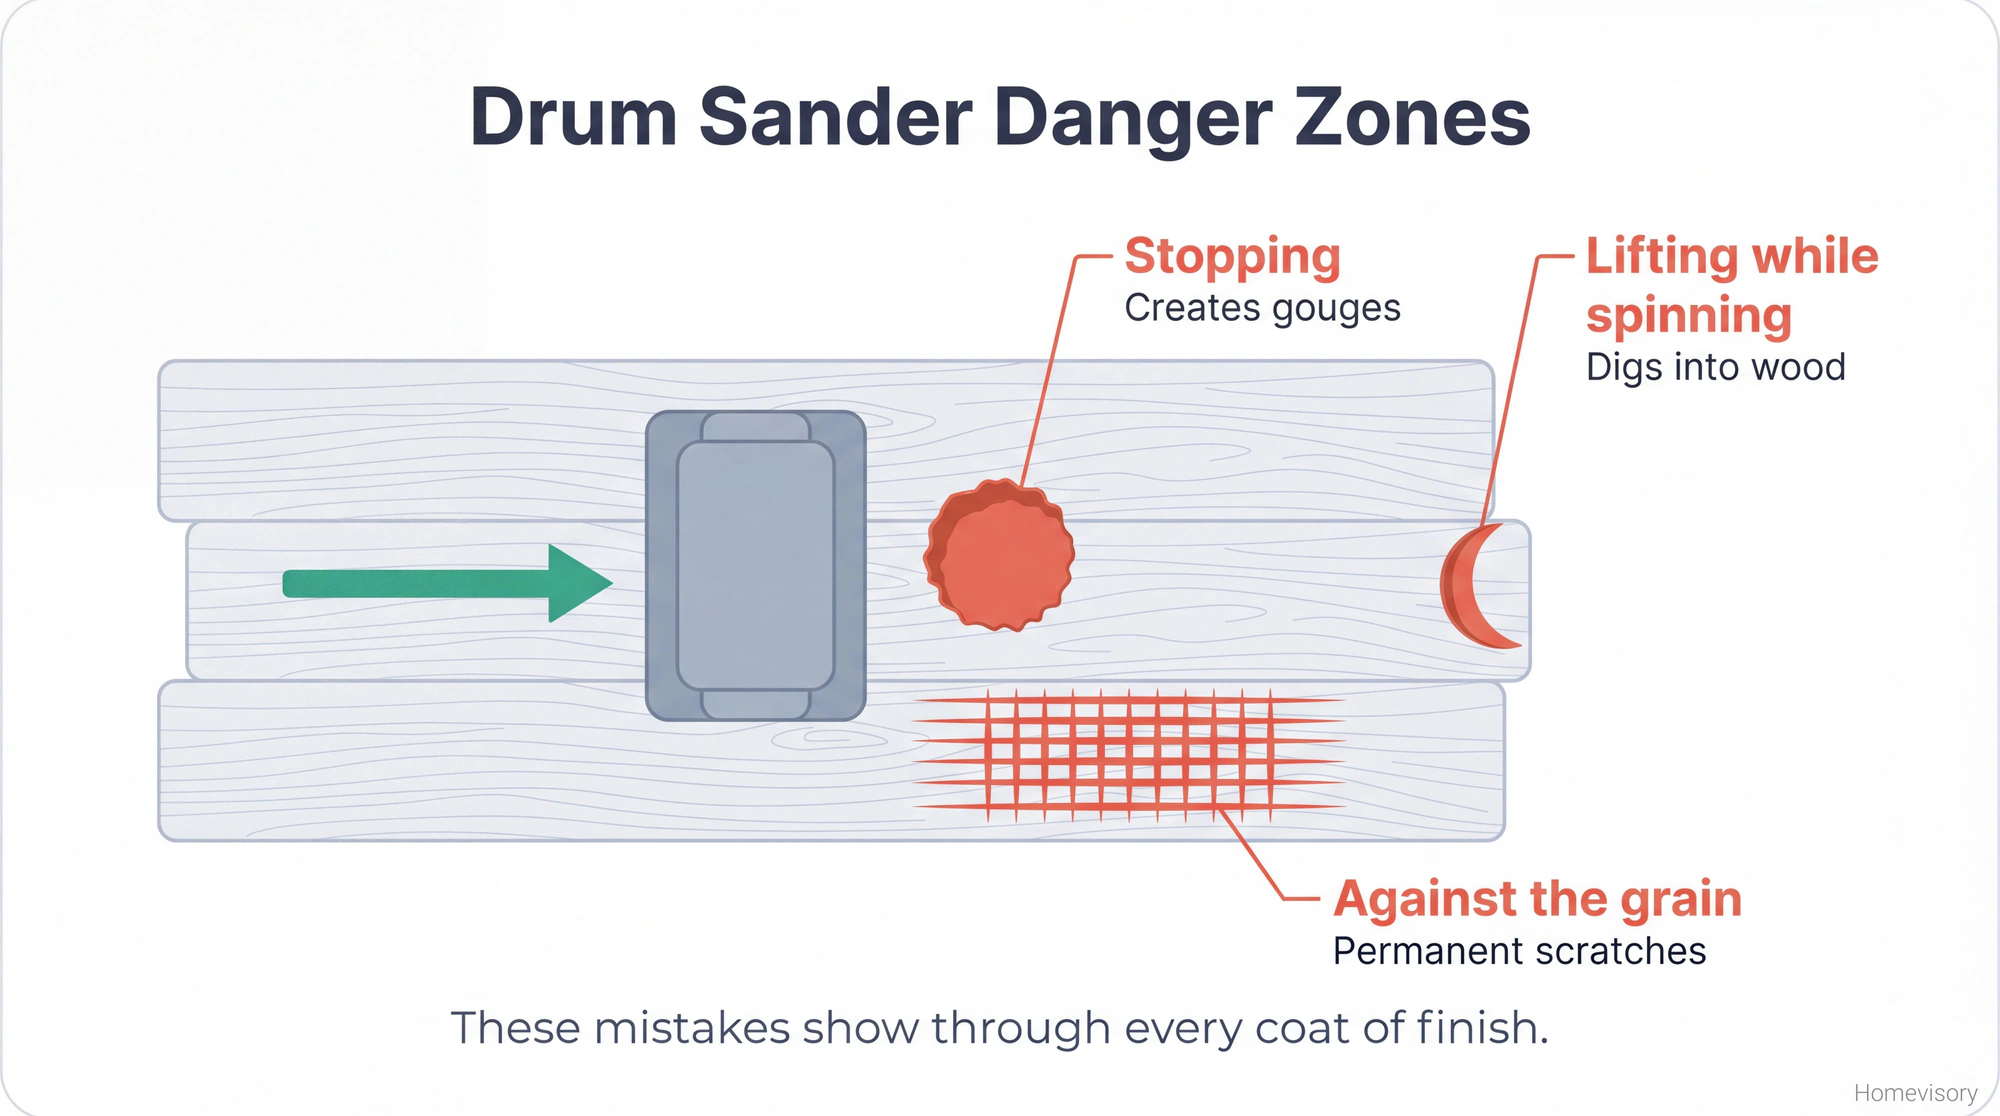
A drum sander is not a polisher. It’s not gentle. It’s a machine designed to remove material from wood floors and it will do that job extremely well whether you want it to or not. If you stop moving, even for a second, it digs. If you lift it while the drum is still spinning, it gouges. If you go against the grain direction, you leave cross-grain scratches that show through every coat of finish you apply afterward.
Most people rent a drum sander, watch a YouTube video, and think they understand. You dont understand until youve run one. The videos make it look easy because the people making videos know what theyre doing. Thats why theyre making videos. The guy at Home Depot who hands you the rental agreement is not going to teach you how to use it. He’s going to hand you a piece of paper and wish you luck.
My first time using a drum sander, and I had watched professionals use them dozens of times, I left a gouge in the middle of my living room that I had to sand out with the edger because the drum couldn’t get it without making it worse. Cost me an extra day and I had to buy more sandpaper. The gouge is still visible if you know where to look. Its faint. But its there. Twenty-two years later, it’s there.
Grit progression is where most DIYers create problems they dont even notice until the finish is on. You have to sand in sequence. 36 to 60 to 100. Or 40 to 80 to 120. Whatever sequence you pick, each grit removes the scratches from the previous grit. If you jump from 36 straight to 100, the 100 grit is too fine to remove the 36 scratches. Youll see them. Parallel lines running the length of your floor, visible in certain light, impossible to fix without starting over.
Professional floor refinishers do this every day. They know their equipment. They know how much pressure to apply, how fast to move, when the paper is worn. They have dust-free sanding systems with vacuum attachments that pull particles away as they work. They dont have to clean their entire house afterward. They dont wake up the next morning with grit in their teeth.
What Mr. Davis Taught Me About Wood
I had a woodshop teacher in Atlanta, Mr. Davis, and he used to make us run our fingertips along boards before we did anything with them. Feel the grain, he’d say. The wood will tell you what it needs.
I thought he was being dramatic. I was thirteen. I wanted to use the power tools and make something. I didnt want to stand there petting lumber like it was a cat.
But he was right. Wood grain matters. When you sand hardwood floors, you sand with the grain, which means parallel to the direction the boards run. This feels obvious when you write it down but when youre running a drum sander and trying not to gouge the floor and the edger is in the corner making a different sound and you’re sweating through your shirt, its easy to forget the basics.
Mr. Davis passed away in 2012. Heart attack. I found out from my mom who still lived in Atlanta then. He probably would have had something to say about me refinishing floors. Probably would have told me I was rushing. Probably would have made me feel the floor with my hands before I started. I think about him sometimes when I’m working on wood projects.
Anyway.
The Finish Application
Assuming you survive the sanding process, you have to apply the finish. This is easier than sanding. Still not easy.
Oil-based polyurethane is more forgiving but takes longer to dry between coats, sometimes 24 hours or more. It yellows slightly over time. It smells terrible and you need serious respiratory protection and ventilation.
Water-based polyurethane dries faster, stays clearer, smells less awful, costs more, and shows every mistake you make during application. Every brush stroke. Every drip. Every spot you missed.
Three coats minimum. Some people do four.
You apply with a natural bristle brush for edges and a foam applicator or lambswool pad for the field. Work with the grain. Maintain a wet edge. Dont go back over areas that have started to tack up. If you see a drip or a miss, leave it and deal with it between coats.
Floor finish application is like painting except the consequences of mistakes are more visible and last longer.
The Honest Assessment
Here’s what I tell people now.
If you have never refinished floors before, and you have more than 300 square feet to do, and you care about the results, hire a professional for the hardwood floor refinishing. The cost difference between DIY and professional is not as big as it looks once you factor in rental time, materials, mistakes, and your own hours.
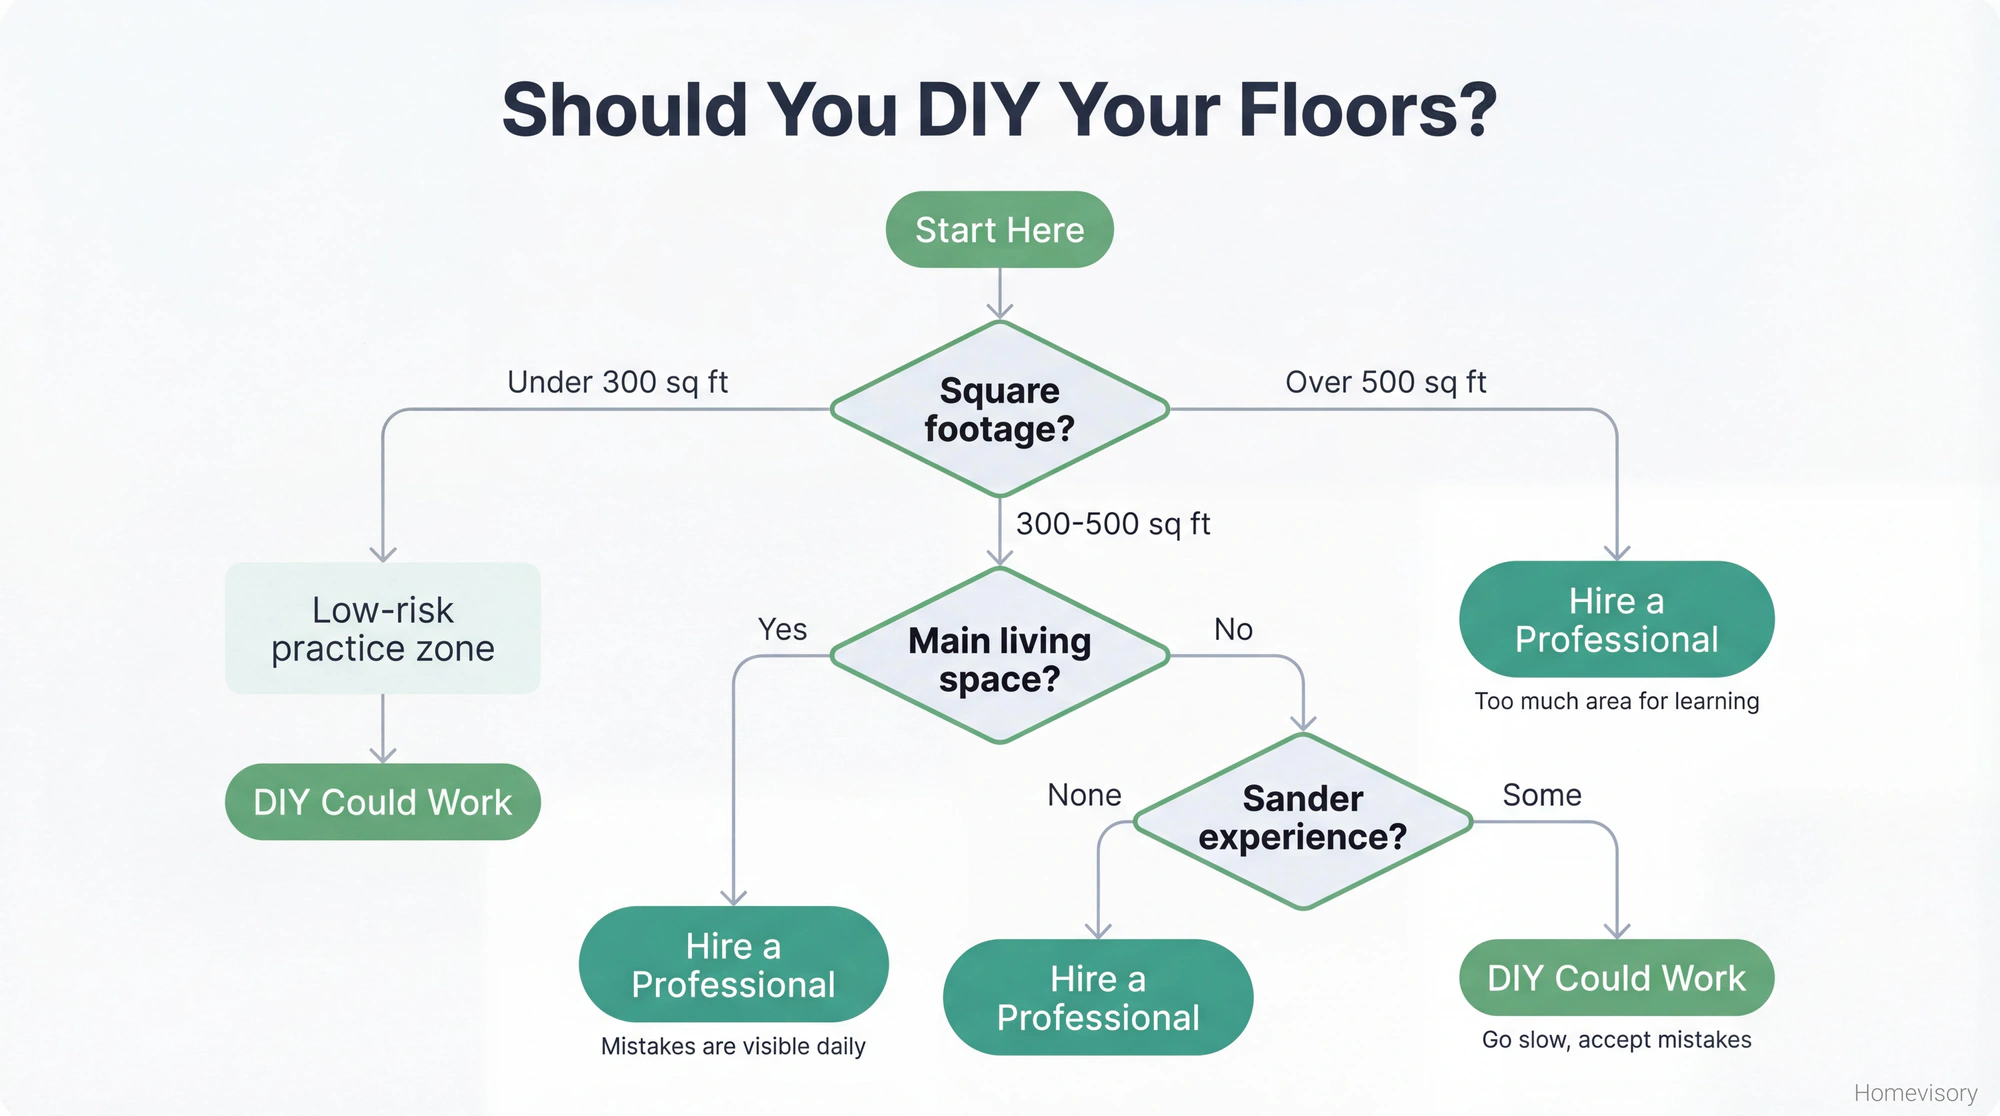
If you have experience with similar equipment, or you’re doing a small room that doesn’t matter much, like a bedroom or a closet, maybe try it yourself. Use it as a learning experience.
The shower tile shortcut I took in 2011 taught me that doing things myself to save money only works if I actually know what I’m doing. I tiled over old tile to save time. Eleven months later the grout cracked, tiles popped, subfloor was soft from water damage. I created a bigger more expensive problem than the one I was trying to avoid. Same principle applies to floors. If you sand incorrectly, if you damage the wood, if you apply the finish wrong, the professional you eventually hire will charge you more to fix your mistakes than they would have charged to do it right in the first place.
When DIY Makes Sense
Small spaces. Closets. A single room. Anywhere you can practice without destroying something you care about.
Floors that are already damaged. If your floors have pet stains or deep gouges or water damage, they might need replacement anyway. Refinishing damaged floors is a gamble. If you’re gambling anyway, your labor is free.
Cost is genuinely prohibitive. Sometimes you just dont have $4,000 for professional refinishing. I get it. If the choice is between doing it yourself or living with ruined floors for another five years, do it yourself. Get the drum sander. Watch the videos. Go slow. Accept that you will make mistakes.
When You Need a Professional
Large areas. Anything over 500 square feet, hire someone.
Floors visible from your main living space. Your living room, dining room, anywhere guests see. These are not the rooms to learn on.
Hardwood that’s been refinished multiple times already. Older floors have less material to work with. One bad sanding pass can go through the wear layer. A professional knows when to stop.
You value your time. If you make $50 an hour at your job, and refinishing will take you 30 hours that it would take a professional 10, you’re not saving money. You’re trading money for stress.
Stain
I’m not getting into stain colors here. Thats personal preference and it depends on your house and your furniture and the natural color of your wood. Pick what you like. Get samples. Test in a closet first.
The only thing I’ll say is that stain adds complexity to the refinishing process. You have to apply it evenly or you get blotching. Dark stains show imperfections in your sanding. If you’re already nervous about DIY refinishing, adding stain makes everything harder.
What Homevisory Does
This is the kind of task that Homevisory helps you track. Not the refinishing itself, that’s a major project, but the ongoing maintenance that extends the life of your refinished floors. When to deep clean. When to screen and recoat. What cleaning products are safe for polyurethane. What temperature and humidity your hardwood needs to stay stable. Our home maintenance checklist covers seasonal tasks for your whole house, floors included.
My dad Curtis used to say, about factory equipment, he’d say you spend all this money getting the machine set up right and then you let it fall apart because you dont maintain it. Same with floors. You spend $3,000 on professional hardwood floor refinishing and then you drag furniture across it without pads. You use the wrong cleaner. You let grit build up and scratch the finish.
Homevisory tracks the small stuff so the big stuff lasts longer. The app is free. That’s what we do here.