
I get more questions about how to winterize sprinkler system setups in October than I do about any other topic. Every single year. And every single spring, I hear from the same people who didnt do it, asking me why their backflow preventer is cracked or why theres water bubbling up in their yard.
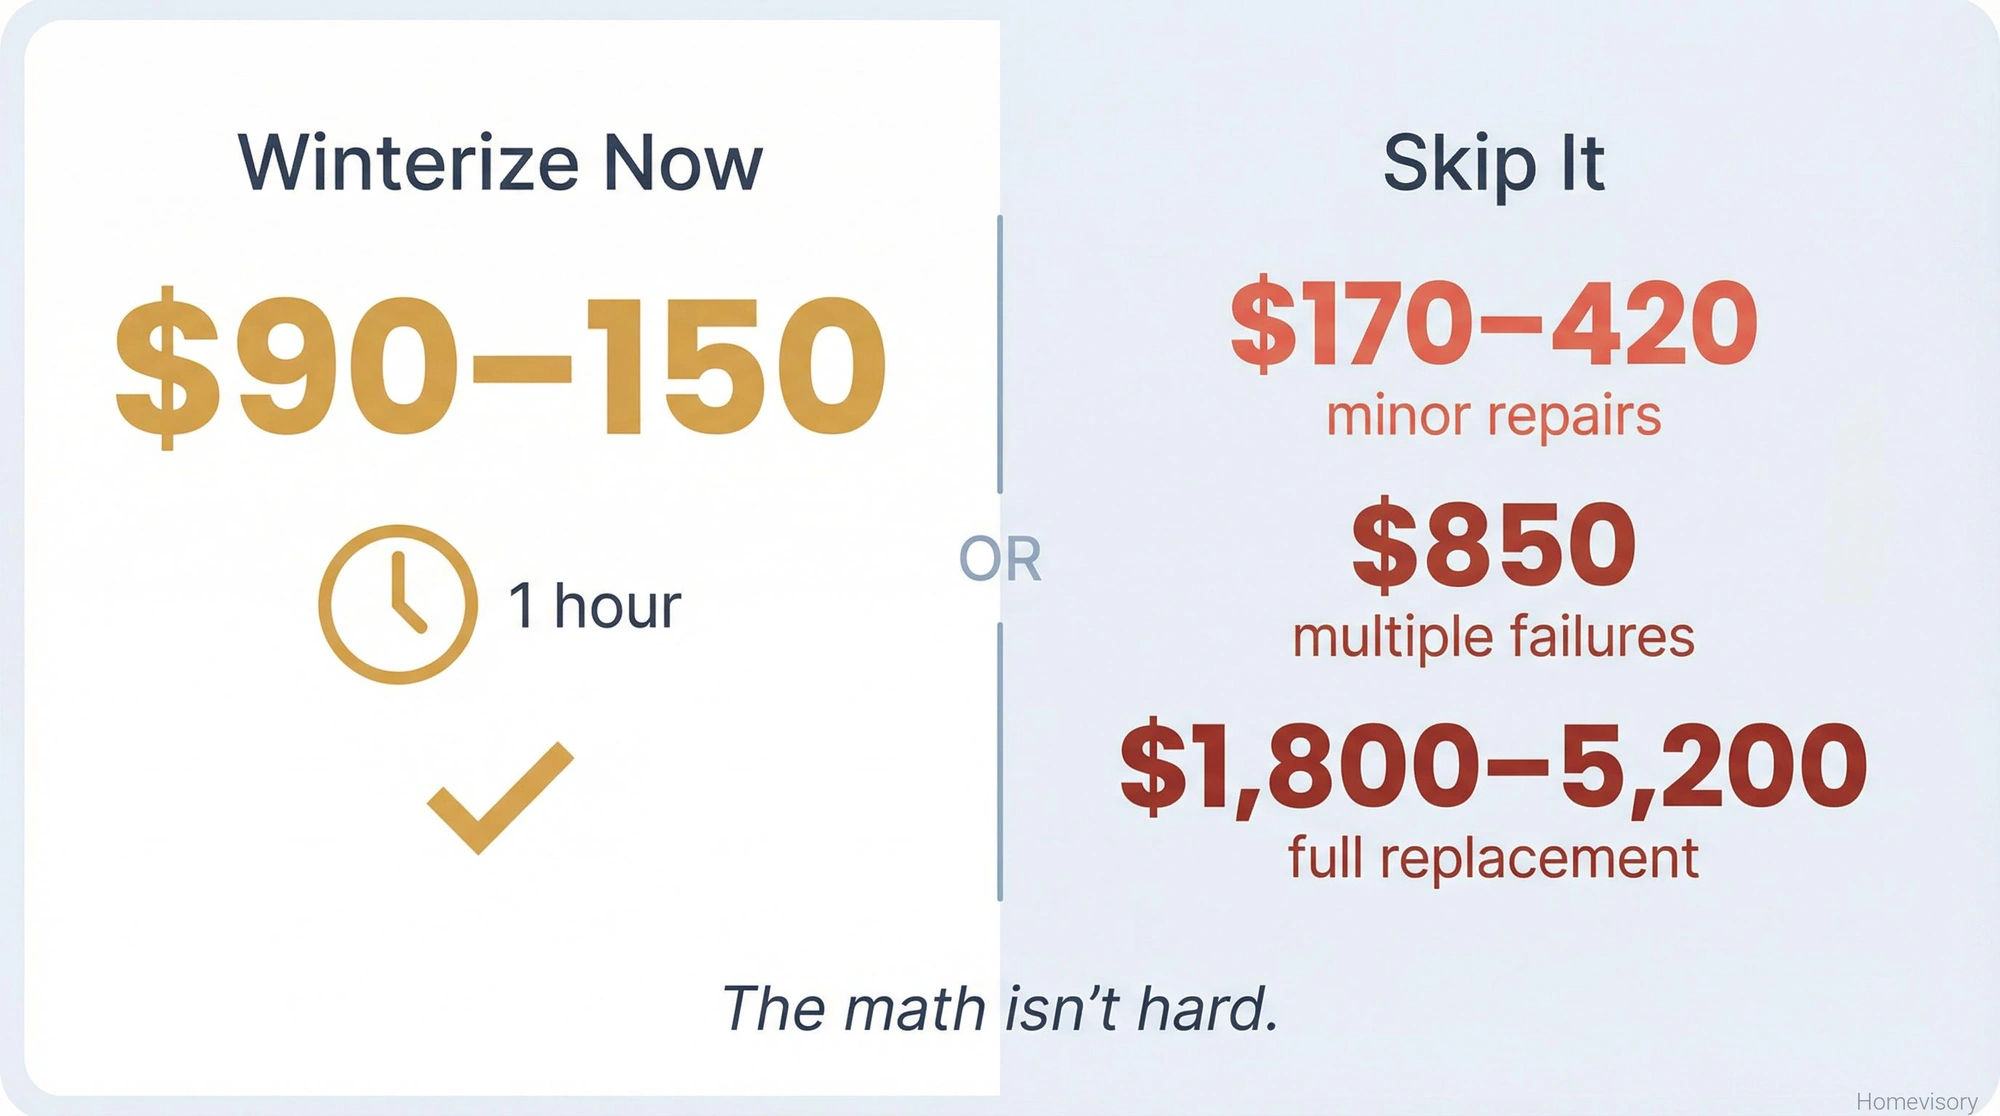
Look, this isnt complicated. But people either overthink it or they skip steps because theyre in a hurry and its cold outside and they just want to be done. I get it. But the math here is brutal. Professional winterization costs between $90 and $150 for most systems. Fixing a frozen system? Thats $170 to $420 on the low end, and I’ve seen bills hit $850 when multiple components fail. Worst case, youre looking at $1,800 to $5,200 to replace an entire freeze-damaged system.
So yeah. Spend the hour. Do it right.
Why You Actually Need to Do This
Water freezes at 32 degrees. You knew that. What you might not know is that water expands by about 9% when it freezes, and your irrigation system, the pipes, the valves, the sprinkler heads, none of it was designed to handle that expansion.
The City of Fort Collins puts it simply: water that remains in your backflow and underground lines will freeze, expand, and leave you with broken pipes and equipment.
The damage isnt always obvious either. Sometimes a pipe cracks underground and you dont notice until spring when you turn the system on and theres a geyser in your flower bed. Or worse, the leak is slow, and youre wasting water for weeks before you figure it out. Even small drips waste thousands of gallons per month.
I lived in Chicago for a while during my project management years. Commercial renovations, traveled all over. That first winter in Chicago, I remember my eyelashes froze walking from the parking lot to a job site. Actual ice on my eyelashes. That kind of cold gets into everything. Into the walls, into the ground, into pipes you thought were buried deep enough. It changed how I think about freeze protection. You cant half-do it. Anyway.
The Three Methods
There are three ways to winterize a sprinkler system: manual drain, automatic drain, and the blow out method. I’m going to spend most of my time on the blow out method because thats what most people need and thats where people make mistakes.
Manual Drain
If your system has manual drain valves, theyre usually at the low points of the piping. You shut off the water supply, open the drain valves, and let gravity do the work. Open the drain cap on the backflow device too. Some systems have multiple drain points.
The problem is gravity only gets water out of the low spots. There can still be water trapped in elevated sections, in the sprinkler heads, in the manifolds. If youre in an area that gets a hard freeze, manual draining alone might not be enough.
Automatic Drain
If you have automatic drain valves, good for you. They open automatically when pressure drops below a certain point. Shut off the water, run each zone for a minute to release pressure, and the valves do their thing.
I’m not spending much time on this because most people dont have them and the ones who do already know what to do.
The Blow Out Method
This is what most people in cold climates need to do, and this is where I see the most mistakes.
The blow out method uses compressed air to force water out of every part of your irrigation system. Its the most thorough method and its most commonly used in the Northern United States where the ground freezes down to the buried pipelines.
Heres where people mess up. They rent whatever compressor is available, hook it up, crank it to maximum, and blast air through their system. Then they wonder why their PVC pipe has a crack in it or why their sprinkler heads are damaged.
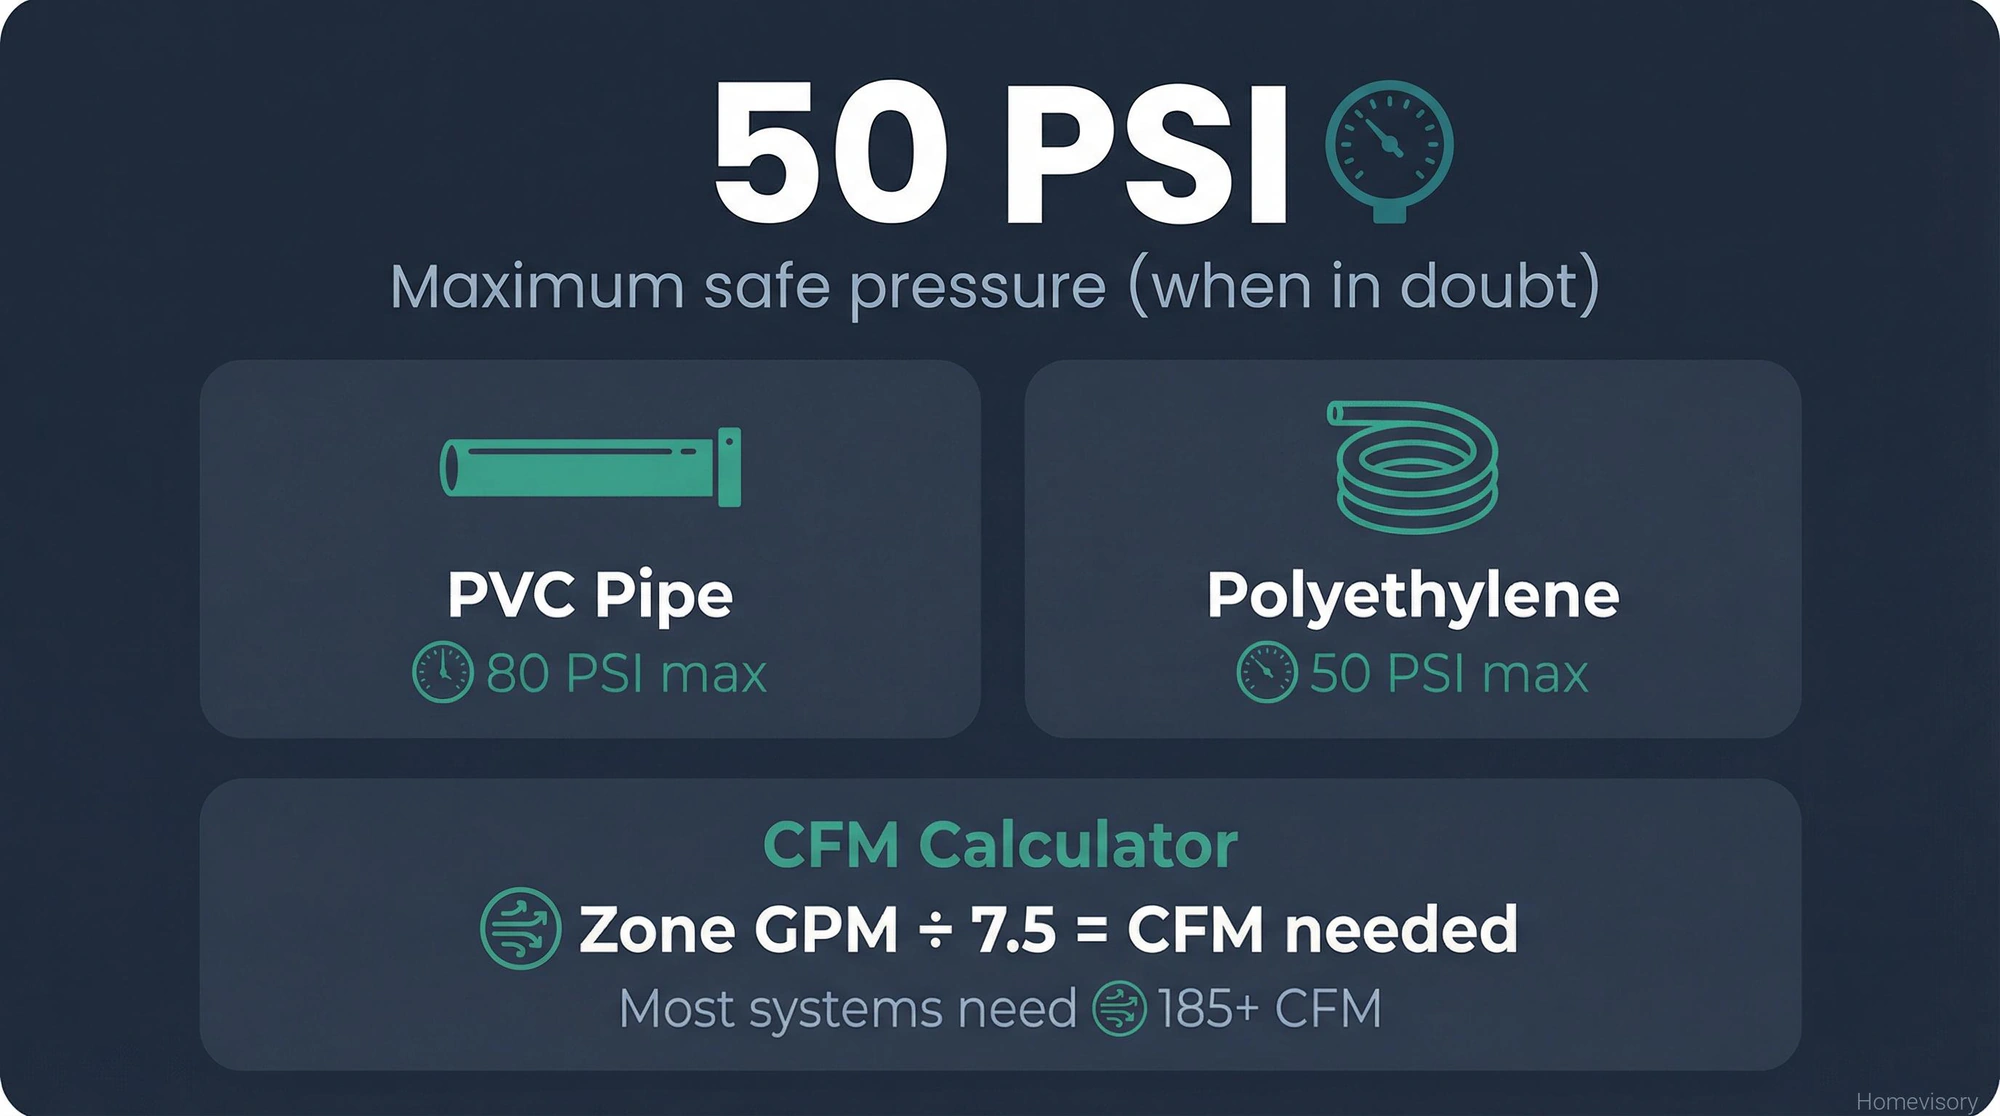
The air compressor specifications matter more than almost anything else in this process and I probably care too much about this but I’ve seen too many people destroy their systems by using the wrong pressure. Colorado State University Extension says ideal pressures are 40 to 80 PSI, with 80 PSI being the maximum for rigid PVC pipe and 50 PSI being the maximum for polyethylene pipe. Rain Bird, one of the biggest names in the industry, is even more conservative, saying air pressure should not exceed 50 PSI. If you dont know what type of pipe you have, assume its polyethylene and stay at 50 PSI or below. You can always do a second pass. You cant un-crack a pipe.
The CFM Thing
PSI gets all the attention but CFM, cubic feet per minute, is just as important. CFM is about volume, how much air your compressor can actually move. A compressor might hit 50 PSI no problem but if it cant maintain enough airflow, youre standing there for hours and still not getting all the water out.
Heres how to figure out what you need. Look up the GPM rating for your sprinkler heads, its usually on the head or in the documentation. Add up the GPM for the zone with the highest flow rate. Then divide that GPM by 7.5 to get the CFM you need. Thats your target.
Rain Bird recommends using a large compressor, 50 to 70 gallons, that can maintain 185 CFM or greater. Most homeowner-grade compressors cant hit that. The little pancake compressor in your garage that you use for nail guns. Forget it. Not even close. Youre looking at renting a tow-behind compressor or a large commercial unit from a rental place. Usually runs $50 to $100 for a day.
Step by Step
Alright. Heres how to actually do this.
Step 1: Shut off the water supply. Find your main irrigation shutoff valve. Its usually near your water meter or where the irrigation line branches off from your main water supply. Close it completely.
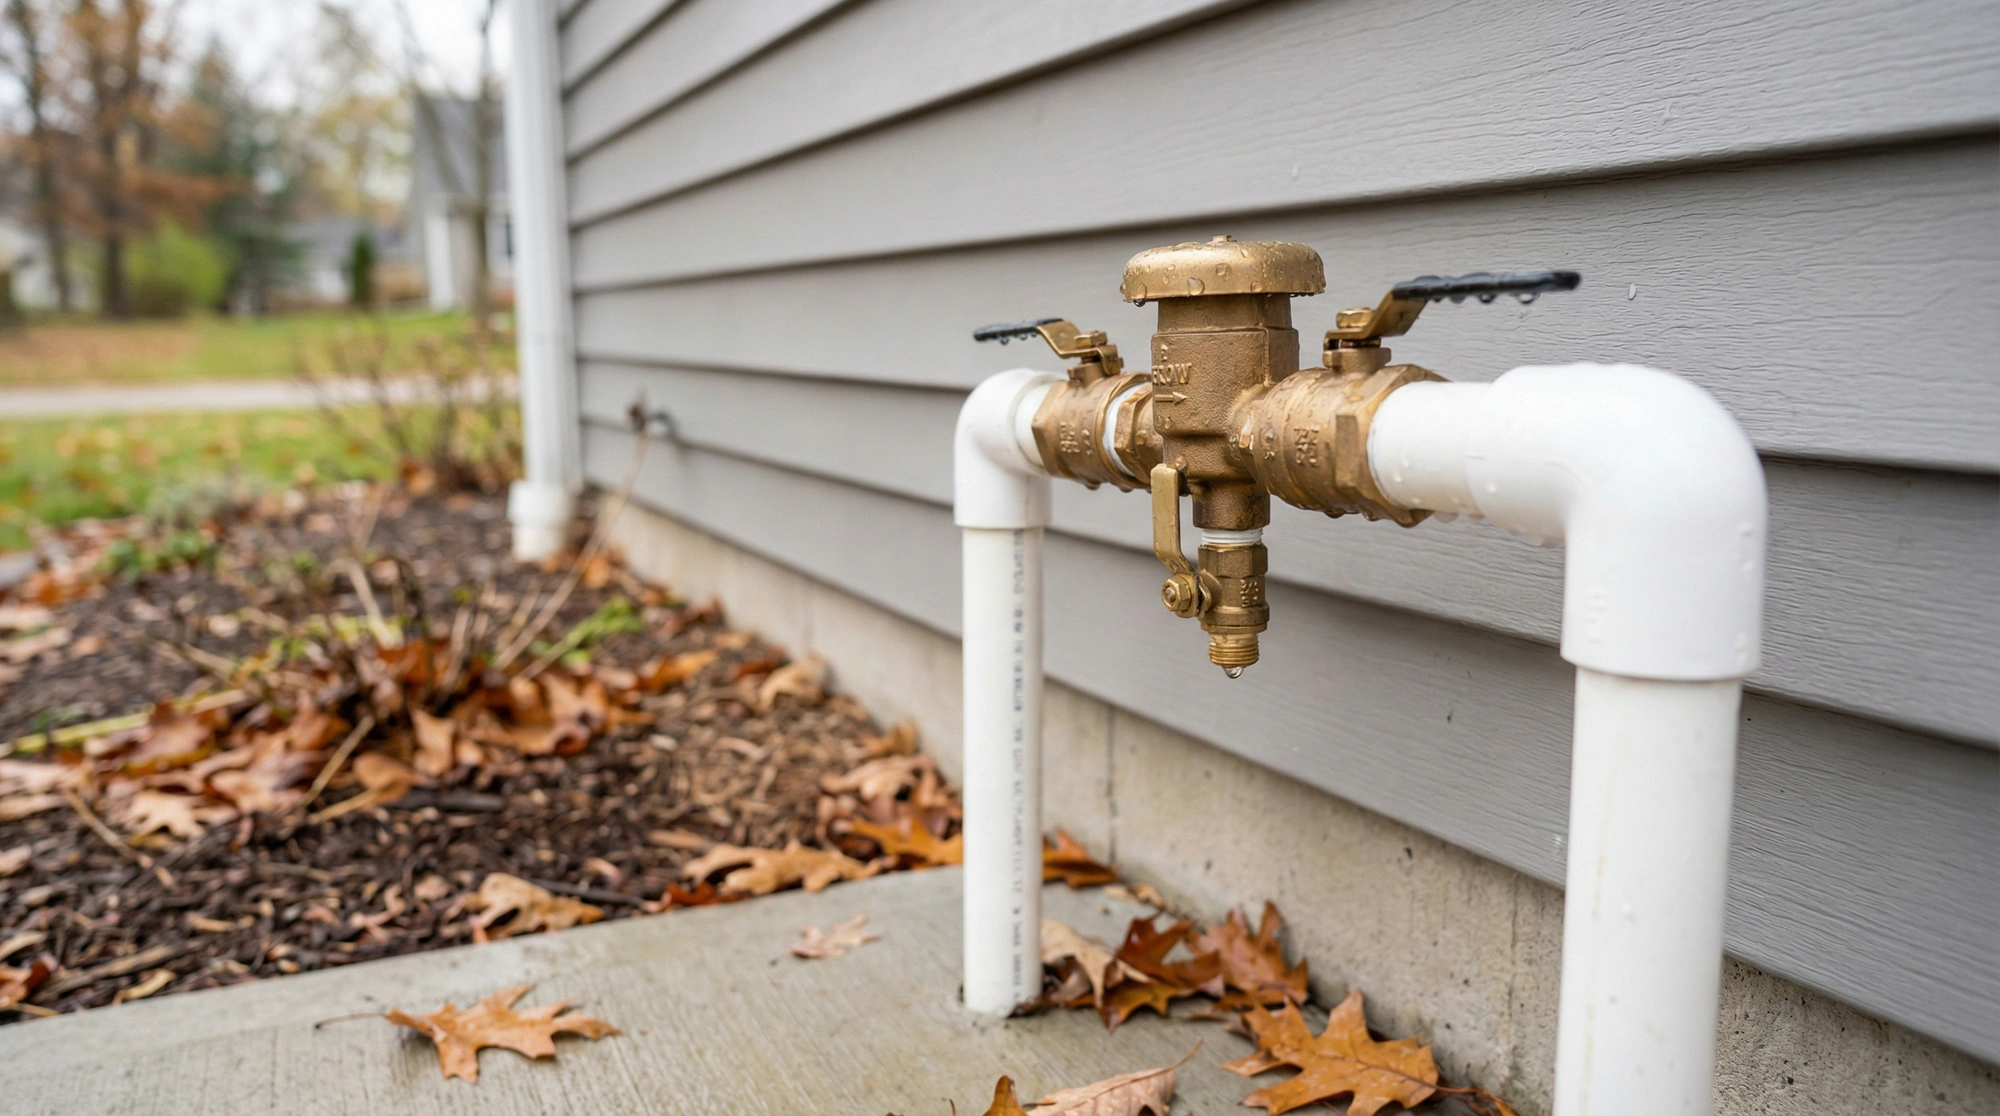
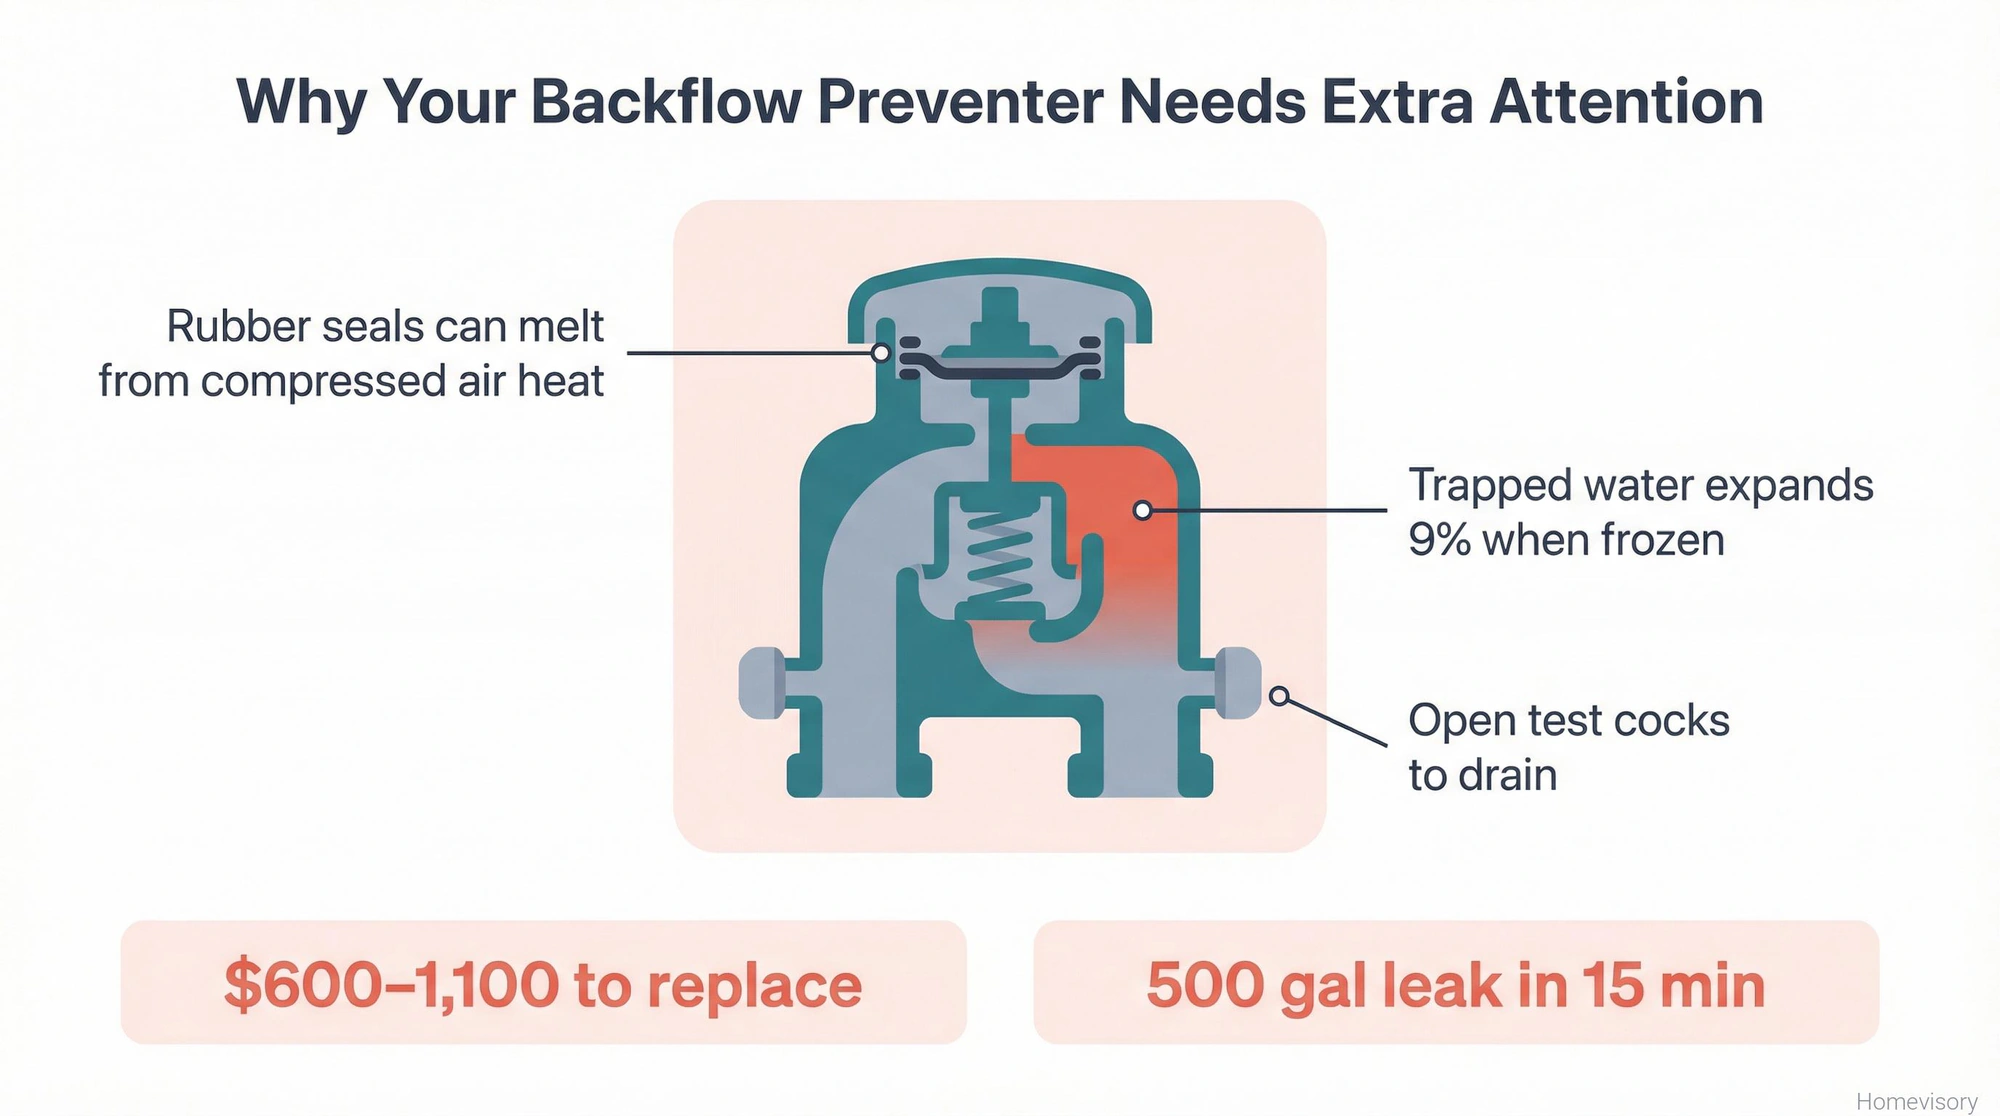
Step 2: Disconnect the backflow preventer if you have one. This is important. Colorado State University is very clear about this: Pressure Vacuum Breaker or Reduced Pressure backflow prevention devices must never be blown out with compressed air. The rubber seals inside can melt from the heat of the compressed air. Remove the backflow device and store it inside for winter, or at minimum drain it completely and insulate it.
Step 3: Connect the compressor. Most systems have a blow-out port, often a quick-connect fitting somewhere after the shutoff valve. If you dont have one, you might need to disconnect a sprinkler head and use an adapter. Make sure your connection is secure.

Step 4: Set your pressure. Before you do anything, set your compressor’s regulator to the appropriate PSI. 50 for polyethylene, up to 80 for PVC, but honestly I stay at 50 for everything.
Step 5: Open one zone at a time. Go to your controller and manually activate the zone furthest from the compressor. Let the compressor build pressure, then open the air supply. Watch the sprinkler heads.
Step 6: Watch and time it. Youll see water sputtering out of the heads at first, then a mix of water and air, then mostly air with a fine mist. When you see just air and mist, youre done with that zone. Do not blow any zone for more than 2 minutes. The heat from compressed air can damage pipes and components if you go too long.
Step 7: Move to the next zone. Close the air supply, switch to the next zone on your controller, then open the air again. Repeat for every zone.
Step 8: Second pass. After youve done every zone once, do it again. I always do at least two passes. Sometimes three if its a larger system.
Step 9: Open drain valves. After blowing out, open any manual drain valves and leave them open for winter.
Step 10: Disconnect and store. Remove the compressor, disconnect any fittings, and open test cocks on the backflow preventer to drain any remaining water.
What About the Controller
Dont forget your irrigation controller. You have two options.
You can shut it off completely, but Colorado State recommends against this. They say the controller should be programmed to run through a minimum cycle once a week to help keep solenoid plungers from sticking.
The better option is to set it to “rain mode” or whatever your system calls it. The controller stays on, keeps the programming, exercises the valves, but doesnt actually send water. Most modern controllers have this feature.
Hire Someone or Do It Yourself
The math isnt hard. Professional winterization averages about $85 for most homes. Could be $60, could be $150 depending on your system size and where you live.
Renting a compressor big enough to do the job right is $50 to $100. So youre saving maybe $35 if you do it yourself, assuming you already have the adapter fittings and know what youre doing. If you have to buy fittings, youre probably breaking even or losing money.
If you dont want to deal with this, pay someone. The whole process takes anywhere from 30 minutes to 3 hours depending on your system. A professional with the right equipment can usually knock it out in under an hour. Moving on.
When to Do This
Timing matters. You want to winterize before the first hard freeze but not so early that youre still watering.
Watch your weather forecast. When nighttime temperatures start hitting the mid-30s consistently, its time. You dont need to wait for an actual freeze. By then it might be too late, or youre rushing to get it done in uncomfortable conditions.
My dad used to say, about tools specifically but it applies to everything, he used to say dont make future you clean up after present you. Do the maintenance before you need to. Winterize your system while its still 45 degrees and pleasant outside, not when its 28 and your fingers wont work. And while you’re at it, sprinklers are just one item on a full house winterization checklist — pipes, windows, heating, all of it needs attention before the first freeze. Our winterization guide puts every task in one place.
The Backflow Preventer Situation
I need to say this again because its a common expensive mistake. Your backflow preventer is probably the most expensive single component in your irrigation system. If it freezes and cracks, replacement costs between $603 and $1,097.
And a standard 1-inch backflow preventer at normal pressure can discharge nearly 500 gallons in just 15 minutes if it bursts. So youre not just paying for the part. Youre paying for water damage, landscaping damage, whatever else happens before you notice.
Drain it completely. Remove it and store it inside if you can. If you cant remove it, insulate any PVC pipes and components exposed above ground. They make insulation covers specifically for backflow preventers. Worth the $15.
Common Mistakes
Using too much pressure. Already covered this but its worth repeating. 50 PSI is safe for any system. Stay there.
Blowing zones for too long. Two minutes maximum per zone. Heat builds up. Things melt and warp.
Forgetting zones. Go through your controller and count zones before you start. Make sure you blow out every single one.
Skipping the second pass. Water hides in low spots and loops. Do at least two passes.
Not draining the backflow preventer. Just. Do it.
Waiting too long. Dont be the person calling for repairs in spring because you thought youd get to it and then didnt.
Learning how to winterize sprinkler system setups properly is one of those things that takes an hour once a year and saves you hundreds or thousands in repairs. Thats what we do here at Homevisory, help you stay ahead of the maintenance so the small stuff doesnt become the expensive stuff.
If keeping track of when to winterize your irrigation system, when to change your HVAC filters, when to flush your water heater, all of it, sounds like a lot to remember, it is. Thats why we built the Homevisory home task manager. It reminds you what needs to be done and when, so youre not trying to remember everything yourself. Sign up free and let us keep track of this stuff for you.