
The Tool Most People Own But Dont Know How to Use
I bet theres a multimeter in your junk drawer right now. Or in the garage, in a toolbox you havent opened in three years. Maybe it came with a kit you bought. Maybe you picked one up thinking you’d figure it out later. Later never came.
A multimeter is one of those tools that looks more complicated than it is. If you’ve never picked one up, our multimeter basics guide walks through the dial settings and probes. Most people take one look at the dial and decide they’ll just call someone or throw whatever’s broken in the trash.
Thats a mistake. And its an expensive one.
I’ve watched people throw away perfectly good batteries because they assumed they were dead. I’ve seen guys replace entire appliance parts when the problem was a two-dollar fuse. I’ve done it myself, back before I knew better. Before my dad Curtis showed me what a multimeter could actually tell you if you bothered to learn.
How to Test Battery with Multimeter
This is where everyone should start. Testing batteries. Its the most common use, its the easiest to learn, and its going to save you money the first week you start doing it. Its also the quickest way to figure out why your smoke detector won’t stop beeping.
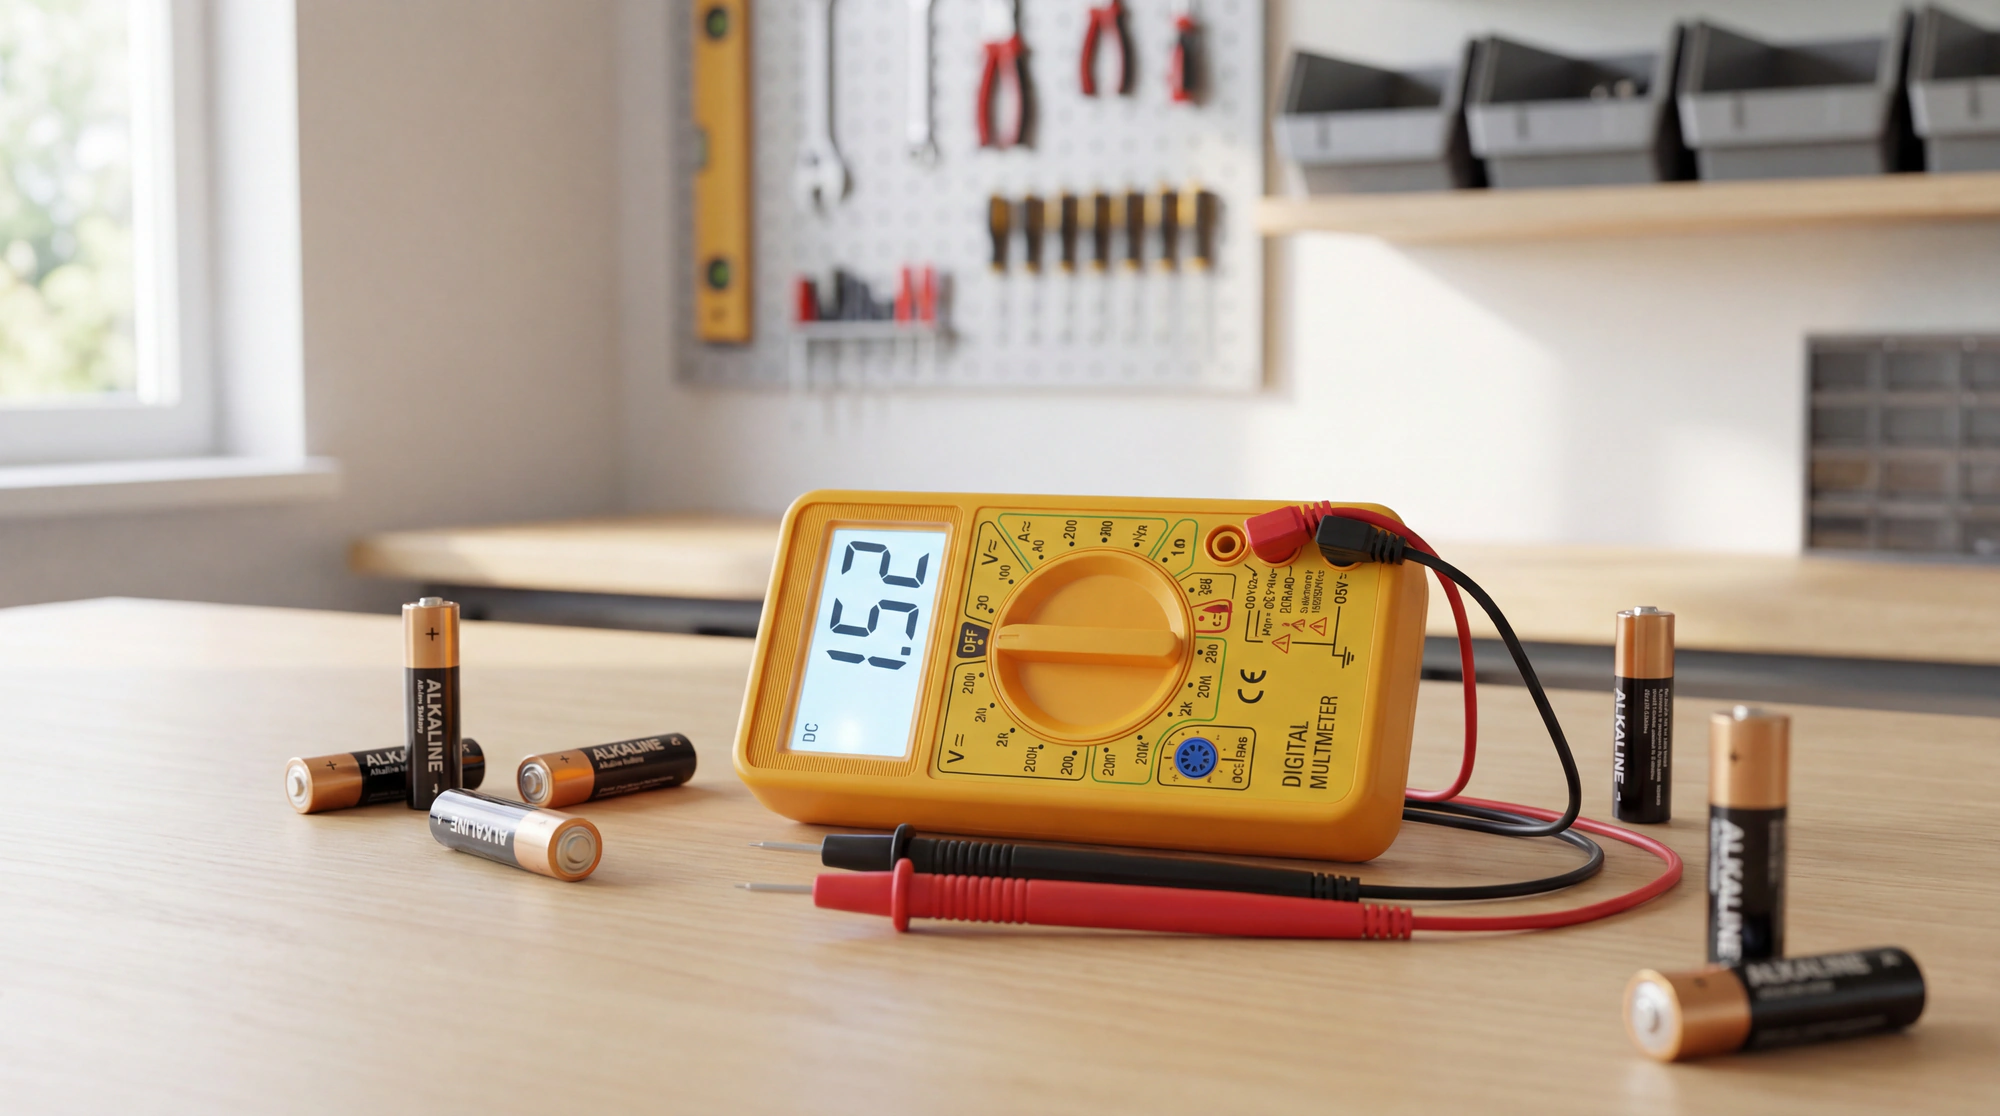
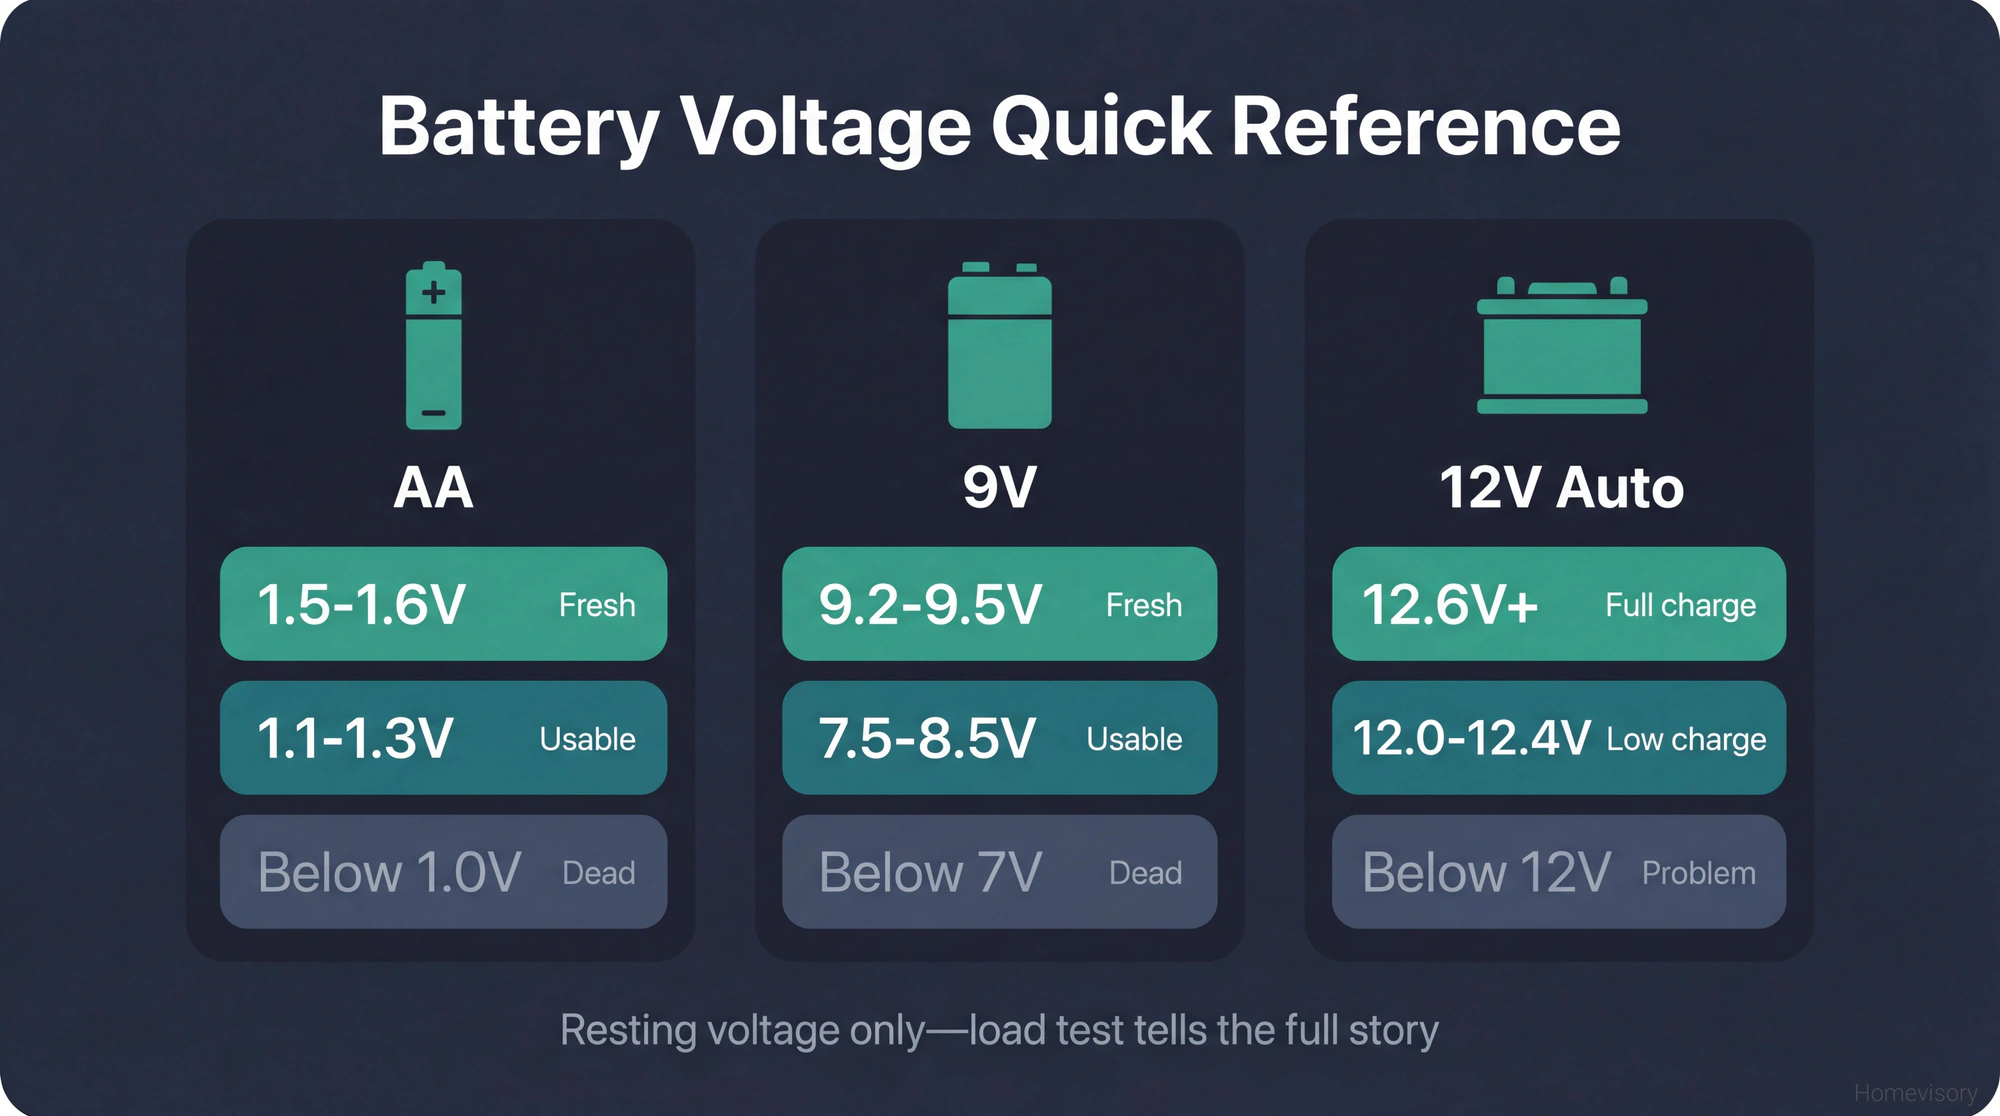
Heres the situation. You’ve got a drawer full of AA batteries. Some are new, some are old, some are probably dead, you dont know which is which because they all look the same. So you either throw them all out or you play the lottery every time you need one.
Or you test them.
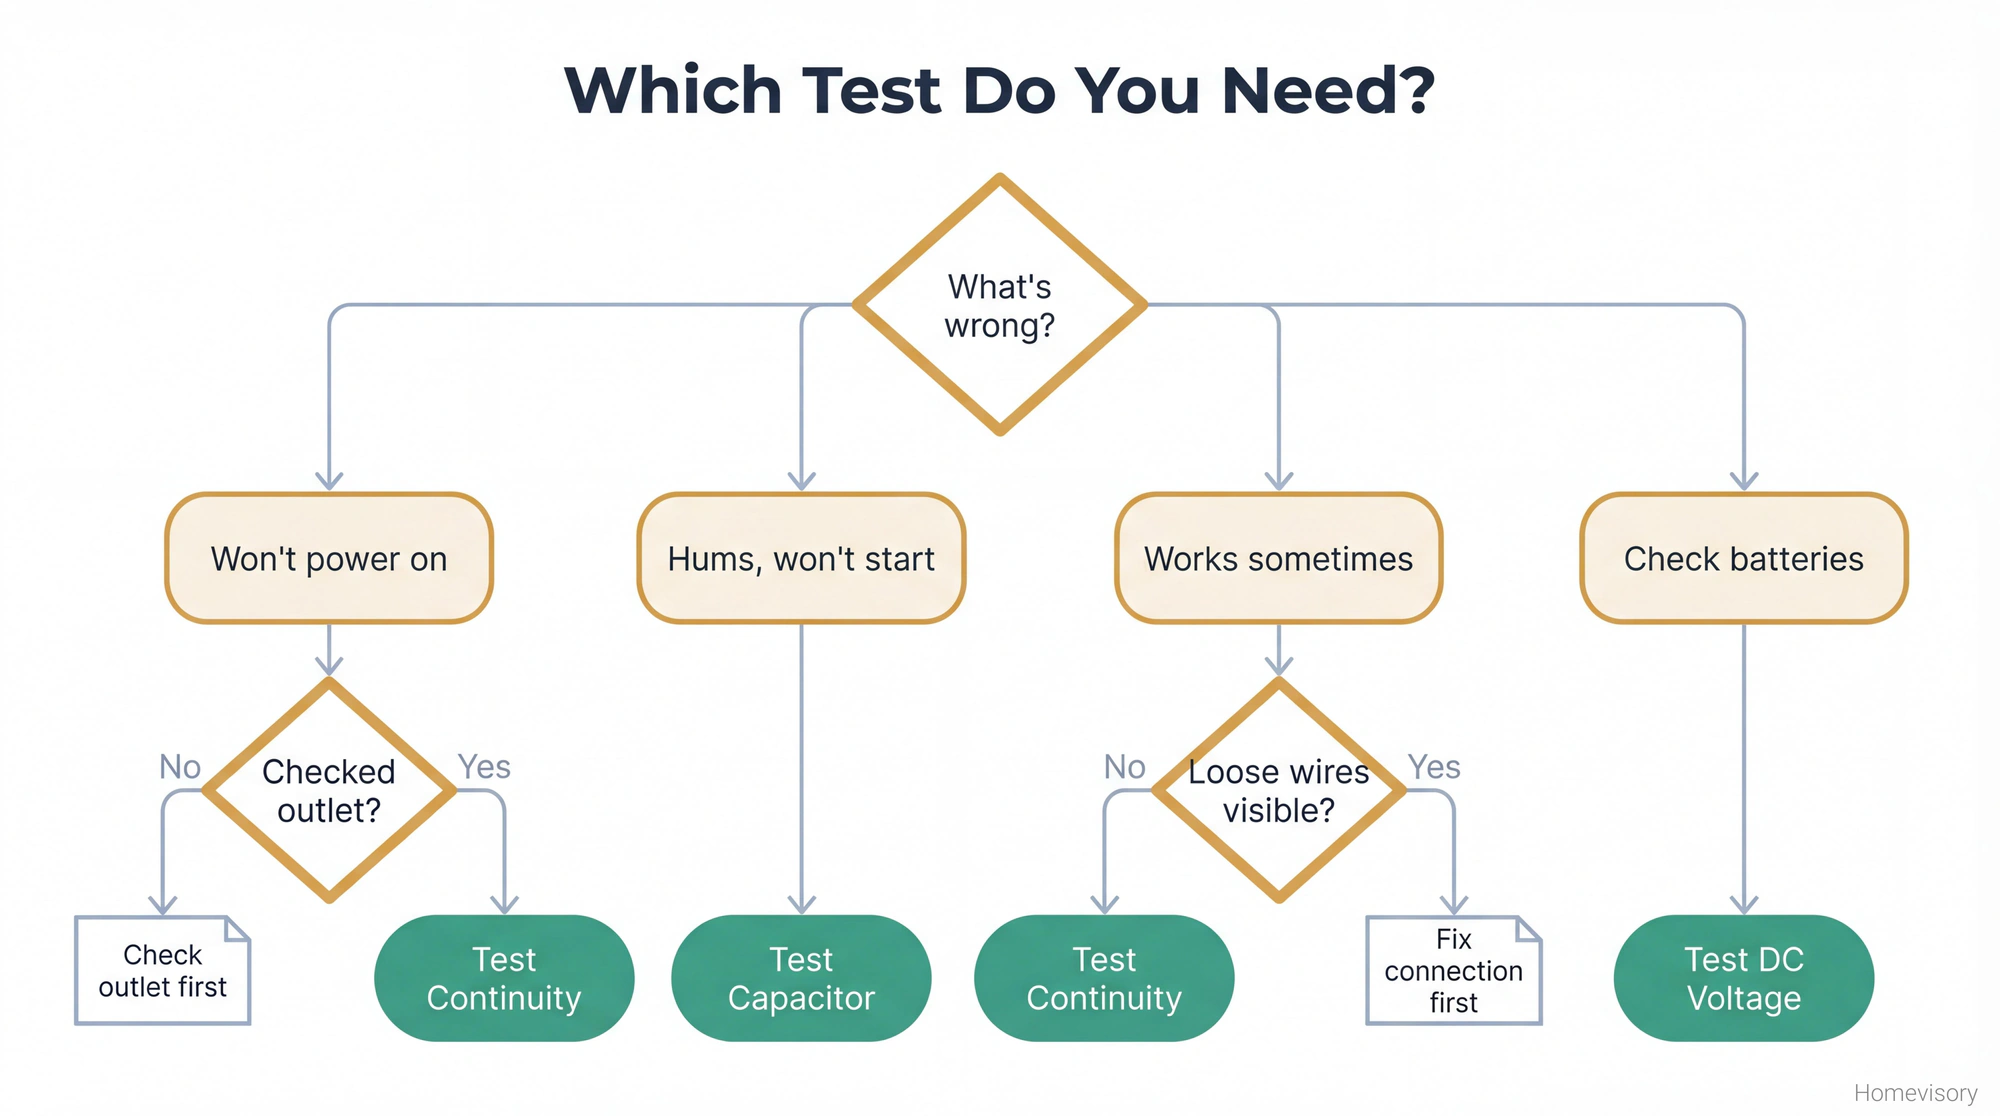
To test battery with multimeter, you need to set the dial to DC voltage. On most meters this is marked with a V and a straight line with a dashed line underneath it. The wavy line is AC, thats for outlets. Batteries are DC.
Set it to 20V if youre testing regular household batteries. This gives you headroom since a fresh AA is only 1.5 volts and a fresh 9-volt is, well, 9 volts. You want your range higher than what youre measuring.
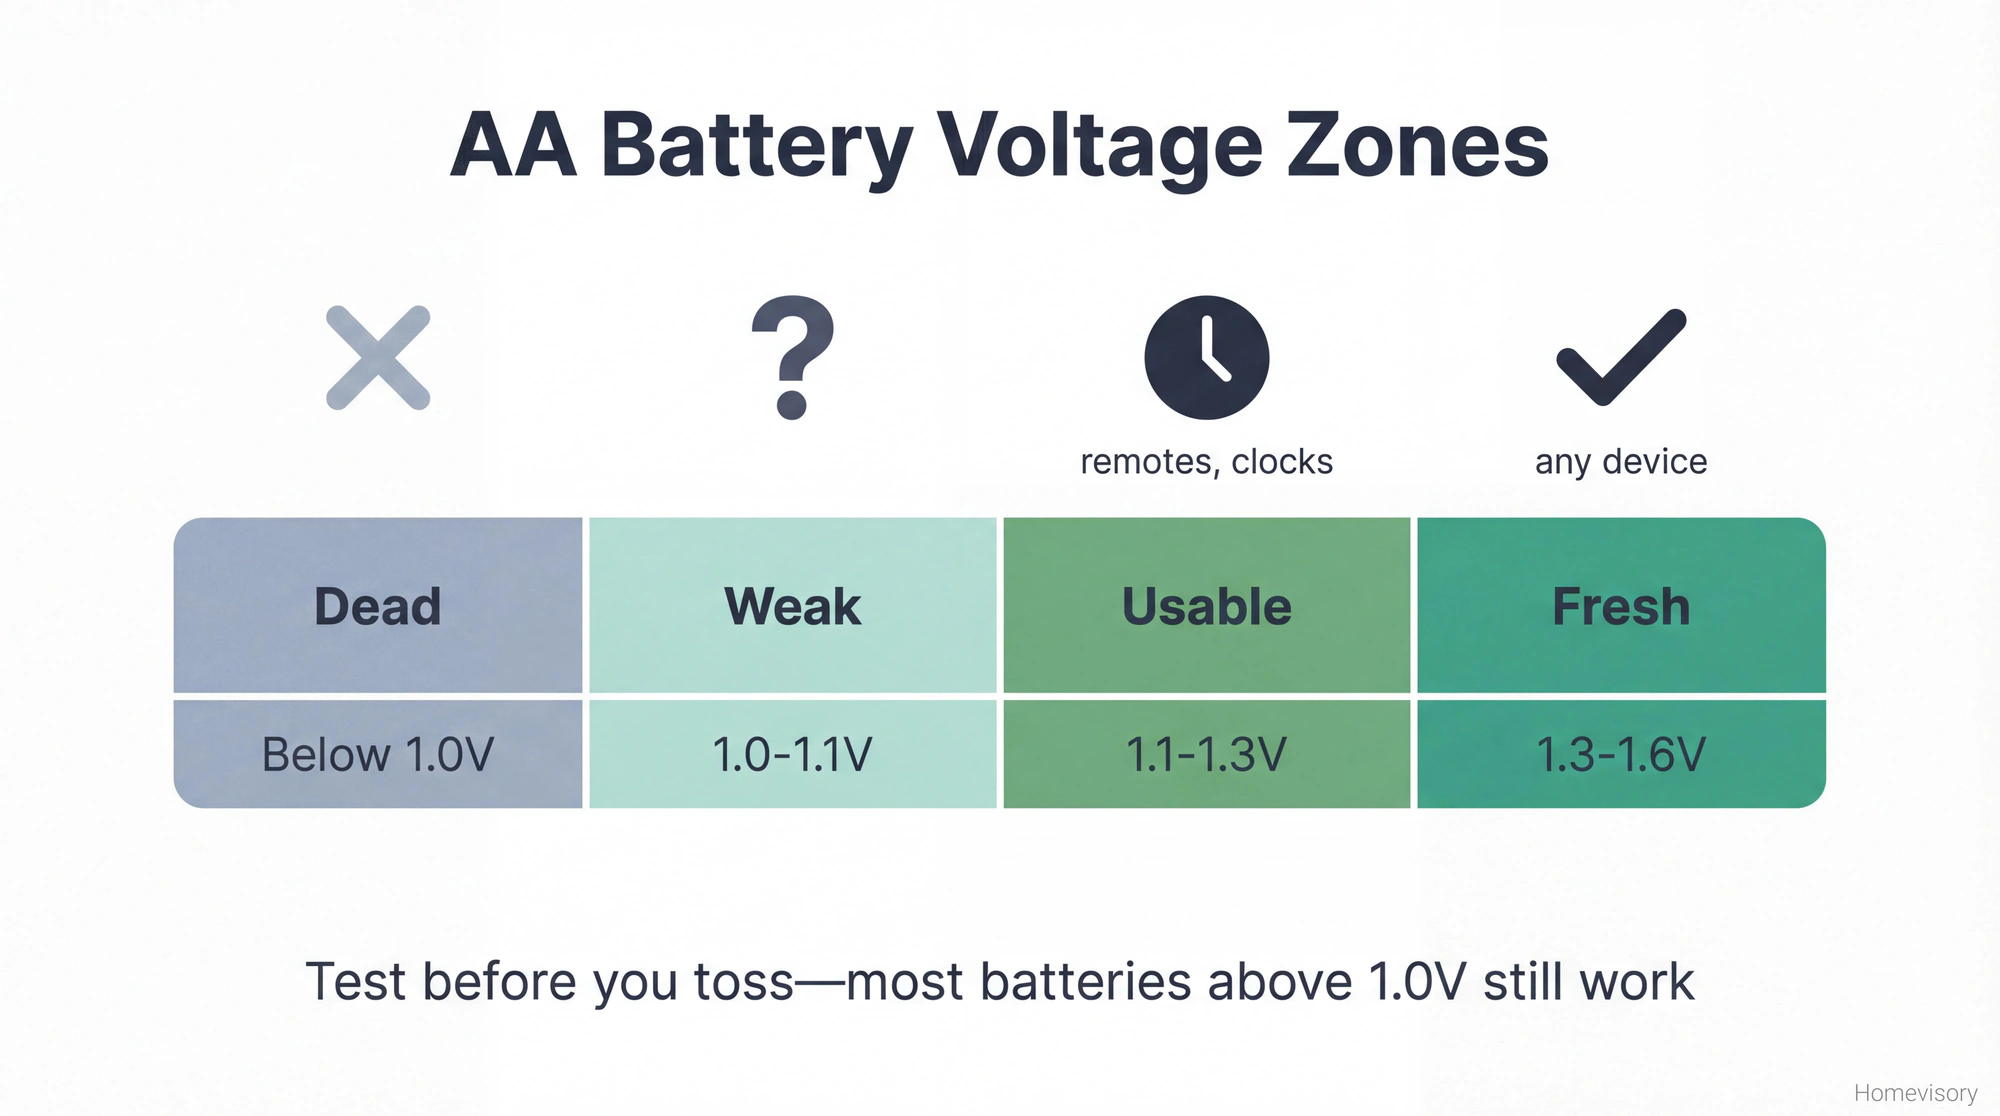
Now touch the red probe to the positive end of the battery, thats the one with the little bump, and the black probe to the negative end, the flat side. Your meter will give you a reading and this is where people get confused because they think anything less than the rated voltage means the battery is dead but thats not how it works. A fresh AA should read around 1.5 to 1.6 volts. At 1.3 volts its still usable for most things, remote controls, wall clocks, stuff that doesnt draw much power. At 1.1 volts its getting weak but might work in a pinch. Below 1 volt its done. A 9-volt battery should read around 9.2 to 9.5 when fresh, still good at 8.5, questionable at 7.5, dead below 7. These are rough numbers but they’ll keep you from throwing away batteries that have life left in them.
The other test, and this is the one most people dont know about, is testing under load. A battery can show good voltage when its just sitting there but collapse the moment you ask it to do something. For this you need a battery tester with a load function or you can improvise by connecting a small resistor across the terminals while you measure. I dont do this for household batteries because honestly its overkill. But for car batteries, for anything important, load testing matters.
Car Batteries
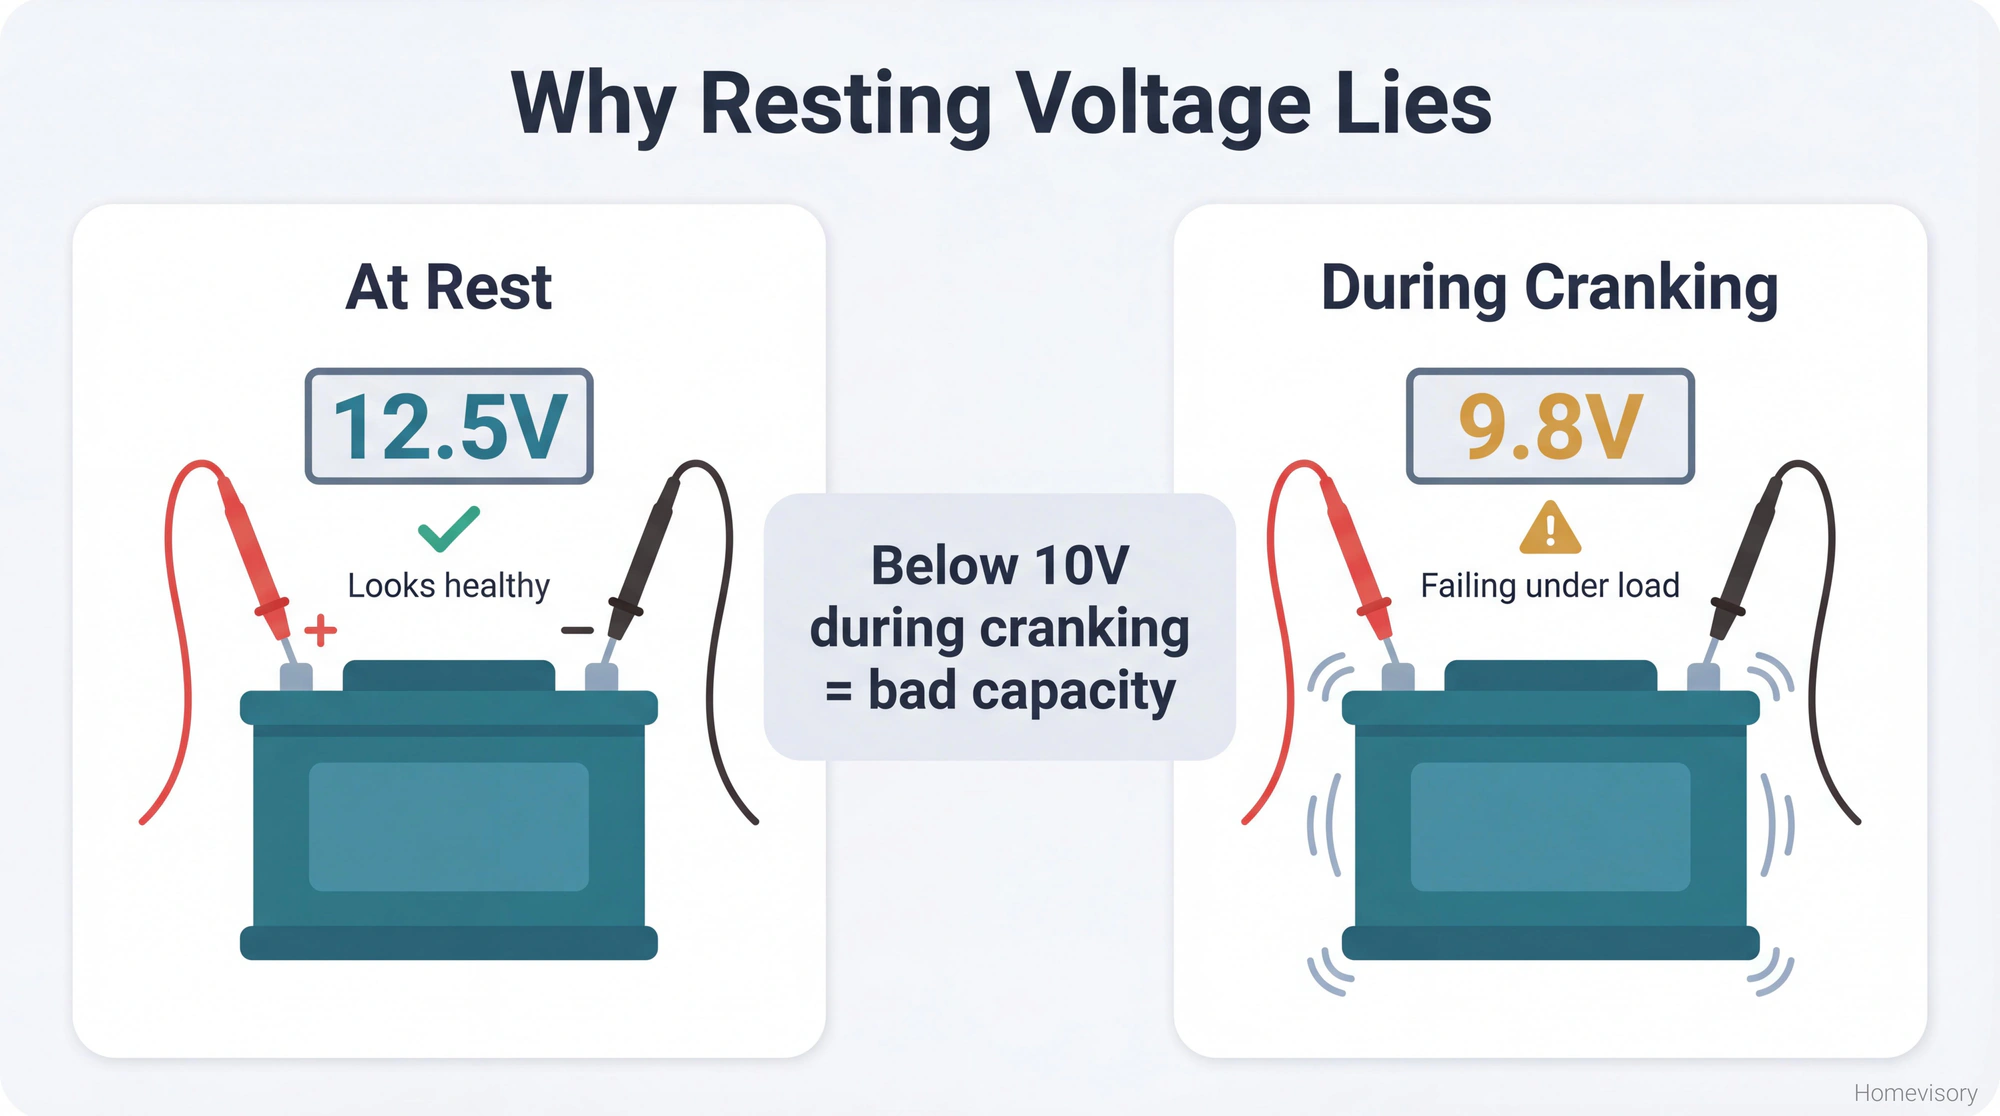
Same principle but bigger stakes. A healthy car battery should read 12.6 volts with the engine off. Below 12.4 and its not fully charged. Below 12 and you’ve got a problem. Below 11.8 and its probably why your car wont start.
But heres what people miss. A battery can read 12.5 volts and still be dead. How. Because voltage without load testing only tells you half the story. The real test is cranking amps, how much power the battery can deliver when the starter motor is demanding it. You can test this at home by having someone try to start the car while you watch the multimeter. If the voltage drops below 10 during cranking, that batterys capacity is shot even if the resting voltage looked fine.
I bought a Harbor Freight multimeter once because it was cheap and I figured a meter is a meter. Lasted about eight months before the probe connections got loose and started giving me phantom readings. I was testing a truck battery, got 12.4 volts, told the guy his battery was fine, turned out it was completely dead and the meter was lying to me. He got stranded at a grocery store in the rain. That was a fun phone call. I still have the Harbor Freight meter somewhere. I use it as a paperweight.
How to Check Continuity with Multimeter
Continuity means the path is complete. Electricity can flow from point A to point B. No breaks in the wire, no blown elements, no corrosion blocking the connection.
Most multimeters have a dedicated continuity setting. Its usually marked with a symbol that looks like sound waves, like the WiFi symbol turned on its side. Some people confuse this with the diode test setting which is nearby. Look for the one that beeps when you touch the probes together.
The beep is the point. Touch the probes to both ends of whatever youre testing, a wire, a fuse, a heating element. If its continuous, it beeps. If it doesnt beep, the path is broken somewhere.
This is how you test extension cords before you throw them out. This is how you test holiday light strings to find the one dead bulb. This is how you figure out if that old power tool is fixable or actually fried.
My dad Curtis used to say, about factory work not electrical stuff, he used to say you gotta read the situation before you act. Dont assume. Dont guess. Find out. He was talking about handling equipment, about not touching something until you understood what state it was in. But the same thing applies here. Dont assume the wire is good because it looks fine. Dont assume its bad because the thing doesnt work. Test it. Read the situation.
He taught me how to use a multimeter when I was maybe sixteen. We were in the garage in Texas, it was hot, I remember the sweat on his forearms and how his hands looked holding the probes. Big hands. Factory hands. He was patient about it even though I kept touching the probes to the wrong spots. He’d just move my hand without saying anything, the way you’d adjust how a kid holds a baseball bat. Anyway.
How to Test a Fuse with Multimeter
This ones simple.
Set your meter to continuity, touch the probes to both ends of the fuse, if it beeps its good, if it doesnt its blown.
You can also set it to the lowest ohm setting and check resistance. A good fuse shows zero or near-zero resistance. A blown fuse shows infinite resistance, usually displayed as OL or 1 on your meter.
Thats it. Moving on.
How to Check Capacitor with Multimeter
Now were getting into slightly more advanced territory. Capacitors store electrical charge. They’re in your AC unit, your refrigerator, your microwave, a lot of things with motors or compressors.
Before I tell you how to test a capacitor with a multimeter, I need to tell you that capacitors can hold a lethal charge even when the appliance is unplugged. This isnt me being dramatic. This is real. Microwave capacitors specifically can kill you. If you dont know how to safely discharge a capacitor, dont touch it. Call someone.
Assuming youre working with a capacitor you’ve safely discharged or one from a low-voltage application, heres how you check it.
Set your multimeter to capacitance mode if it has one. Many basic meters dont, but if yours does, its marked with a symbol that looks like two parallel lines, one straight and one curved. Touch the probes to the capacitor terminals and it should give you a reading in microfarads. Compare this to the rating printed on the capacitor. If its within 10% of the rated value, the cap is probably fine. If its way off, the capacitor is failing.
If your meter doesnt have capacitance mode, you can do a rough test with the resistance setting. Set it to a high ohm range, 20k or higher. Touch the probes to the capacitor terminals. What you should see is the resistance reading climb slowly from low to high. This is the capacitor charging from the meters internal battery. Then swap the probes. You should see the same climbing pattern. If the resistance immediately reads zero and stays there, the capacitor is shorted. If it reads infinite immediately and stays there, the capacitor is open. Either way its bad.
This isnt as accurate as a dedicated capacitance test but it tells you if a cap is obviously dead.
When to Test Capacitors
The most common reason to check capacitor with multimeter is when you have an AC unit or refrigerator that hums but wont start. The motor tries to kick on, you hear the click and buzz, but nothing happens. Often thats a failed start capacitor or run capacitor. They’re cheap to replace if you know what youre looking for. Testing tells you if the caps the problem before you start replacing expensive parts.
How to Test a Relay with a Multimeter
Look, if youre testing relays, you probably have some idea what youre doing. But the basics.
A relay is an electrically operated switch. You send power to the control side and it closes or opens a connection on the load side. They’re in cars, HVAC systems, appliances, all over the place.
To test a relay with a multimeter, first identify the control pins and the load pins. The relay should have a diagram printed on it or stamped into the plastic. The control side is the coil, usually two pins. The load side is the switch, usually three to five pins depending on whether its a single-throw or double-throw relay.
Set your meter to continuity or low ohms. Test across the control coil pins. You should see some resistance, typically 50-200 ohms for most relays. If you see infinite resistance, the coil is burned out. Relay is dead.
Now test the load side with the relay at rest. Between the normally-open contacts you should see infinite resistance. Between the normally-closed contacts you should see zero resistance.
Then you need to activate the relay. Apply the rated voltage to the control coil using a battery or power supply. While the relay is energized, test the load side again. The normally-open contacts should now show zero resistance. The normally-closed contacts should show infinite.
If the relay clicks but the contacts dont switch properly, or if it doesnt click at all when you power the coil, its bad.
What Most People Get Wrong
The biggest mistake is thinking a multimeter tells you everything. It doesnt. It tells you voltage, resistance, and continuity. It tells you if a path exists and how much potential is there. It doesnt tell you if a component works properly under real-world conditions.
A battery can show good voltage but fail under load. A capacitor can test fine but leak intermittently. A relay can click but have burned contacts that work sometimes and fail other times. The multimeter gives you a snapshot. Real diagnosis often requires more.
But the multimeter is where you start. Its the tool that keeps you from replacing parts blind. Its the tool that saves you from throwing away things that still work.
The Homevisory Connection
Every home has moments where something stops working and you dont know if its a simple fix or a real problem. Testing before assuming is the first step. A multimeter costs twenty to fifty dollars for a decent one, more if you want capacitance testing built in. Its one tool that replaces a lot of guessing.
Thats what we do here at Homevisory. We help you stay ahead of the surprises. Our Homevisory home task manager tracks maintenance so you’re not scrambling when something breaks. Its free to sign up. And when something does stop working, youll have the history and the knowledge to figure out if its something you can test yourself or something that needs professional help.
Test before you toss. Read the situation before you act. Your wallet will thank you.